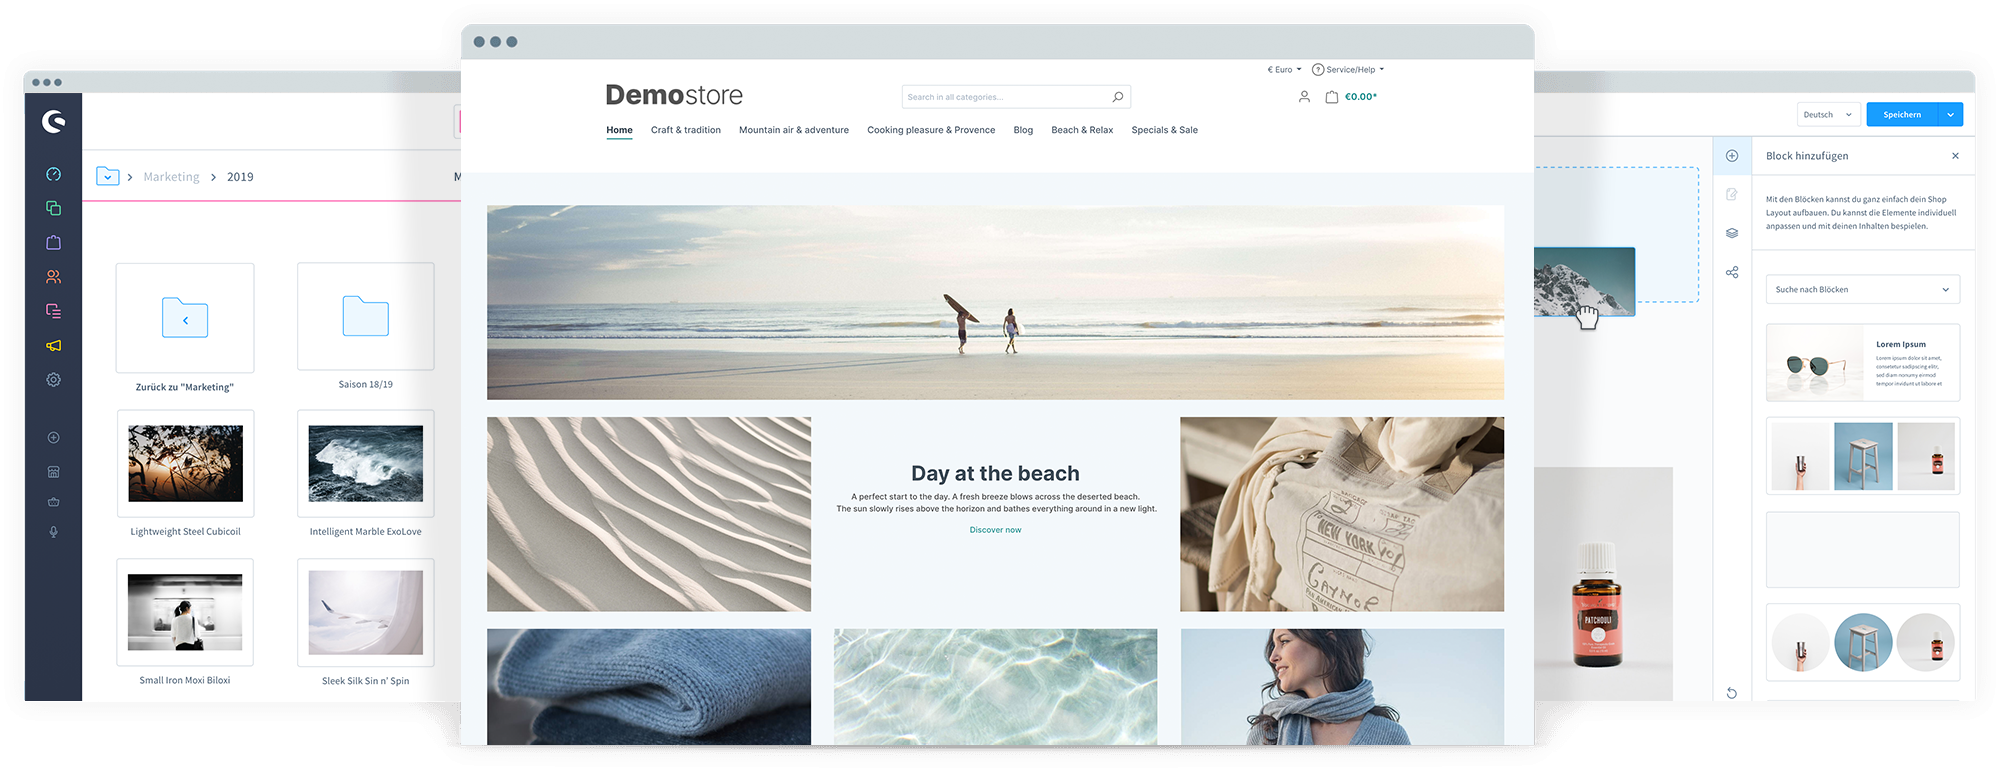
Quickly and responsively toggle the display value of components and more with our display utilities. Includes support for some of the more common values, as well as some extras for controlling display when printing.
Theming Bootstrap
Customize Bootstrap 4 with our new built-in Sass variables for global style preferences for easy theming and component changes.
Guide – Bootstrap Themes
This guide will help you get started with a Bootstrap Theme, including how to run, customize, update, and integrate your theme!
Guide – Bootstrap Themes
This guide will help you get started with a Bootstrap Theme, including how to run, customize, update, and integrate your theme!
Preview – Bootstrap Themes
This guide will help you get started with a Bootstrap Theme, including how to run, customize, update, and integrate your theme!
webpack
webpack is a module bundler. Its main purpose is to bundle JavaScript files for usage in a browser, yet it is also capable of transforming, bundling, or packaging just about any resource or asset.
Cartzilla – Digital Marketplace & Grocery Store WordPress Theme
Cartzilla – Digital Marketplace & Grocery Store WordPress Theme
Cartzilla is the ultimate WordPress theme for your Digital Marketplace & G…
[expand title=“mehr lesen…“]
[/expand]
bootstrap – cartzilla – shopware theme
bootstrap – cartzilla – shopware theme
dist
Introduction
Get started with Bootstrap, the world’s most popular framework for building responsive, mobile-first sites, with BootstrapCDN and a template starter page.
Download
Download Bootstrap to get the compiled CSS and JavaScript, source code, or include it with your favorite package managers like npm, RubyGems, and more.
[expand title=“mehr lesen…“]
[/expand]
bootstrap
bootstrap
Introduction
Get started with Bootstrap, the world’s most popular framework for building responsive, mobile-first sites, with BootstrapCDN and a template starter page.
Download
Download Bootstrap to get the compiled CSS and JavaScript, source code, or include it with your favorite package managers like npm, RubyGems, and more.
[expand title=“mehr lesen…“]
Documentation · Dashboard theme · Official Bootstrap Themes
Hey there! You’re looking at the docs for an Official Bootstrap Theme—thanks for your purchase! This theme has been lovingly crafted by Bootstrap’s founders and friends to help you build awesome projects on the web. Let’s dive in.
Bootstrap E-Commerce & Retail Themes and Templates
Download Bootstrap 4+ E-Commerce & Retail themes and templates built or reviewed by the creators of Bootstrap.
[/expand]
shopware6 – github
shopware6-github
shopware/platform
Shopware 6 is an open source eCommerce platform realised by the ideas and the spirit of its community. – shopware/platform
Shopware 6 is an open source ecommerce platform based on a quite modern technology stack that is powered by Symfony and Vue.js. It’s the successor of the very successful e-commerce shopping cart Shopware 5 which has over 800000 downloads. Shopware 6 is focused on an api-first approach, so it’s quite easy to think in different sales channels and make ecommerce happen whereever you want it.
[expand title=“mehr lesen…“]
Shopware 6 is an open source ecommerce platform based on a quite modern technology stack that is powered by Symfony and Vue.js. It’s the successor of the very successful e-commerce shopping cart Shopware 5 which has over 800000 downloads. Shopware 6 is focused on an api-first approach, so it’s quite easy to think in different sales channels and make ecommerce happen whereever you want it.
If you like Shopware 6, give us a star on Github ★
The Shopware 6 Storefront is based on Twig and Bootstrap. Two well known and easy to learn frameworks, making the creation of templates a breeze!
The Shopware 6 Administration is based on Vue.js and twig.js, making the creation of new modules fast and easy. Get started with the design documentation.
The Rulebuilder makes the implementation of business processes easy.
Designing content is fast and intuitive with the Shopping Experiences.
Technology
Shopware 6 provides Services through REST-APIs and rich user interfaces to customers and administrators alike.
The chart shows how the Shopware Platform fits into your enterprise. It provides web frontends for management and for commerce through a multitude of sales channels. It comes with a set of user facing interfaces and provides the ability to connect to your own infrastructure and outside services through REST-APIs.
Shopware 6 will continue to evolve together with you and your feedback. This is our number one priority!
With openness as one of our core values, we will always provide you with a transparent overview of our product development. The Shopware Roadmap shows you what we are working on, what we want to tackle next, and what visions we have for the future.
In today’s information-based world, you cannot thrive in closed systems. Black boxes and vendor lock-in models hurt innovation – and belong in the dark ages of ecommerce.
The future of IT is all about collaboration. At Shopware, we believe that the best ecommerce solution can only be developed in constant exchange with the people that use it every day. This is why we made a clear promise to the open source approach and embrace everyone willing to participate. We consider our community to be our greatest strength; not our competitor, like many companies tend to do.
We believe that our open source edition is our strongest asset and that we need, now more than ever, to invest in our ecosystem of partners and developers. So that we can work together to collaborate across backgrounds, experiences and ideas and mutually benefit from the software that results.
Our Shopware Ecosystem gives you all the information you need to dive deep into the Shopware universe.
Shopware Community Store
Whether plugin, theme or marketing tool: You can easily extend the functionality of your shop with over 3,500 available plugins in the Community Store.
Do you want to become a Shopware expert or get a sneak peek into the software? Find a training session that is individually tailored to your interests.
If you have decided to contribute code to Shopware and become a member of the Shopware community, we appreciate your hard work and want to handle it with the most possible respect. To ensure the quality of our code and our products we have created a guideline we all should endorse to. It helps you and us to collaborate. Following these guidelines will help us to integrate your changes in our daily workflow.
When submitting your code to Shopware you automatically need to sign our CLA (Contributor License Agreement). This CLA ensures that Shopware will stay an open and living product. In short, you give the explicit right to use your code in Shopware to shopware AG.
Shopware 6 is completely free and released under the MIT License.
[/expand]
trusted shops
trusted shops
Trusted Shops für Shopbetreiber
Schaffen Sie Vertrauen im eCommerce mit Trusted Shops & erreichen so für Ihren Shop mehr Traffic ✓, mehr Konversion ✓ & mehr Kundenbindung ✓ !
[expand title=“mehr lesen…“]
[/expand]
shopware subshops
11. Shopware Subshops
11. Shopware Subshops › Jan Brinkmann
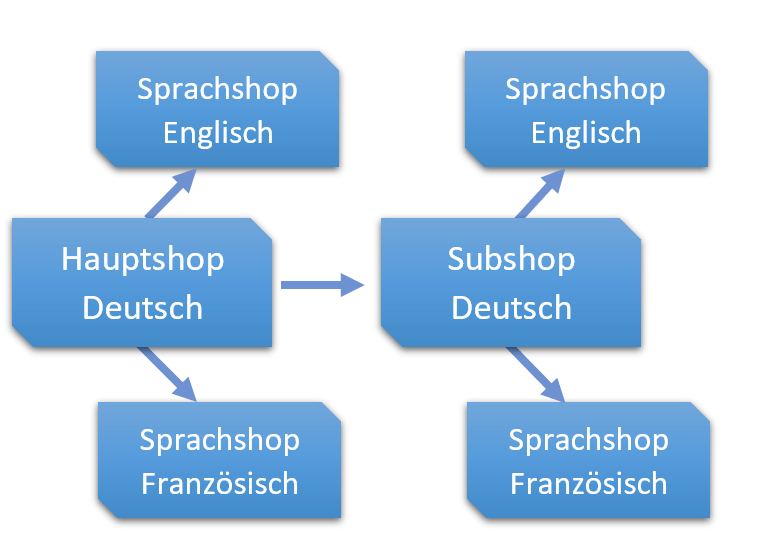
Shopware erlaubt es uns unsere Inhalte auf unterschiedliche Shops aufzuteilen. Der offensichtlichste Vorteile ist dabei natürlich der Sprachshop, durch den wir unser Angebot in einer anderen Lokalisierung anbieten können. Aber auch Subshops, also eine “parallel laufende” Shopseite, kann sehr nützlic…
Shopware erlaubt es uns unsere Inhalte auf unterschiedliche Shops aufzuteilen. Der offensichtlichste Vorteile ist dabei natürlich der Sprachshop, durch den wir unser Angebot in einer anderen Lokalisierung anbieten können. Aber auch Subshops, also eine “parallel laufende” Shopseite, kann sehr nützlich sein, um dort zum Beispiel eine andere Produktkategorie mit anderem Layout zu vertreiben.
[expand title=“mehr lesen…“]
Hauptshops, Subshops und Sprachshops – erklärt.
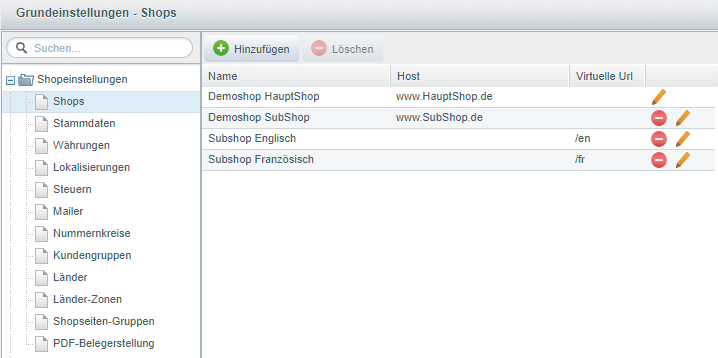
In die Übersicht für Subshops gelangen wir über “Einstellungen” -> “Grundeinstellungen” -> “Shopeinstellungen” -> “Shops”
Unser Hauptshop ist bereits in der Liste enthalten. Der Hauptshop kann in seinem Typ auch nicht auf Sub- bzw. Sprachshop geändert werden. Er wird bei der Shopware Installation definiert. Natürlich können wir noch Einstellungen daran vornehmen, dazu weiter unten mehr.
Der Subshop ist getrennt vom Hauptshop. Es können auf unterschiedliche Produktkategorien und Einkaufswelten/Themes zugegriffen werden. Außerdem kann der Subshop mit einer anderen Domain aufgerufen werden.
Der Sprachshop ist dem Hauptshop oder einem Subshop “unterstellt”. Das heißt die Seite des Sprachshops kann nicht für sich existieren, sondern muss wissen, welche Seite erweitern werden soll. Zusätzlich greifen Sprachshops die Domain und Templates des zugewiesenen Shops auf. Mit Hilfe einer virtuellen URL kann der Sprachshop aber zum Beispiel über /en beim Domain-Namen aufgerufen werden.
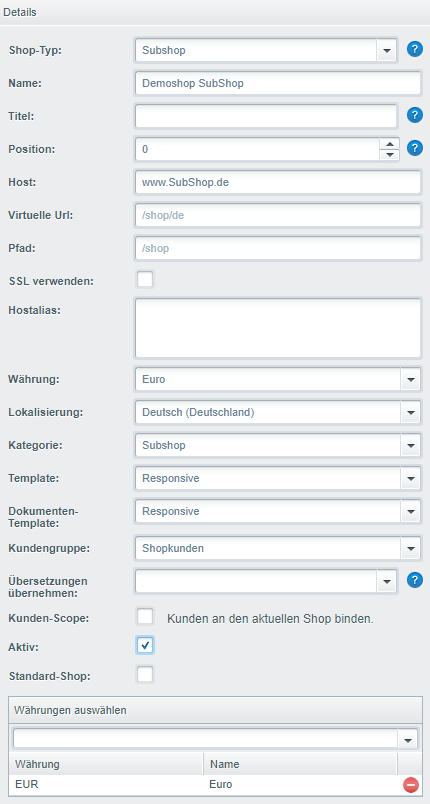
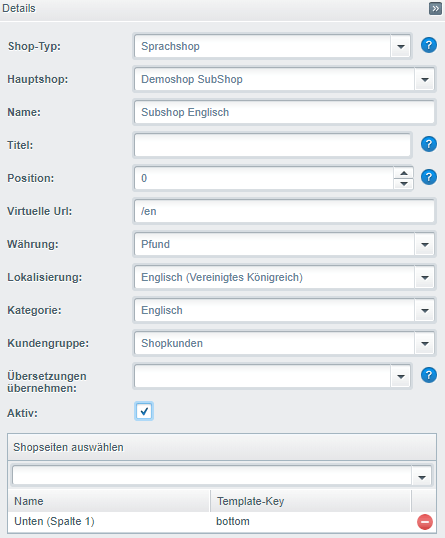
Anlegen und Konfigurieren eines Subshops
Nach einem Klick auf “Hinzufügen” finden wir auf der rechten Seite des Fensters die Details für den neuen Shop.
Wichtig ist, dass der Shop-Typ auf “Subshop” eingestellt ist, davon hängen nämlich die restlichen Optionen ab.
Checkliste für die wichtigsten Einstellungen:
Name: Der Name des Subshops. Dient eher der Verwaltung im Backend.
Titel: Setzt das Title-Tag für die Seiten im Frontend.
Position: Die Reihenfolge der Auflistung, wenn man mehrere Shops hat.
Host: Hier kann die URL des Shops gewählt werden.
Virtuelle URL: Vor allem für Sprachshops interessant. Durch /de oder /en hinter der URL kann direkt ein Sprachshop aufgerufen werden.
Pfad: Muss nur angepasst werden, wenn die Dateien des Shops in einem anderen Unterordner liegen.
SSL verwenden: Kann nur mit gültigem SSL Zertifikat genutzt werden. Ermöglicht Verschlüsselung für sensible Bereiche der Website
Hostalias: Macht den Shop auch unter anderen URLs erreichbar. Also kann hier zum Beispiel auch “Subshop.de” eingetragen werden. Mehrere Einträge werden mit Enter getrennt
Die restlichen Punkte sind tatsächlich recht selbsterklärend. So können wir noch die Standard-Währung, Land, Produktkategorie, Template und Kunden einstellen.
Die Checkbox für “Kunden-Scope” ermöglicht uns, Kunden an den gewählten Shop zu binden. Kunden können sich in dem Fall nur in dem gewählten Shop mit ihren Daten einloggen. Wenn man diese Funktion benutzen möchte, sollte sie jedoch für alle verfügbaren Shops aktiviert werden.
Hinweis: Wer nochmal schnell nachschauen möchte, wie unterschiedliche Währungen für Shops angelegt werden können, kann das hier nachschlagen.
Sprachshops erstellen
Um einen Sprachshop anzulegen wählen wir zunächst wieder den Button “Hinzufügen”. Sobald wir den Shop-Typ auf “Sprachshop” setzen ändern sich auch die restlichen Einstellungen der Detailseite.
Der wichtigste Punkt der Einstellungen ist jetzt das Auswählen des zugehörigen Hauptshops. Für meinen neuen Sprachshop wähle ich also den vorher angelegten Subshop aus.
Viel neues kommt sonst allerdings auch nicht hinzu. Im Falle des Beispiels für einen englischsprachigen Shop werden natürlich Englisch als Lokalisierung und Pfund als Währung eingestellt. Eine Produktkategorie kann beispielsweise dupliziert und mit englischen Namen versehen werden und von der Virtuellen URL sollte Gebrauch gemacht werden.
Der Punkt “Übersetzung übernehmen” ist nur interessant, wenn wir mehrere Sprachshops der gleichen Sprache nutzen.
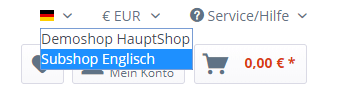
Nach dem Speichern können wir im Frontend unseren Sprachshop aus der Liste auswählen:
Hinweis: Werden Änderungen im Frontend nicht angezeigt sollte der Cache geleert werden (Einstellungen/Caches/Cache leeren).
Sie haben weitere Fragen rund um das Thema Shopseiten oder brauchen Unterstützung bei der Konfiguration? Ich bin ihr Shopware Ansprechpartner. Kontaktieren Sie mich einfach. Ein erstes Gespräch ist vollkommen unverbindlich.
case 'html':
    return Isotope::formatPriceWithCurrency($product->getPrice()->generate());
fritzmgvor 1 Jahr Oder das vielleicht sogar als default case benutzen. Dann kann man {{product_price}} schreiben und es wird automatisch die HTML Ausgabe für das aktuelle Produkt generiert.
Is there a way to skip the Installation? Because i already imported my Database but shopware always want`s to run the wizard.
[expand title=“mehr lesen…“]
Create a file called INSTALL.LOCK in the root dir
[/expand]
Shopware Child-Theme Problem
#2140 Neue Felder fehlen nach Update im Child-Theme (Theme-Duplikat)
Derzeit werden in Shopware 6 neue Konfigurations-Felder von Themes bei einem Plugin-Update nicht in Child-Themes übernommen. Dies können wir technisch leider nicht ändern da die Ursache hierfür im Shopware-Core liegt. Wir haben dazu bereits e…
Shopware Issuetracker
Shopware Issuetracker
Shopware Issuetracker
Shopware Issuetracker
[expand title=“mehr lesen…“]
Shopware Child-Theme Problem
Derzeit werden in Shopware 6 neue Konfigurations-Felder von Themes bei einem Plugin-Update nicht in Child-Themes übernommen. Dies können wir technisch leider nicht ändern da die Ursache hierfür im Shopware-Core liegt.
Bis Shopware das Problem gelöst hat, haben wir nachfolgend einen kleinen Workaround für Dich verfasst. Dieser Workaround kann jedoch nur für Shopware On-Premises genutzt werden.
Um das neue Feld bzw. die neuen Felder auf das Child-Theme zu übertragen ist eine kleine Modifikation der Datenbank notwendig. Im folgenden zeigen wir Dir in 8 Schritten wie Du das Feld bzw. die Felder ganz einfach selber ergänzen kannst.
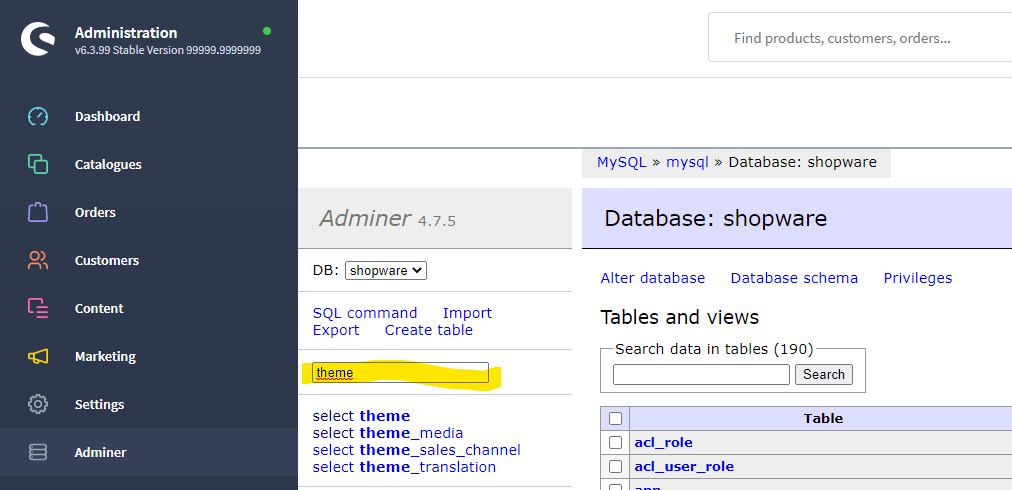
Tipp: Wir nutzen dafür das kostenlose Plugin „Adminer für das Admin„. Damit erhält man in der Shopware-Administration einen direkten Zugriff auf die Datenbank.
Schritt 1)
Im Suchfeld grenzt Du die Tabellen mit „theme“ auf den Bereich Themes ein:
Schritt 2)
Mit „select“ für die Tabelle „theme“ gelangst Du auf eine Übersicht aller installierten Themes:
Child-Themes erkennst Du daran, dass Sie keinen „technical_name“ haben.
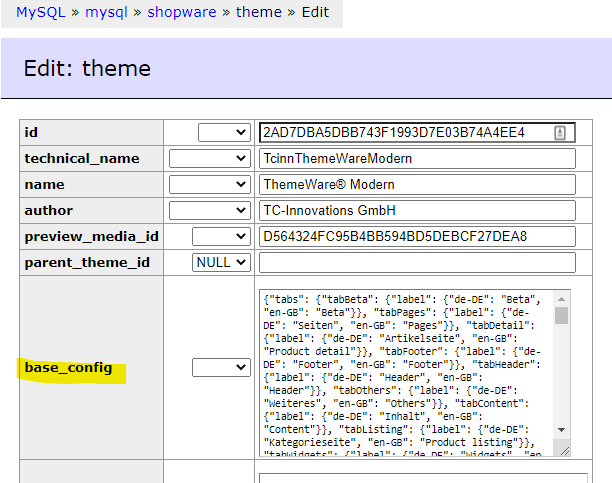
Schritt 3)
Zuerst editierst Du das Parent-Theme (in unserem Beispiel „ThemeWare Modern“):
Schritt 4)
Kopiere den Inhalt der Spalte „base_config“:
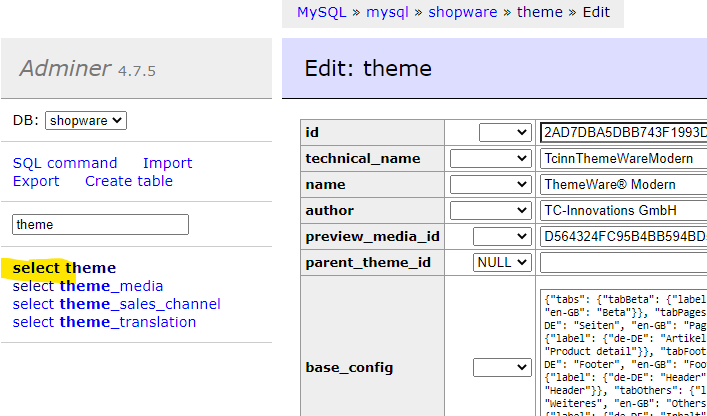
Schritt 5)
Wechsel mit „select“ für die Tabelle „theme“ wieder zurück auf die Theme-Übersicht:
Schritt 6)
Editiere nun das Child-Theme:
Schritt 7)
Leere hier das Feld „base_config“ komplett und füge die kopierte Konfiguration aus dem Parent-Theme ein und speicher die Änderung mit „Save“:
Schritt 8)
Zum Abschluss öffne die Konfiguration des Child-Themes im Theme-Manager. Das fehlende Feld bzw. die fehlenden Felder sollten jetzt konfigurierbar sein. Speicher und kompiliere das Theme einmal neu, damit die Änderungen in der Storefront wirksam werden.
In diesem Artikel werden alle notwendigen oder empfohlenen Vorbereitungsschritte genannt um unseren Cybercrime Schutz optimal zu nutzen. DNS Im Optimal-Fall kann über die geschützte Domain nicht auf den “echten” Server zurückgeführt werden. Es gilt zu vermeiden, dass ein Angreifer z. B. einen DDOS A…
[expand title=“mehr lesen…“]
Cybercrime Schutz – Vorbereitung
In diesem Artikel werden alle notwendigen oder empfohlenen Vorbereitungsschritte genannt um unseren Cybercrime Schutz optimal zu nutzen.
DNS
Im Optimal-Fall kann über die geschützte Domain nicht auf den „echten“ Server zurückgeführt werden. Es gilt zu vermeiden, dass ein Angreifer z. B. einen DDOS Angriff über eine Subdomain starten kann, die direkt auf den Server zeigt oder aufgrund der Subdomain auf die Server IP Adresse.
Für E-Mail, SSH und FTP Verbindung kann z. B. die Server-Domain genutzt werden:
Whitelisten von IP-Adressen
Abgleiche von z. B. der WaWi erzeugen so viele Aufrufe, dass diese schnell als Angriff gewertet werden können. Um dort Probleme vorzubeugen, lohnt es sich die IP Adressen uns zu nennen, damit wir diese Whitelisten können.
Shopware — trusted Proxies
Gemäß Dokumentation muss hier der Shopware Shop konfiguriert werden, IPs:


 1
1