Wie sichere ich das Shopware backend via .htaccess ab?
Wie sichere ich das Shopware backend via .htaccess ab? – Profihost Knowhow FAQ Fragenbereich
Es empfiehlt sich das Shopware Backend vor dem eigentlichen Login bereits mit Zugriffsberechtigungen zu versehen. Dies kann über die .htaccess geregelt werden. Im besten Fall wird dieser direkt auf einzelne IPs beschränkt. Da hier jedoch nicht jeder mit einer festen IP Adresse arbeitet, kann der Zug…
[expand title=“mehr lesen…“]
Wie sichere ich das Shopware backend via .htaccess ab?
Es empfiehlt sich das Shopware Backend vor dem eigentlichen Login bereits mit Zugriffsberechtigungen zu versehen. Dies kann über die .htaccess geregelt werden. Im besten Fall wird dieser direkt auf einzelne IPs beschränkt. Da hier jedoch nicht jeder mit einer festen IP Adresse arbeitet, kann der Zugriff über mod_geoip auf bestimmte Länder begrenzt werden.
Folgend dazu ein Code-Beispiel für die .htaccess, dass den Zugriff auf das Frontend nur für DE, AT und CH erlaubt und den Backend Zugriff nur über DE erlaubt:
# Nur DE, CH und AT erlauben <IfModule mod_geoip.c> GeoIPEnable On SetEnvIf GEOIP_COUNTRY_CODE DE AllowCountry SetEnvIf GEOIP_COUNTRY_CODE AT AllowCountry SetEnvIf GEOIP_COUNTRY_CODE CH AllowCountry # allow US for GoogleBot, Paypal etc. SetEnvIf GEOIP_COUNTRY_CODE US AllowCountry
Sollte der Zugriff auf das Backend direkt über die IPs abgesichert werden können, so kann folgender Code verwendet werden:
# Backend Zugriff absichern <FilesMatch „backend“> <IfModule mod_authz_core.c> # Apache 2.4 # List of ip adresses that can access the backend Require ip 1.2.3.4 Require ip 5.6.7.8
</IfModule> </FilesMatch>
[/expand]
Wie erstelle ich ein Wrapper-Skript für einen Shopware Cronjob?
Wie erstelle ich ein Wrapper-Skript für einen Shopware Cronjob? – Profihost Knowhow FAQ Fragenbereich
Wenn Sie Ihre Shopware Cronjobs mit Hilfe der Shopware Console ausführen möchten, benötigen Sie ein Wrapper-Skript. Zunächst konfigurieren Sie bitte die gewünschten Cronjobs in Ihrem Shopware Backend. Wie Sie dabei vorgehen, erfahren Sie in der Shopware Community unter folgendem Link: Cronjobs — Ko…
[expand title=“mehr lesen…“]
Wie erstelle ich ein Wrapper-Skript für einen Shopware Cronjob?
Wenn Sie Ihre Shopware Cronjobs mit Hilfe der Shopware Console ausführen möchten, benötigen Sie ein Wrapper-Skript.
Zunächst konfigurieren Sie bitte die gewünschten Cronjobs in Ihrem Shopware Backend. Wie Sie dabei vorgehen, erfahren Sie in der Shopware Community unter folgendem Link: Cronjobs — Konfiguration in Shopware
Beispiel für ein Wrapper-Skript
Um skriptgesteuert die Cronjobs über die Shopware Console auszuführen, erstellen Sie ein Skript mit folgendem Inhalt und der Dateiendung *.sh und legen es auf Ihrem Speicherplatz ab:
Wrapper Skript für Shopware Cron am Beispiel von PHP 7.0
Bitte passen Sie im oberen Beispiel den Pfad zu Ihrem Shopware-Verzeichnis und ggf. die PHP Version an und geben dem Skript die Rechte 700 (-rwx——). Wie Sie die Rechte anpassen können, erfahren sie unter folgendem Link: CHMOD — Welche Rechte sollte ich vergeben? Wie geht dies? Hinweis
Die Tilde (~) innerhalb der Pfadangabe löst automatisch Ihr Heimatverzeichnis auf.
Sie können den Pfad im Skript also wie folgt angeben: „~/shopwareverzeichnis/bin/console“
Die Alternative ohne Tilde sähe so aus: „/home/IhrUsername/shopwareverzeichnis/bin/console“ Hinweis
Dieses Wrapper-Skript kann natürlich angepasst werden, so dass andere Shopware Consolen Tasks durchgeführt werden. Wenn Sie beispielsweise automatisiert den Cache über die Shopware Console löschen möchten, ändern Sie im Skript das „sw:cron:run“ zu „sw:cache:clear“ . Eine Befehlsübersicht der Shopware Console finden Sie unter folgendem Link: Shopware CLI: Nützliche Befehle & Tricks
Einrichtung des ServerCon Cronjobs
Anschließend müssen Sie das Skript triggern, indem Sie einen Cronjob in ServerCon erstellen und den Pfad zu dem soeben erstellen Skript angeben . Den passenden Artikel dazu finden Sie hier: Wie richte ich einen Cronjob ein?
Der Cronjob ist nun eingerichtet und wird im gewünschten Turnus durchgeführt.
Es ist endlich soweit: Shopware hat die sechste Version Ihres Shopsystems veröffentlicht und umfangreiche technologische Verbesserungen vorgenommen. Ab sofort haben Sie die Möglichkeit Shopware 6 für 30 Tage völlig kostenfrei und unverbindlich zu testen. In diesem Artikel erklären wir Ihnen, wie Sie…
[expand title=“mehr lesen…“]
Shopware 6 kostenfrei testen!
Es ist endlich soweit: Shopware hat die sechste Version Ihres Shopsystems veröffentlicht und umfangreiche technologische Verbesserungen vorgenommen. Ab sofort haben Sie die Möglichkeit Shopware 6 für 30 Tage völlig kostenfrei und unverbindlich zu testen. In diesem Artikel erklären wir Ihnen, wie Sie einen Shopware Demoshop bestellen und diesen vor Ende der Testphase in ein reguläres Hosting überführen können.
Für die Einrichtung benötigen wir lediglich Ihre E-Mail-Adresse und die zukünftige Shop-Domain. Sobald Sie das Online-Formular ausgefüllt und verschickt haben, erhalten Sie an die angegebene E-Mail Adresse folgende Informationen zum Demoshop zugeschickt:
— URL zum Shopware Demoshop und zum Backend — Zugangsdaten zum Shopware Backend — FTP-Zugangsdaten Hinweis
Hinweis: Sollten Sie nach 5 Minuten keine Mail erhalten, prüfen Sie bitte Ihren Spam-Ordner und wenden Sie sich ggf. an unseren Support.
Überführung des Shop in ein reguläres Hosting
Während der Testphase können Sie uns damit beauftragen den Demoshop in ein reguläres Hosting zu überführen. Je nach dem wie umfangreich Ihr Shop aufgebaut wird, entscheidet sich welches Hostingprodukt am besten zu Ihrem Vorhaben passt.
Für kleine bis mittelgroße Shops mit bis zu 30.000 Besuchern pro Monat empfehlen wir unseren Managed Shophosting Tarif. Den Link zum Bestellablauf finden Sie unter folgendem Link: https://www.profihost.com/shop-hosting
Für umfangreichere Shops empfehlen wir unsere Managed FlexServer. Eine Vergleichsübersicht und die Bestellunterlagen finden Sie hier: https://www.profihost.com/managed-server
Wenn Sie Ihren Shopware Shop komplett neu aufbauen, oder wenn Sie mit weniger als 30.000 Besuchern / Monat rechnen, eignet sich unser Managed Shophosting Tarif. Geben Sie während der Bestellung im ersten Schritt Ihre Wunschdomain an, als Paket „Shopware“ und unter „Paketpreis & Zahlung“ Ihre Zahlungsweise. Anschließend öffnen sich einige „Extra Features„, unter anderem sehen Sie hier den Auswahlpunkt „Shopware CE Demoshop umziehen für 0,00 € / Monat„.
Sobald Sie auf „Weiter zur Dateneingabe“ geklickt haben, geben Sie bitte unter „Bemerkungen“ Ihre vorläufige Demoshop-URL an, damit wir Ihren Demoshop 1 zu 1 migrieren können.
Häufige Fragen
Kann ich eine Domain angeben, die bereits in Verwendung ist?
Ja, Sie können auch eine bereits registrierte Domain angeben, die Sie bereits verwenden. Dies hat keine Auswirkungen auf Ihre Produktivumgebung. Für die Testphase generieren wir eine vorläufige Domain für Sie, die sich aus der Wunschdomain und der Serveradresse zusammensetzt.
Werden alle meine Daten bei der Übernahme des Testshops übernommen?
Nach der Migration auf einen regulären Hostingserver können Sie genau da weitermachen, wo Sie aufgehört haben. Der Datenbestand bleibt 1 zu 1 bestehen. Es ändern sich lediglich folgende Daten:
FTP-Zugangsdaten
Zugangsdaten zur Datenbank
Serveradresse und IP-Adresse
Shop-URL (Sie erhalten nach der Migration eine weitere vorläufige Domain)
Ändern sich meine Zugangsdaten?
Die Zugangsdaten zum Shopware Backend bleiben bestehen. Es ändern sich lediglich die FTP-Zugangsdaten und die Zugangsdaten zu Ihrer Datenbank.
Was passiert, wenn die 30 tägige Testphase ausläuft?
Sobald die Testphase nach 30 Tagen beendet wird, wird Ihr Demoshop deaktiviert und nach weiteren 10 Tagen gelöscht. Sollte Ihr Demoshop bereits deaktiviert sein, können Sie unseren Support kontaktieren, damit der Shop reaktiviert wird und in eine Live-Umgebung überführt werden kann.
[/expand]
Shopware Fehler nach Update der PHP Version
Shopware Fehler nach Update der PHP Version – Profihost Knowhow FAQ Fragenbereich
PHP Version aktualisieren Im Zuge des des Shopware Updates auf die Version 5.6 muss die PHP Version auf 7.2 oder höher aktualisiert werden. Wie Sie die Umstellung der PHP-Version vornehmen, erfahren Sie in folgendem Wissensdatenbankartikel (hier beispielhaft für PHP 7.2): PHP 7.2 aktivieren Ursache …
[expand title=“mehr lesen…“]
Shopware Fehler nach Update der PHP Version
PHP Version aktualisieren
Im Zuge des des Shopware Updates auf die Version 5.6 muss die PHP Version auf 7.2 oder höher aktualisiert werden. Wie Sie die Umstellung der PHP-Version vornehmen, erfahren Sie in folgendem Wissensdatenbankartikel (hier beispielhaft für PHP 7.2): PHP 7.2 aktivieren
Ursache des Fehlers identifizieren
Wenn Sie anschließend einen Fehler in Ihrem Shop feststellen, kann dies an Shopware Plugins liegen, die mit der höheren PHP-Version aus unterschiedlichen Gründen nicht kompatibel sind. Zur Überprüfung, welche Plugins das sind, können Sie in Ihrer neuen php.ini Datei in Ihrem Home-Verzeichnis das PHP Error-Reporting aktivieren. Wie Sie dies tun, erfahren Sie in folgendem Wissensdatenbankartikel: PHP Error Reporting aktivieren
In der nun erstellten Datei „phperror.log“ steht, welches Plugin nicht kompatibel mit PHP 7.1 oder höher ist. Hier ist eine beispielhafte Fehlermeldung, wie sie im Log zu finden sein kann: Fehlermeldung
[16-Aug-2019 11:39:25 Europe/Berlin]PHP Fatal error: The file /home/USER/www.DOMAIN.TLD/engine/Shopware/Plugins/Community/Core/SwagLicense/Bootstrap.php was encoded by the ionCube Encoder for PHP 5.6 and cannot run under PHP 7.1 or later.
Deaktivierung von nicht kompatiblen Plugins
Hier ist zu sehen, dass das Plugin ,,SwagLicense“ nicht kompatibel mit PHP 7.1 oder höher ist, da das Plugin unter PHP 5.6 mit dem IonCube Loader veschlüsselt wurde. Hierbei wird von uns empfohlen, das fehlerhafte Plugin zunächst zu deaktivieren, um Ihre Website auch unter PHP 7.2 lauffähig zu machen. Zum deaktivieren von Plugins gehen Sie in Ihr Shopware Backend und wechseln in den Plugin Manager. Hier haben Sie unter dem Punkt ,,Installiert“ die Möglichkeit, Ihre Plugins zu verwalten. Durch einen Klick auf den Stift bei dem entsprechenden Plugin können Sie dieses deaktivieren. Hinweis
Der Einsatz des Shopware Lizenz-Managers (SwagLicense) ist unter Shopware 5.6 nicht möglich. Bitte löschen Sie das Plugin, wenn ein Update auf 5.6 bevorsteht.
Nun sollte der Shop wieder erreichbar sein. Sollte dies nicht der Fall sein, überprüfen Sie bitte erneut das PHP Error-Log, ob noch weitere Plugins nicht kompatibel mit PHP 7.1 oder höher sind. Sollte dies der Fall sein, deaktivieren Sie diese bitte ebenfalls.
Wir empfehlen das PHP Error Reporting nach erfolgreichem Update zu deaktivieren. Löschen Sie dazu einfach den entsprechenden Eintrag aus Ihrer php.ini.
[/expand]
elasticsearch mit Shopware auf einer VM
elasticsearch mit Shopware auf einer VM – Profihost Knowhow FAQ Fragenbereich
Setzen Sie elasticsearch in Kombination mit Shopware auf einer VM ein, sollten passende Settings in Shopware in der config.php Datei definiert sein: Die elasticsearch Version wird laufend aktualisiert und muss auch bei Shopware angepasst werden. Vollständige Konfiguration und Hintergrund: https://developers.shopware.com/sysadmins-guide/elasticsearch-setup/…
[expand title=“mehr lesen…“]
elasticsearch mit Shopware auf einer VM
Setzen Sie elasticsearch in Kombination mit Shopware auf einer VM ein, sollten passende Settings in Shopware in der config.php Datei definiert sein:
Problem Nach der Anmeldung zu einem Newsletter wird ein Fehler 500 oder folgende Fehlermeldung angezeigt: Haben Sie keine Fehlermeldung, sondern bekommen nur Fehler 500 angezeigt, so können Sie mit Hilfe des PHP Error Reportings die Ursache erörtern – im nachfolgendem Artikel wird die Vorgehensweise…
[expand title=“mehr lesen…“]
Shopware Newsletter Anmeldung nicht möglich (Fehler 500) – Lösung
Problem
Nach der Anmeldung zu einem Newsletter wird ein Fehler 500 oder folgende Fehlermeldung angezeigt:
PHP Fatal error: Uncaught TypeError: Argument 2 passed to sAdmin::subscribeNewsletter() must be of the type integer, string given
Haben Sie keine Fehlermeldung, sondern bekommen nur Fehler 500 angezeigt, so können Sie mit Hilfe des PHP Error Reportings die Ursache erörtern – im nachfolgendem Artikel wird die Vorgehensweise beschrieben:
Auf Grund einer Fehlkonfiguration im Shop wird eine Zeichenfolge (string) übergeben, obwohl die Funktion einen Zahlenwert (int) erwartet. Der falsche Übergabetyp sorgt dann für den Fehler.
Lösung
Im Shopware Backend muss unter Einstellungen → Grundeinstellungen → Storefront → Anmeldung/Registrierung in der Zeile „Standard-Empfangsgruppe (ID) für registrierte Kunden (System / Newsletter)“ eine ID (numerischer Wert) stehen. Wenn dieses Feld leer ist oder ein Wort enthält, resultiert das in dem o.g. Fehler – um dies zu beheben tragen Sie bitte eine Zahl in dieses Feld ein.
Anschließend ist die Newsletteranmeldung wieder möglich.
[/expand]
Shopware Fehler nach Update
Shopware Fehler nach Update – Profihost Knowhow FAQ Fragenbereich
Sollte Ihr Shopware-Shop nach einem Update nicht mehr erreichbar sein und Sie erhalten einen Error 500, dann führen Sie bitte folgende Schritte durch: Aktivieren Sie das PHP Error Reporting. Wie das geht, erfahren Sie in nachfolgendem Artikel: PHP Error Reporting aktivieren Hier finden Sie folgend…
[expand title=“mehr lesen…“]
Shopware Fehler nach Update
Sollte Ihr Shopware-Shop nach einem Update nicht mehr erreichbar sein und Sie erhalten einen Error 500, dann führen Sie bitte folgende Schritte durch:
Aktivieren Sie das PHP Error Reporting. Wie das geht, erfahren Sie in nachfolgendem Artikel: PHP Error Reporting aktivieren
Hier finden Sie folgende Fehlermeldung: Uncaught PDOException: SQLSTATE[23000]: Integrity constraint violation: 1048 Column ‚element_id‘ cannot be null in /home/USER/www.DOMAIN.TLD/vendor/doctrine/dbal/lib/Doctrine/DBAL/Connection.php
Führen Sie in MySQL folgende Befehle aus: INSERT INTO s_core_config_elements (form_id, name, value, label, description, type, required, position, scope) VALUES (‚0‘, ‚trackingUniqueId‘, ‚ s:0:““;‘, ‚Unique identifier‘, ‚ ‚, ‚text‘, ‚0‘, ‚0‘, ‚1‘) und anschließend SELECT id FROM s_core_config_elements WHERE name = ‚update-unique-id‘ Wenn die SELECT-Abfrage genau ein Ergebnis ausgibt, dann merken Sie sich bitte die entsprechende ID und fügen diese in das folgende SQL-Statement ein: UPDATE s_core_config_elements SET name=“trackingUniqueId“ WHERE id=ID
Anschließend wird Ihre Website wieder erfolgreich angezeigt.
Hintergrund In der Standardkonfiguration führt Shopware 6 Browser Prozesse aus, um alle Hintergrundaufgaben zu erledigen. Dadurch werden andere Web-PHP-Prozesse blockiert. Sofern nun mehrere Benutzer gleichzeitig im Backend arbeiten, verlangsamt dies entsprechend die Seitengeschwindigkeit. Um dieses…
[expand title=“mehr lesen…“]
Shopware 6: Worker im Hintergrund laufen lassen
Hintergrund In der Standardkonfiguration führt Shopware 6 Browser Prozesse aus, um alle Hintergrundaufgaben zu erledigen. Dadurch werden andere Web-PHP-Prozesse blockiert. Sofern nun mehrere Benutzer gleichzeitig im Backend arbeiten, verlangsamt dies entsprechend die Seitengeschwindigkeit.
Um dieses Performance Einbußen zu minimieren, können die Prozesse auf dem Server direkt ausgeführt werden.
Deaktiveren der Browser Prozesse Zum deaktivieren der Browser Prozesse muss folgendes in Shopware hinzugefügt werden: /home/$USER/$domain.de/config/packages/shopware.yaml
Standardmäßig speichert Symfony die Sessions auf Dateiebene. Im folgendem Artikel wird beschrieben, wie die Sessions über Redis gesteuert werden können. In der genutzten php.ini wird die Redis Extension hinzugefügt werden: Anschließend werden folgende Dateien hinzugefügt: In der .env Datei wird die …
[expand title=“mehr lesen…“]
Shopware 6: Sessions über Redis steuern
Standardmäßig speichert Symfony die Sessions auf Dateiebene. Im folgendem Artikel wird beschrieben, wie die Sessions über Redis gesteuert werden können. Hinweis
Aktuell wird Redis von Shopware 6 nicht offiziell unterstützt. Der beschriebe Weg entspricht der Symfony Dokumentation.
Redis kann momentan ausschließlich auf einem eigenem FlexServer verwendet werden. Vorab müssen wir jedoch Redis installieren, kommen Sie dafür gerne auf uns zu.
In der genutzten php.ini wird die Redis Extension hinzugefügt werden:
extension=“redis.so“
Anschließend werden folgende Dateien hinzugefügt: config/services.yaml
Webkul is the hook for enterprise businesses and helps enterprises to upscale easily with a wider range of ready to use and highly customisable eCommerce centric products.
[expand title=“mehr lesen…“]
Installation Process
Please find here the installation process with terminal:
1) Extract the zip file of the Shopware multi-seller plugin.
2) Upload the folder WebkulMVMarketplace to custom/plugins directory of your Shopware 6.
3) Now open the Shopware 6 application in the Terminal.
4) Run the following commands in the Terminal
./bin/console plugin:refresh (Insert and list the plugins) ./bin/console plugin:install –activate WebkulMarketplace (Installing and activating the plugin) ./bin/console c:c (Clearing the cache) ./psh.phar administration:build (Building the application)
1234
./bin/console plugin:refresh (Insert and list the plugins)./bin/console plugin:install –activate WebkulMarketplace (Installing and activating the plugin)./bin/console c:c (Clearing the cache)./psh.phar administration:build (Building the application)
5) Now refresh the administration.
Please find here the manual installation process:
1) Extract the zip file of the plugin.
2) Goto your Shopware 6 installation backend panel and navigate to Setting -> System -> Plugins after that you can find all the installed plugin in it.
For installing the plugin, the user can click on the Upload Plugin button. The user can upload the plugin zip(WebkulMVMarketplace) here.
3) After uploading the plugin zip, the user can see the plugin in the list.
4) Now the user can click on the install icon to install the Shopware multi-seller plugin.
5) After the installation of the plugin, the user can click to activate the plugin.
Shopware Multi-Seller Marketplace Configuration
After installing the Shopware multi-seller plugin, the user can navigate to Setting -> System -> Plugin.
After clicking on the plugin, the user can see all the installed plugin in the Shopware. The user can click on the “…” icon for the configuration option of the plugin.
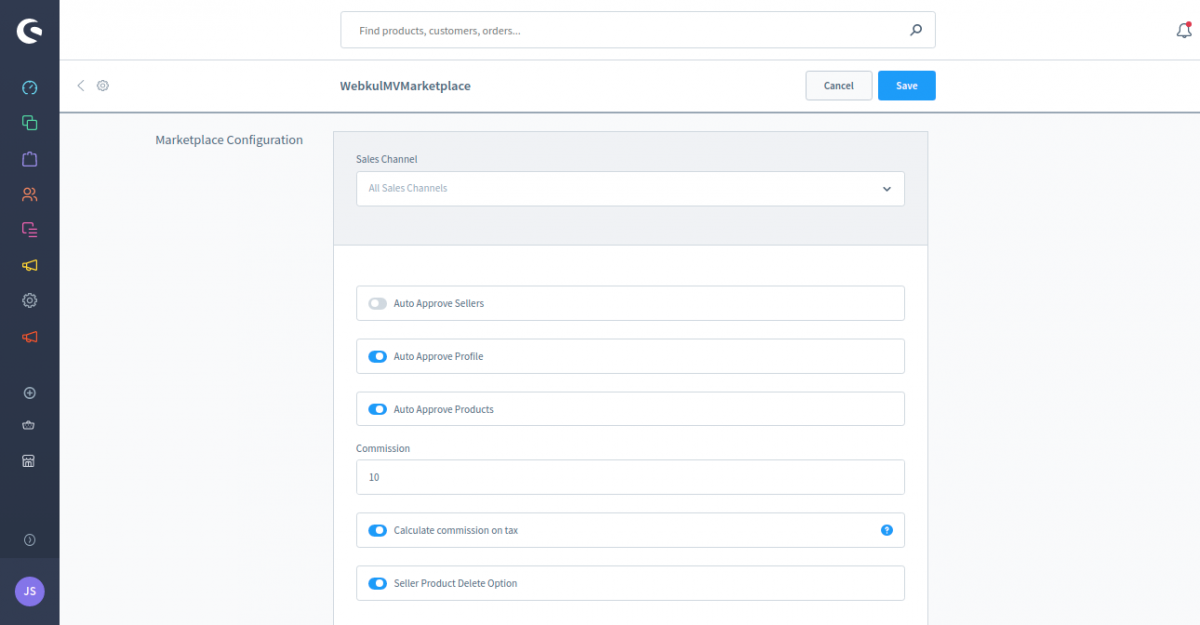
After clicking on the Config icon, the user can see these options:
Auto Approve Sellers – The admin can enable the option to auto-approve the sellers.
Auto Approve Products – The admin can enable this option to auto-approve the seller’s products.
Commission – Here the admin can set the commission percentage.
Calculate commission on tax – Enable this option so that the admin’s commission will be calculated on the product’s unit price.
Seller Product Delete Option – Enable this option so that the seller can delete the seller product.
After entering the details, the admin can click on the Save button.
Shopware Multi-Seller Marketplace Admin Panel
For the Shopware Multi-Seller Marketplace admin option, the user can see the marketplace icon at left menus in Shopware6 backend.
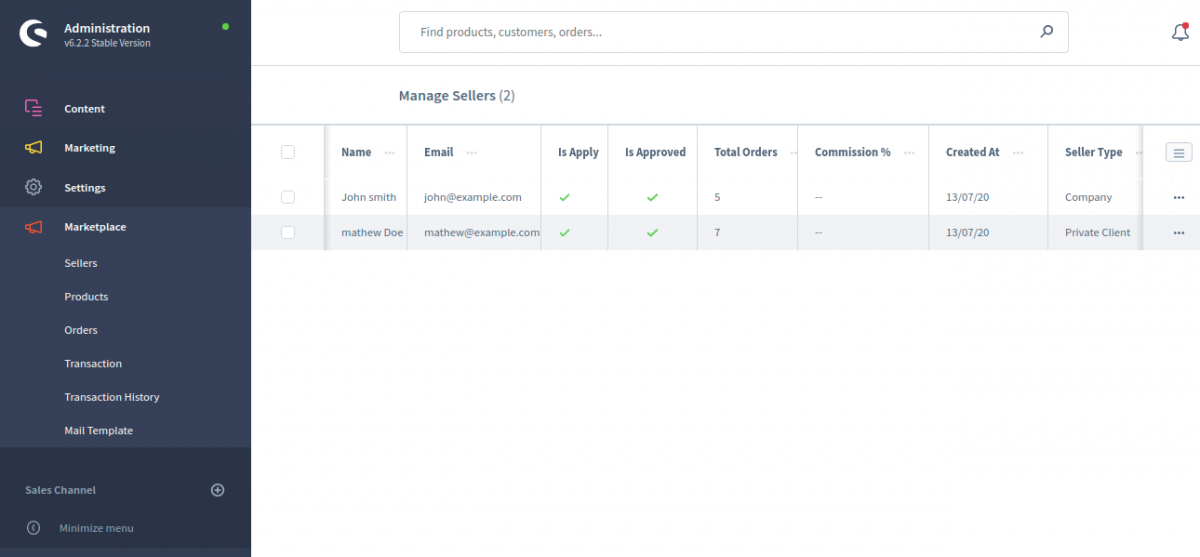
Sellers
Under the seller menu option, the admin can manage all the sellers like – Approve/Disapprove them. Admin can see all the sellers register at the Marketplace. The admin can see these details in the seller’s grid.
Name
Email
Is Apply
Is Approved
Total Orders
Commission
Created at
Seller Type
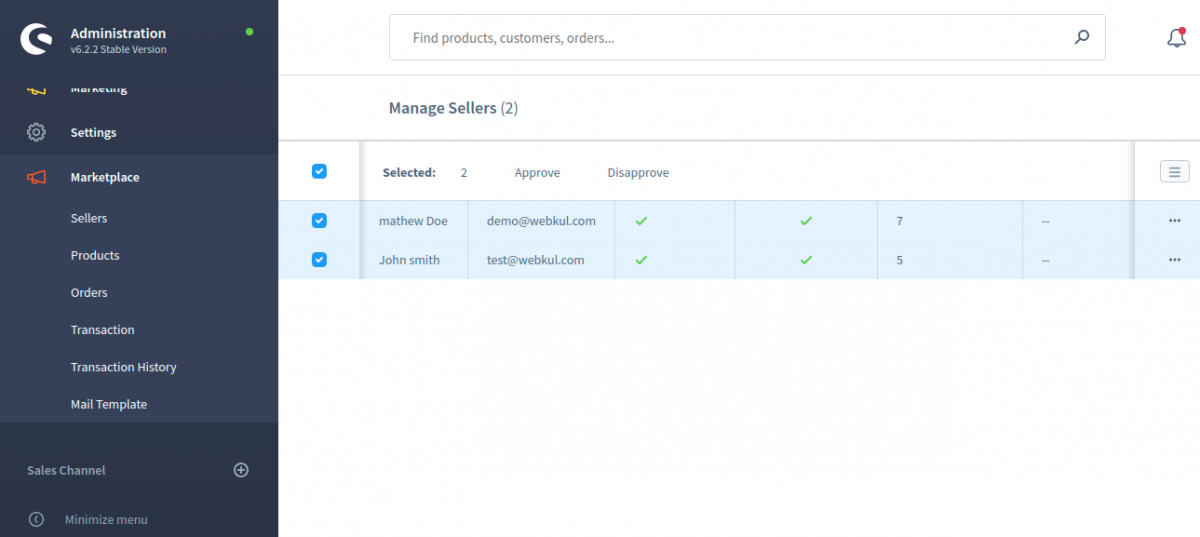
The admin can select particular and also select mass to approve or disapprove sellers on the Marketplace.
In this below image, you can see that admin selects mass seller to approve or disapprove on the marketplace.
The admin can click on the edit (…) button. Here admin can config the seller information.
Commission Percentage– Admin can define the Commission Percentage for the seller. The admin can set the commission for all the sellers. When the product will be purchased, the admin can earn the profit as a commission.
Store Logo – Admin can see the seller store logo, and can delete also.
Banner logo – Admin can see the seller store Banner logo, and can delete also.
Owner logo – Admin can see the seller store Banner logo. and can delete also.
Store logo, Banner logo and Owner logo can upload anyone in the seller end.
Profile Status – The admin can enable or disable seller profile on the Marketplace.
Seller Status – The admin can enable or disable sellers status on the Marketplace.
Products
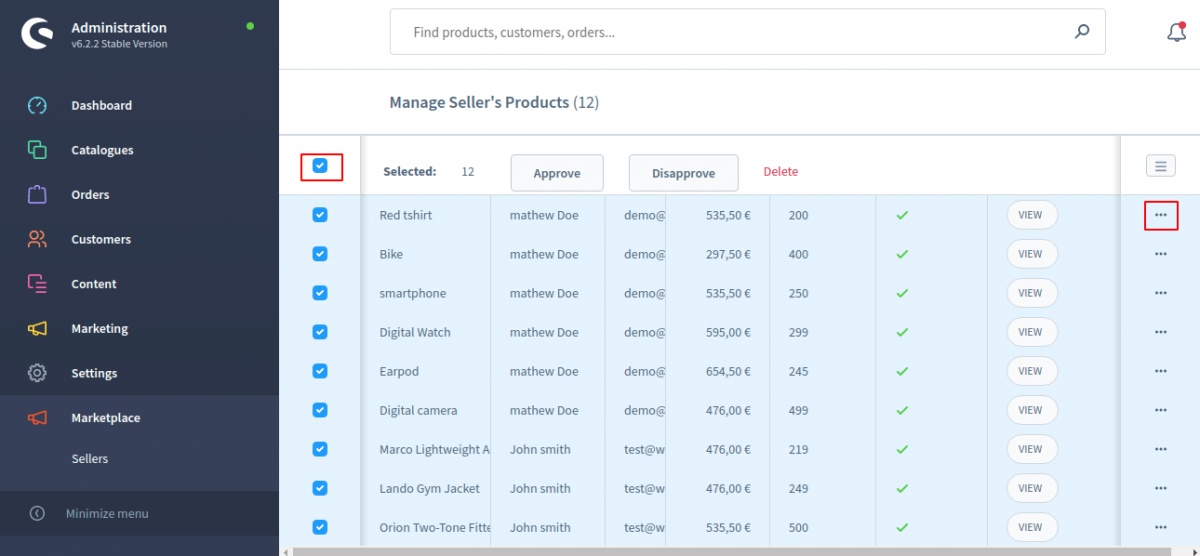
Under this section, the admin will be able to approve one by one and also able to mass approve the store products to the seller’s account as required. Here, the admin can see all of the store products as well.
In the products, the admin can select delete, approve, and disapprove the product one by one and also select mass product in one time.
In the seller’s product grid, the admin can see these details.
Product’s Title
Seller’s Name
Seller’s Email
Price
Stock
Status
Product’s View
In the below image, you can see that the admin has selected mass product to Approve, Disapprove or delete the product.
The admin can also click on the “view” button to see the products at the front-end.
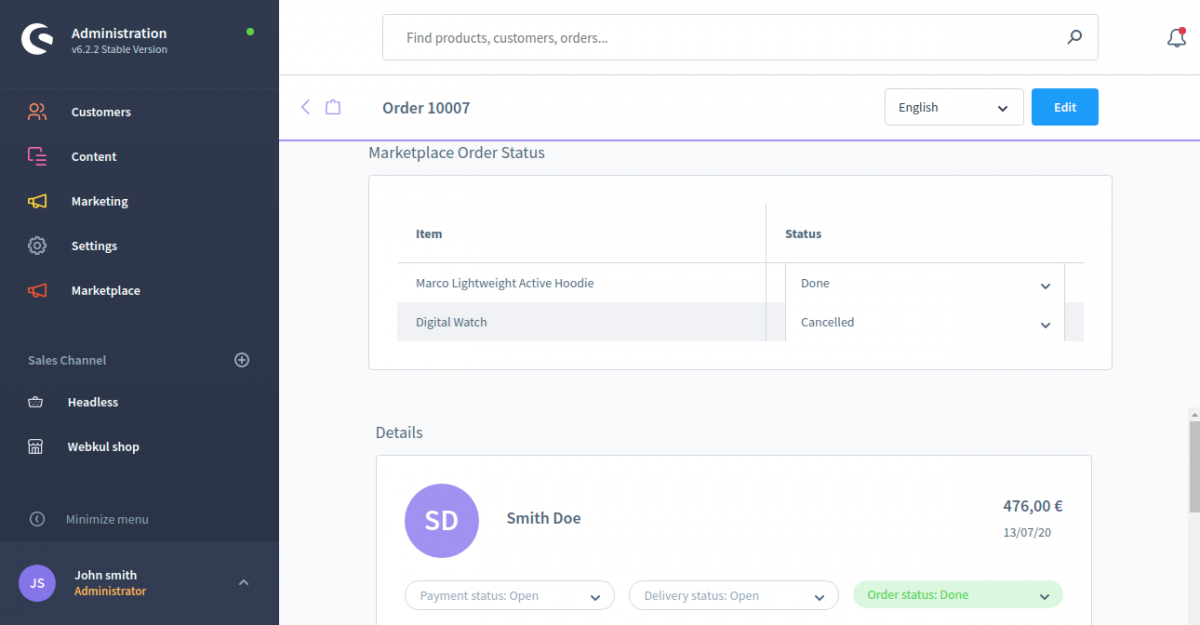
Orders
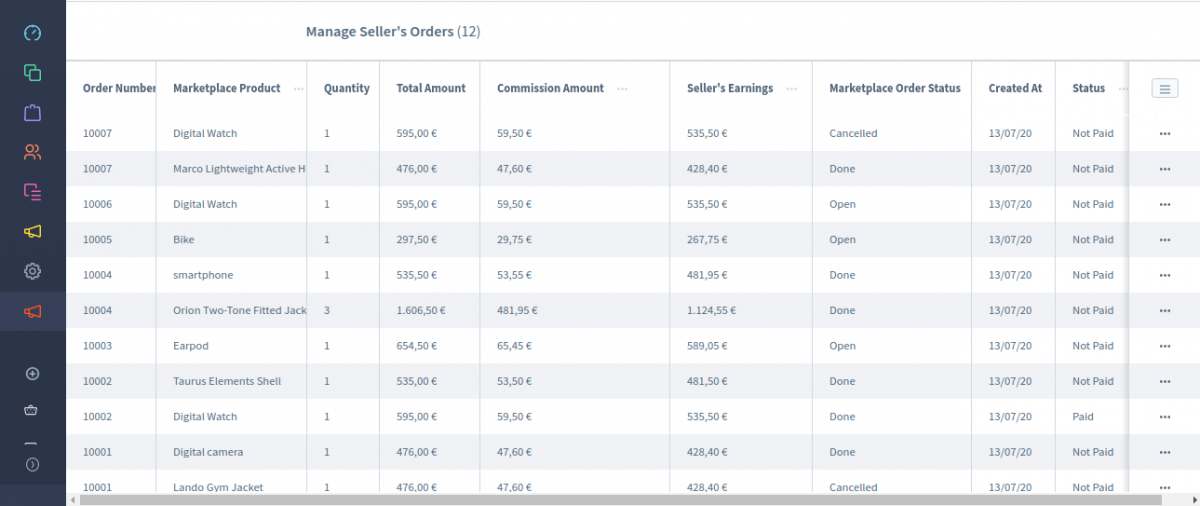
Under this section, the admin can see the orders made for marketplace products. From here, the admin can view orders, change order status for each product. Also, can click on the View button, the admin will be able to see the order details of a particular order and can make changes to order as well.
The admin can see these details in the seller’s product order grid.
Order number
Marketplace Product
Quantity
Total amount
Commission Amount
Seller’s Earning
Marketplace order status
Created at
Status
If a customer has placed any two products order, after that customer cancelled one product, so order status in admin end, one order status will show cancelled.
Price of cancelled product will get decreased from total order after cancellation of product.
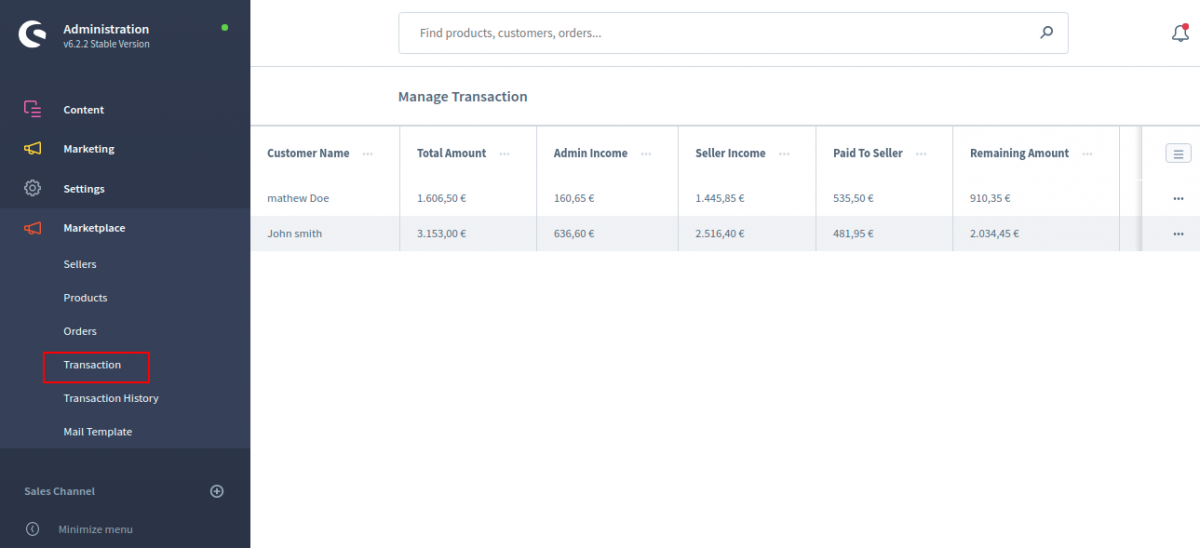
Transaction
Forthwith, Under the transactions section, the admin will be able to check the transactions of all the marketplace sellers to maintain a record. When admin and seller will be done the order status, then the transaction will show in this part.
Here you can also see the details of seller’s Manage Transaction.
Customer Name
Total Amount
Admin Income
Seller Income
Paid To Seller
Remaining Amount
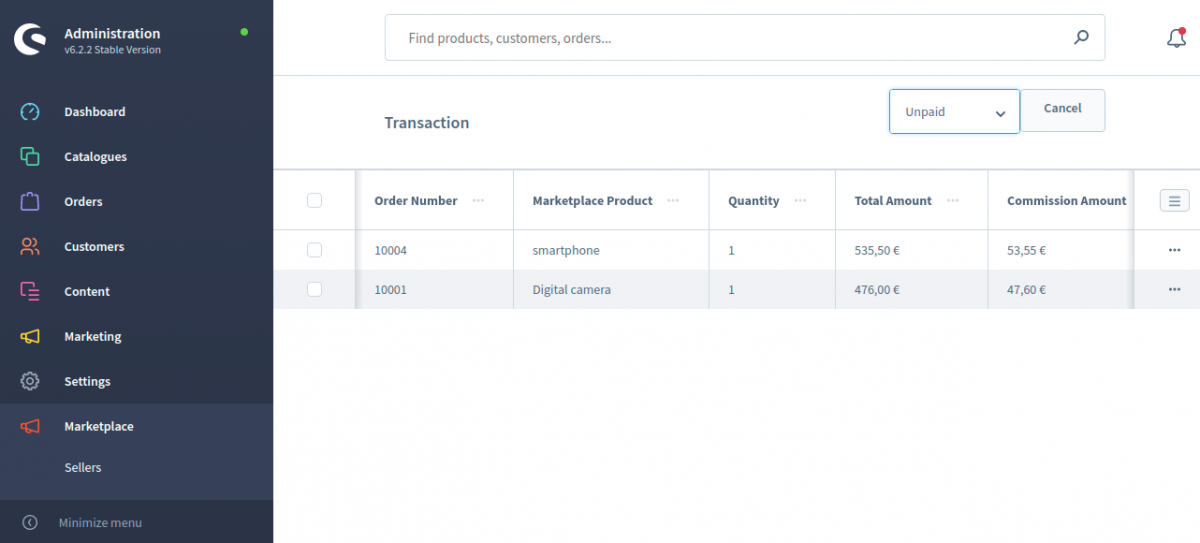
The admin can click on the edit (…) button on any customer. In this page, the admin can see the customer details –
Order number
Marketplace Product
Quantity
Total Amount
Commission Amount
Seller’s Earnings
Created At
Status
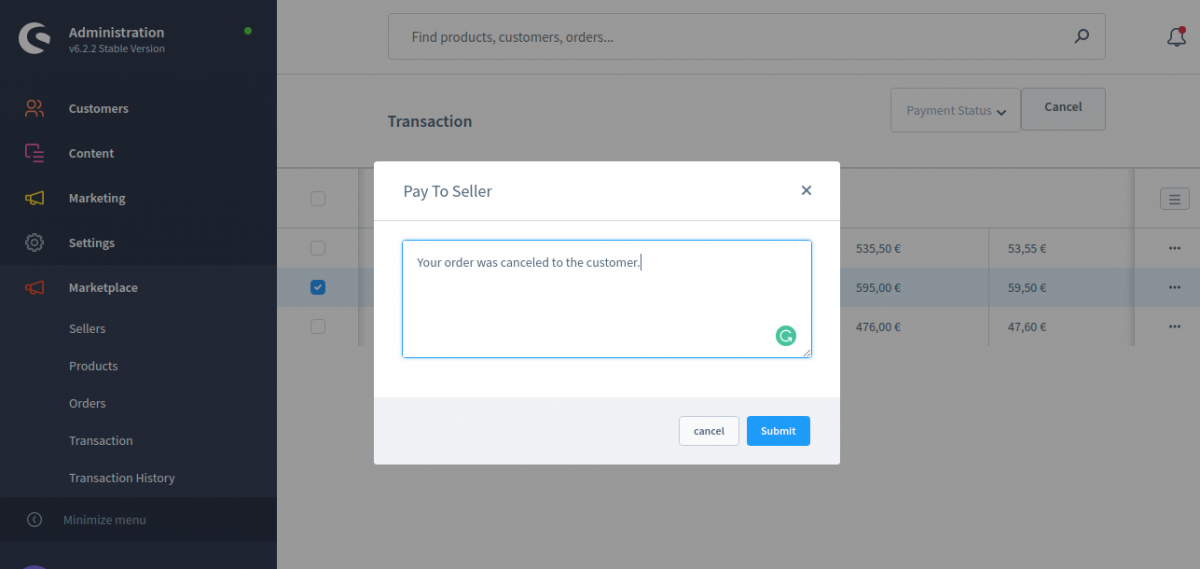
In the payment status, the admin can filter to select paid or unpaid. The admin can select one or multiple transitions for pay to the seller. In the below image, you can see the paid.
Here you can see the unpaid transitions.
When admin will pay to seller, then admin can write a note for the seller, after that click on the submit button.
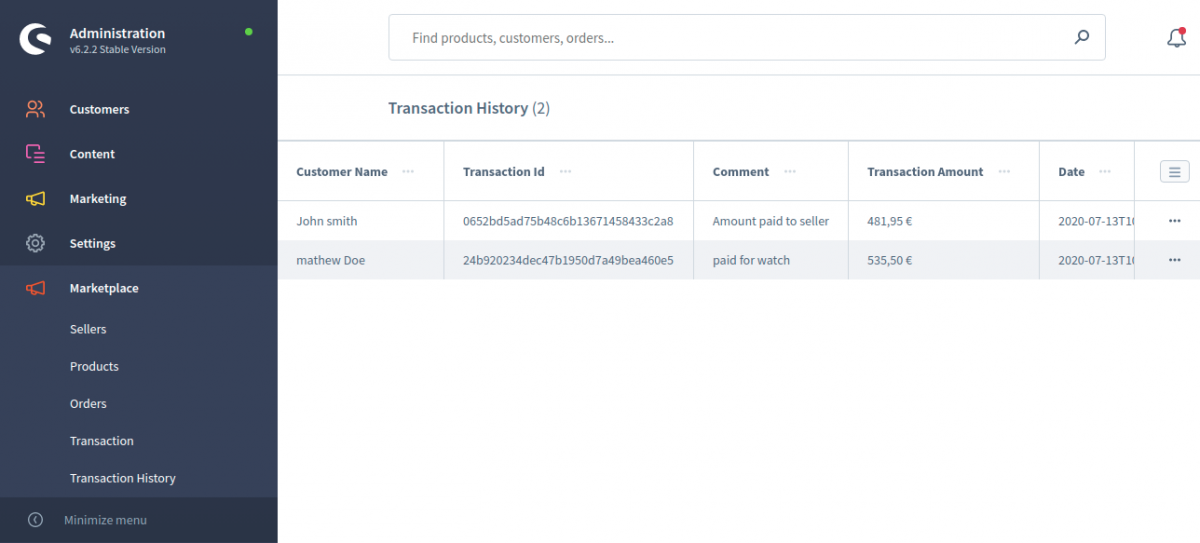
Transaction History
In the Transaction history, the admin see the seller’s translation details.
Customer Name
Transaction Id
Comment
Transaction Amount
Date
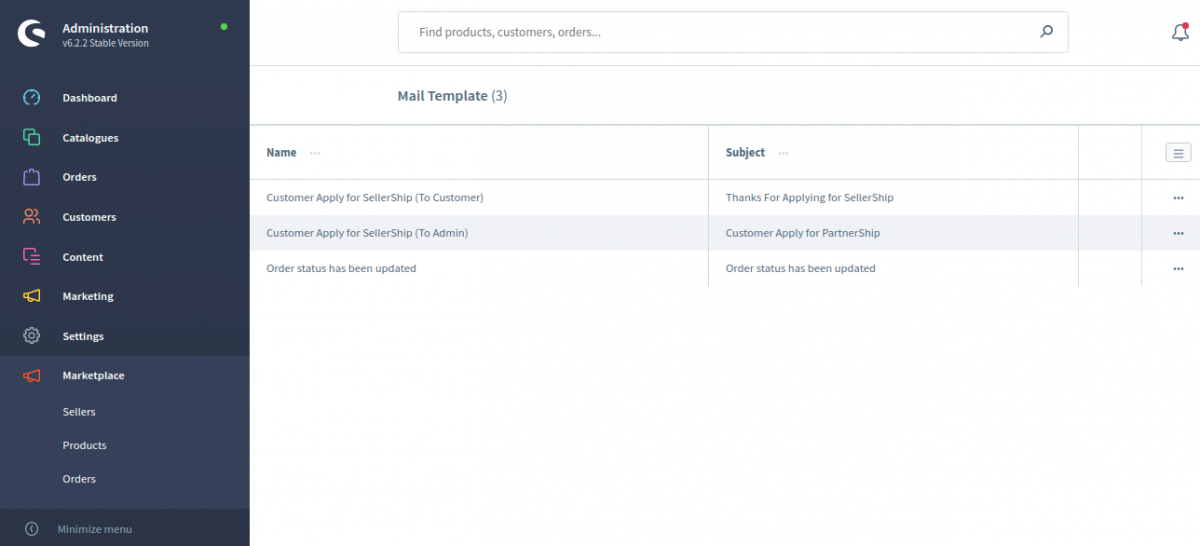
Mail Template
Under the mail section, the admin can create/delete the Mail messages for the defaultconditions of the Marketplace, the admin can set the mail for different conditions that will occur in the marketplace.
This mail will come only when anyone installs the plugin, it can be edited by admin and can be saved. Also when a customer will become a seller, then a mail has sent to the admin and seller both.
When a seller change the order status, then a mail automatically sent to the customers.
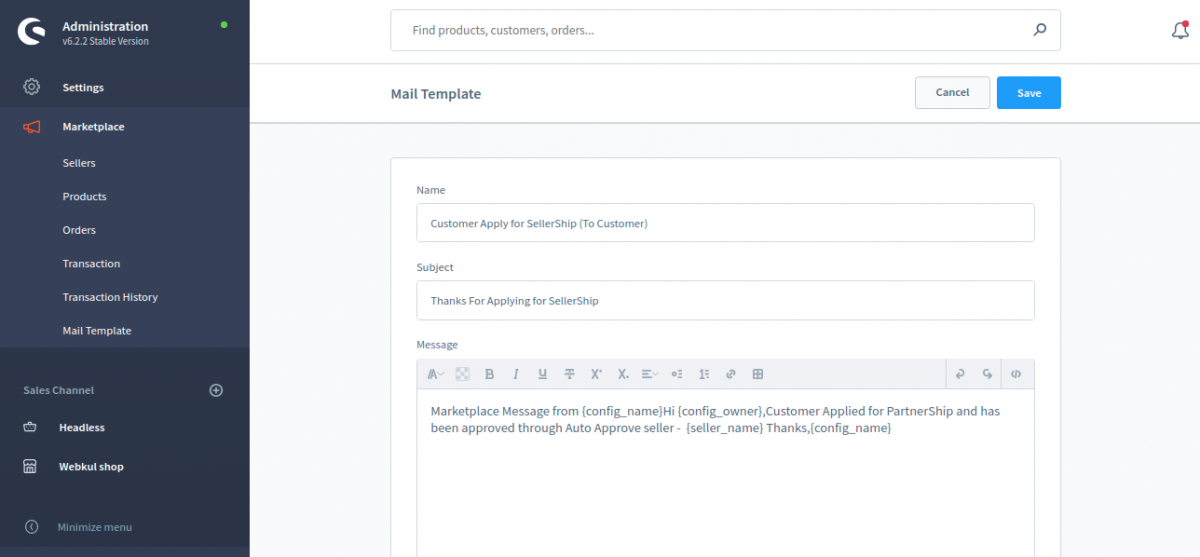
Admin can click on the edit (…) button on any mail. In this page, the admin can change the mail templates.
Shopware Multi-Seller Marketplace Front-end
After the installation of the Shopware6 multi-seller module, there will be an icon “Marketplace” on the right side of the screen.
The customer can click on the Marketplace Sellers icon under the Marketplace. After that, the customer will be able to see all the marketplace sellers registered at the marketplace.
The customer can see the details of the seller after clicking on the seller profile.
Here the customer can see the seller details like these:
About – Here the customer can check about the seller.
Products – Here the customer can see the seller products and details.
Reviews – Here the customer can check the seller reviews.
The customer can also login to review the seller. The customer can enter these details:
Ratings – The customer can rate the seller in the marketplace.
Summary – The customer can also add a summary of the review.
Review – The customer can add a review of the seller.
Social Links – Here the customer can check the seller’s social media profiles.
Shopware Multi-Seller Marketplace Seller Login
The customer can register himself/herself at the Shopware multi-seller marketplace after clicking on the Register button at the front-end. If the customer already registered at the Marketplace then he/she can click on the login button.
After clicking on the “Register” Button the customer can see the registration page. Here the customer can enter his/her details.
The customer can become the seller after selecting the “Yes” option in the “Select “Yes” if you want to become a seller and sell your products on the store.“.
After the registration, the seller can log in to the Shopware multi-seller Marketplace.
After the login, the seller can see these seller’s options.
Add Products
Your profile
Your orders
Marketplace Sellers
Your Products
Marketplace Dashboard
After login, the Marketplace dashboard will appear as shown in the below snapshot.
After clicking on the dashboard, the seller can see the complete statistics for his store account. The seller can see the –
Pending orders quantity
Number of orders in process
Complete orders quantity
Number of order canceled
Moreover, the seller can also see the following details like:
The total number of orders that have been placed by the customers.
The total number of Turnover
Total number of logged-in Buyers,
Low Stocks
Your Profile –
The seller profile displays critical information about the seller. After the registration, the seller needs to complete the seller profile. The seller can manage the profile under “Seller Profile”. The seller has to enter these details.
Once the seller enters all the details in the profile, the user can access it from the product page.
Store Logo
Store Banner
Social links
Store Owner
Store Slug
Owner Name
Store Title
Store Description
The seller profile and rest of the pages will be display on front-end as below images:
Add Products –
The seller can add the product at the Marketplace. The seller has to enter these details to create the products.
Product name
Price
Product Number
Product Stock
Description
Product Tax
Product Manufacturer
Media Files
Product categories
After saving the products, the seller can see the products in the marketplace seller’s products grid.
Your Products –
Taping the Add Products menu option brings up the section to add the products. Here the seller can easily add in his products. The seller can see all the products created by him/her.
For delete the product, seller can click on the particular product and delete it.
The seller can add a new product here and also edit the product. To edit the product, the seller has to click on the “Edit” button. Here the seller can see the options.
Update Product – Using this option, the seller can update the created products.
View Product – The seller can click on the “View Product” to check the product on the product page. On the product page, the seller can also see his/her details.
Variant Generator – The seller can add/generate the variant of the product here.
For creating the variant, the seller can select the “Product Groups” after that the seller can see the seller group option for creating the product variant.
For example: If the seller will select the “Colour” product group then he/she will be able to see the “Group Options” like “Green”, “White”, “Blue”.
After that, the seller can click on the “Update Variant” to generate the variant products.
Here the seller can edit the details of the variant products –
Price – The seller can change the price of each variant product.
Stock – The seller can change the stock of each variant product.
The seller can click on the “Update” button to update the variant products. The seller can also delete the variant product. After the changes, the seller can see the product at the front-end like this.
Your Orders –
Now, clicking the Orders menu option will bring up the section to view all the orders that have been placed for this Sellers products. The seller can see these order details:
Date – The seller can see the product order date by the customer.
Order Number – The seller can check the order number.
Order Status – The seller can check the order status.
Payment Status – Ther seller can check the payment status like open/closed.
Action – The seller can perform the action View and Hide the order details.
Clicking the “Order” link under the column View will allow the seller to view the complete order details.
Customer name
Customer email
Payment Method
Shipping Method
Commission Amount
Seller earnings
Total amount
Marketplace Sellers –
With this option, the seller can check all the registered sellers and his/her details in the marketplace.