case 'html':
    return Isotope::formatPriceWithCurrency($product->getPrice()->generate());
fritzmgvor 1 Jahr Oder das vielleicht sogar als default case benutzen. Dann kann man {{product_price}} schreiben und es wird automatisch die HTML Ausgabe für das aktuelle Produkt generiert.
#2140 Neue Felder fehlen nach Update im Child-Theme (Theme-Duplikat)
Derzeit werden in Shopware 6 neue Konfigurations-Felder von Themes bei einem Plugin-Update nicht in Child-Themes übernommen. Dies können wir technisch leider nicht ändern da die Ursache hierfür im Shopware-Core liegt. Wir haben dazu bereits e…
Shopware Issuetracker
Shopware Issuetracker
Shopware Issuetracker
Shopware Issuetracker
[expand title=“mehr lesen…“]
Shopware Child-Theme Problem
Derzeit werden in Shopware 6 neue Konfigurations-Felder von Themes bei einem Plugin-Update nicht in Child-Themes übernommen. Dies können wir technisch leider nicht ändern da die Ursache hierfür im Shopware-Core liegt.
Bis Shopware das Problem gelöst hat, haben wir nachfolgend einen kleinen Workaround für Dich verfasst. Dieser Workaround kann jedoch nur für Shopware On-Premises genutzt werden.
Um das neue Feld bzw. die neuen Felder auf das Child-Theme zu übertragen ist eine kleine Modifikation der Datenbank notwendig. Im folgenden zeigen wir Dir in 8 Schritten wie Du das Feld bzw. die Felder ganz einfach selber ergänzen kannst.
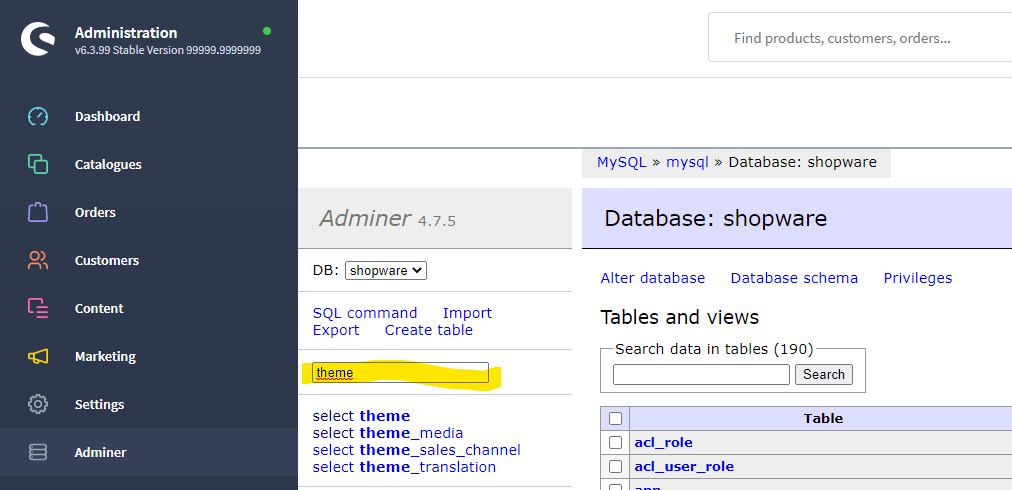
Tipp: Wir nutzen dafür das kostenlose Plugin „Adminer für das Admin„. Damit erhält man in der Shopware-Administration einen direkten Zugriff auf die Datenbank.
Schritt 1)
Im Suchfeld grenzt Du die Tabellen mit „theme“ auf den Bereich Themes ein:
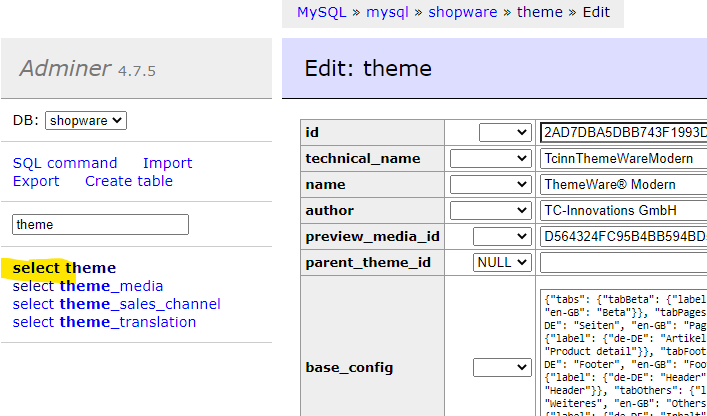
Schritt 2)
Mit „select“ für die Tabelle „theme“ gelangst Du auf eine Übersicht aller installierten Themes:
Child-Themes erkennst Du daran, dass Sie keinen „technical_name“ haben.
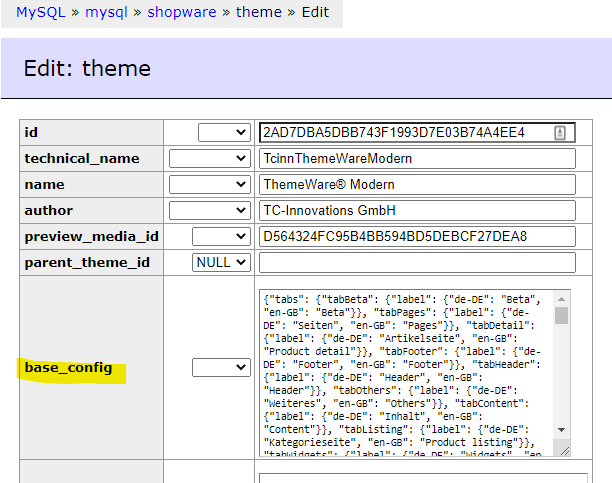
Schritt 3)
Zuerst editierst Du das Parent-Theme (in unserem Beispiel „ThemeWare Modern“):
Schritt 4)
Kopiere den Inhalt der Spalte „base_config“:
Schritt 5)
Wechsel mit „select“ für die Tabelle „theme“ wieder zurück auf die Theme-Übersicht:
Schritt 6)
Editiere nun das Child-Theme:
Schritt 7)
Leere hier das Feld „base_config“ komplett und füge die kopierte Konfiguration aus dem Parent-Theme ein und speicher die Änderung mit „Save“:
Schritt 8)
Zum Abschluss öffne die Konfiguration des Child-Themes im Theme-Manager. Das fehlende Feld bzw. die fehlenden Felder sollten jetzt konfigurierbar sein. Speicher und kompiliere das Theme einmal neu, damit die Änderungen in der Storefront wirksam werden.
Gekaufte Shopware Templates installieren und individuell anpassen
Gekaufte Shopware Templates installieren und individuell anpassen
Mit den Shopware Templates im Community Store gibt es eine kostengünstige Alternative den eigenen Shop individueller zu gestalten. Besonders beliebt ist z.B. das Responsive Template von Conexco. Das Template nutze ich in einigen Shops als Grundlage für weitere indviduelle Designanpassungen. Vorteile
Mit den Shopware Templates im Community Store gibt es eine kostengünstige Alternative den eigenen Shop individueller zu gestalten. Besonders beliebt ist z.B. das Responsive Template von Conexco. Das Template nutze ich in einigen Shops als Grundlage für weitere indviduelle Designanpassungen. Vorteile sind z.B.:
Optimierte Darstellung für mobile Endgeräte
Kompatibel mit den Shopware Einkaufswelten
Kompatibel mit einigen Drittanbieter-Plugins
Kompatibel mit Shopware Premium Plugins (Live-Shopping, Bundle, Bonus-System, etc.)
Ständige Weiterentwicklung und Optimierung
Gerade die Unterstützung der Einkaufswelten und Plugins ist keine Selbstverständlichkeit und sollte vor dem Kauf eines Templates überprüft werden. Ansonsten könnten zusätzliche Kosten entstehen, wenn ein Plugin nicht funktioniert oder die Darstellung fehlerhaft ist. Die meisten Plugins werden nämlich nur für das Standard-Template von Shopware entwickelt, da der Entwickler das verwendete Template ja nicht kennt.
[expand title=“mehr lesen…“]
Installation und Aktivierung von gekauften Templates
Gekaufte Templates werden über den Shopware Community Store geladen und über den Plugin-Manager installiert. Die Aktivierung hängt vom verwendeten Template ab. Entweder muss das Template im Plugin aktiviert und konfiguriert werden oder es erscheint ein neuer Menüpunkt unter Einstellungen. Infos dazu findet man meist in der Dokumentation vom Template.
Nachdem ein Template installiert und konfiguriert wurde, sollte der Shop-Cache gelöscht werden, damit keine zwischengespeicherten Ansichten angezeigt werden.
Individuelle Anpassungen beim gekauften Template
Die original Template-Dateien sollten nicht verändert werden, da die Anpassungen beim nächsten Update garantiert überschrieben werden.
Um ein Template updatesicher zu verändern, erstellt man in dem Order „templates/_local“ eigene Template-Dateien und überschreibt oder erweitert so das Design des aktiven Templates.
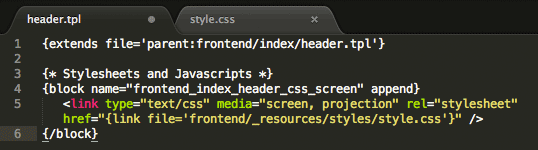
Beispiel 1 – Eigene CSS-Datei integrieren
Schritt 1: Datei „header.tpl“ im Order „templates/_local/frontend/index/“ anlegen. Die Ordner „frontend“ und „index“ müssen auch angelegt werden, sofern nicht vorhanden.
Schritt 2: Folgenden Quellcode in die Datei „header.tpl“ einfügen. Dadurch binden wir die CSS-Datei „style.css“ in das Template ein.
Schritt 3: Datei „style.css“ im Order „templates/_local/frontend/_resources/styles“ anlegen. Die Ordner „_resources“ und „styles“ müssen auch angelegt werden, sofern nicht vorhanden.
Schritt 4: Eigene CSS-Styles in der Datei „style.css“ einfügen.
Schritt 5: Shop-Cache leeren, damit die Änderungen sichtbar werden.
[/expand]
shopware 6 storefront
shopware 6 storefront
All you need to know about the new Shopware 6 storefront
Taking new paths means adjusting to new opportunities! It means critically examining long-standing approaches, thinking outside the box…
[expand title=“mehr lesen…“]
All you need to know about the new Shopware 6 storefront
Taking new paths means adjusting to new opportunities! It means critically examining long-standing approaches, thinking outside the box and trying out new things. The experience gained from previous versions, in particular, allows developing a software solution in a sensible way to meet the changing requirements of an already fast-moving market. Otherwise, a system risks turning into a dusty monolith.
Shopware 6 has a lot of thought put into it, leaving much room for new things. Since Shopware is not only a software solution for users but also a sort of framework for developers, the requirements and needs of the developer community are also an important topic for further development.
While the lion’s share is under the surface, as is so often the case in the software business, and is usually hidden from the majority of people’s eyes, e-commerce is also about the design, the look & feel, the performance, etc. — a good reason to break new ground with Shopware 6 also in the frontend!
Shopware 6 is based entirely on the tried-and-tested PHP framework called Symfony. Considering the above, it makes perfect sense that the Twig template engine, also developed by SensioLabs, has found its way into software, replacing the previously used Smarty. But standardisation doesn’t stop here — on the contrary!
A Bootstrap CSS framework instead of in-house development, Sass instead of LESS, object-oriented JavaScript (ES6), Webpack… the list is long and so are the resulting advantages and changes.
Keep reading to find out what changes you can expect and what is important in the Shopware 6 storefront.
Martin Schindler, BSc in Computer Science (Software Architect at dasistweb GmbH)
The components of the Shopware 6 storefront
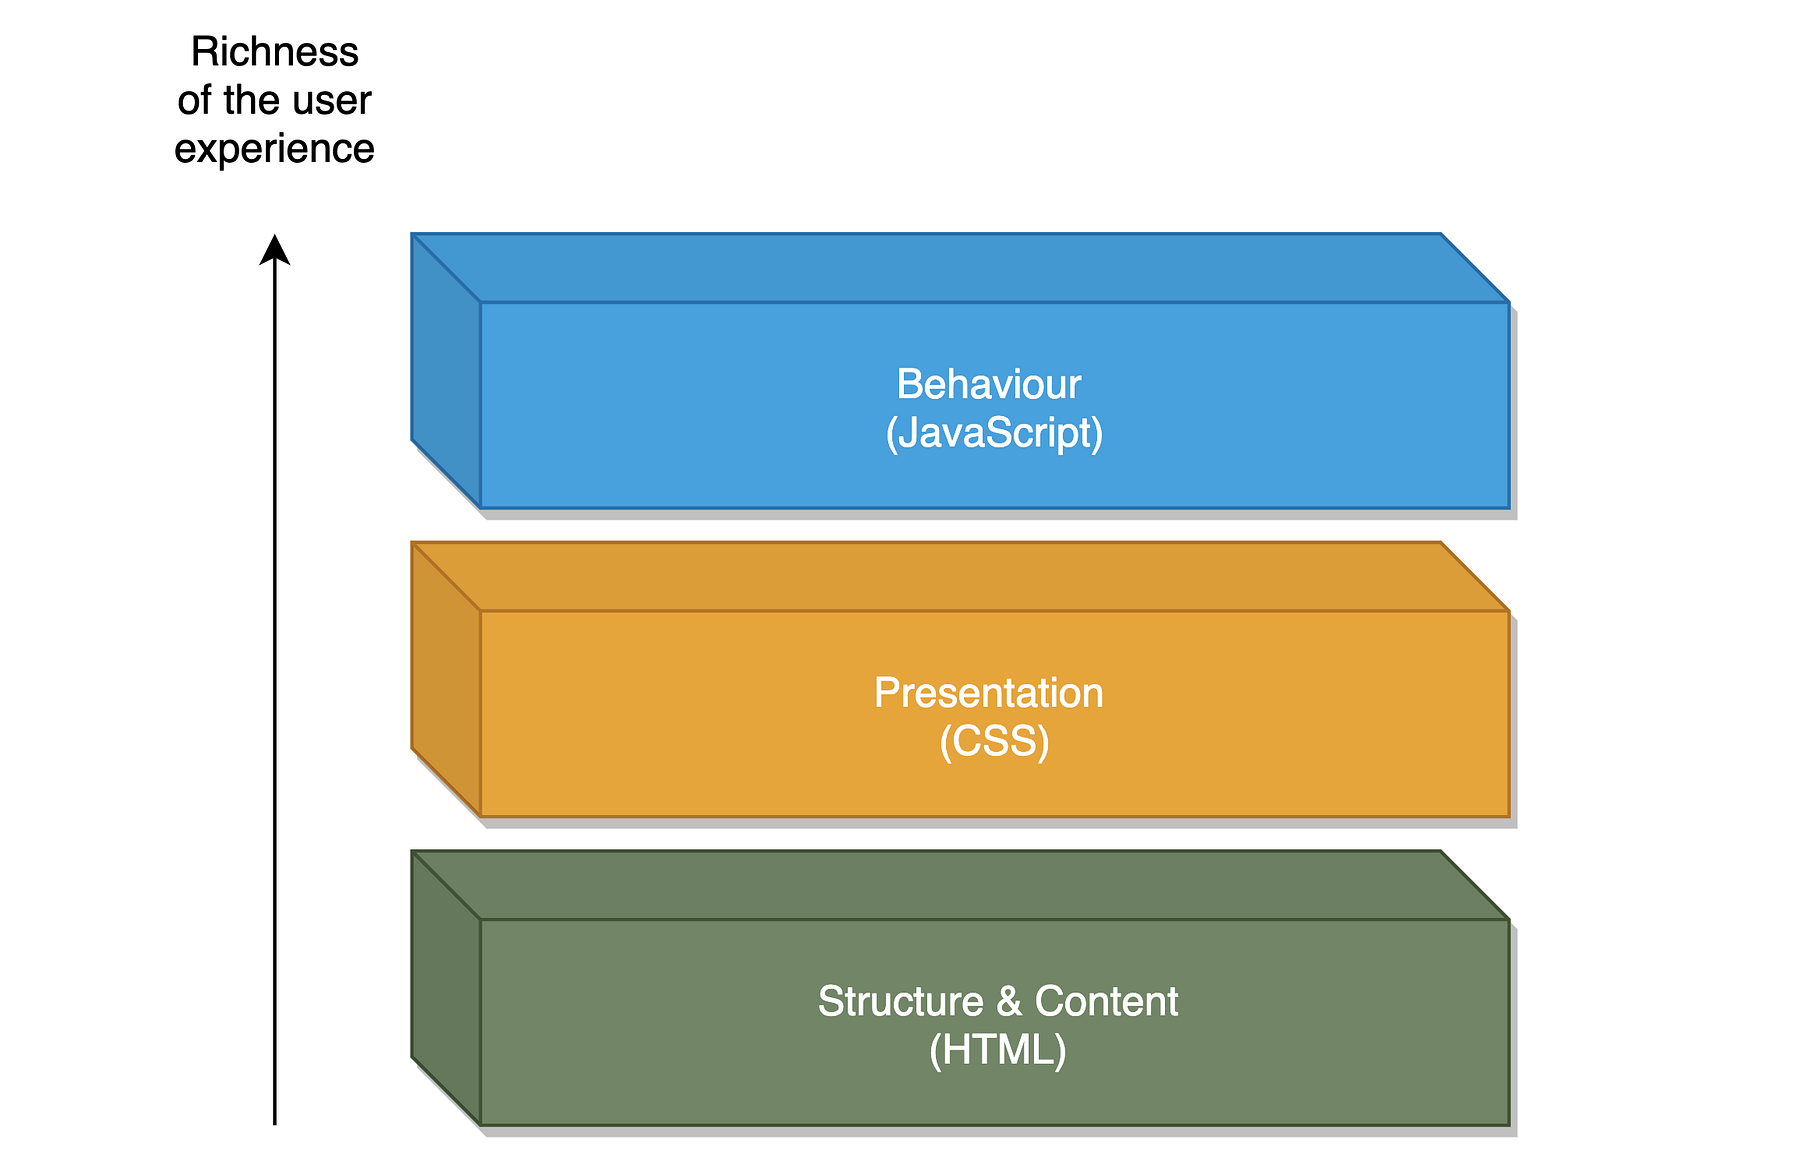
In order to understand the bigger picture, you often have to take a look at the individual components and how they interact first. For this reason, we are going to examine the individual building blocks of the new storefront, starting with the three elementary layers of a web-based application and the new tools and standards used. I will try to make references to the various counterparts from Shopware 5, to help you better understand why some things suddenly run differently than before.
The three typical layers of a web application
Structure layer (structure & content)
The foundation of a web frontend is the structure layer — in its simplest form consisting of static HTML markup, divided into logical or content-related sections. In order to meet increased technical requirements, “template engines” are used that take over the rendering of HTML markup with the help of templates. This is nothing new for anyone who has already worked with an earlier version of Shopware.
What is new, however, is that from now on Twig will be deployed as the template engine, whereas Smarty was used in previous versions including Shopware 5. Also provided from the makers of Symfony, it is a purely logical conclusion for reasons of integration and interoperability in the Symfony cosmos alone. Without going too much into the details, Twig is considered one of the fastest, safest and most flexible of the established PHP-based template engines on the market.
And again: new (or better “different”) technologies come with an initial hurdle — the syntax in Twig, for example differs from the well-known Smarty syntax. Useful information on how to use Twig, its features, extensibility and coding standards can be found in the official documentation.
The most important aspects of working with Twig in the storefront
Debugging — A simple var_dump on an object in the view could bring Smarty to its knees. With Twig, things are completely different — fortunately! Thanks to the integrated VarDumper component and Symfony’s DebugBundle, all variables in the storefront can now be output smoothly:
An additional priority was placed on the clarity of the debug output. Thanks to visual preparation, the confusing “print_r” output is now a thing of the past:
Scalar data types, arrays and objects can easily be debugged using {{ dump() }}
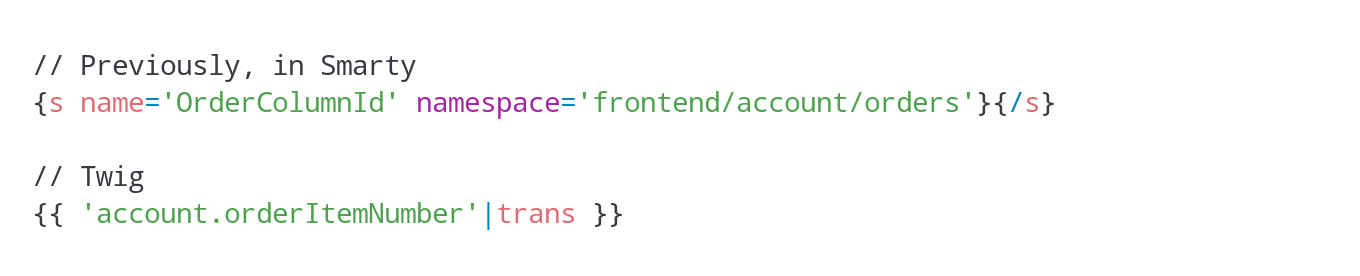
Text blocks — Text blocks have also been modified. While a specially developed snippet function was used and each text block was identified by a combination of name and namespace in the Smarty context, things now work slightly different in Twig:
Using the “trans” filter, which comes with Symfony and Twig by default, text blocks can be placed anywhere in the template and consumed from the underlying data source (e.g. messages.de.yaml for German text blocks, messages.en.yaml for English translations).
Extensions & include — Twig provides great technical solutions to ensure extensibility. The ability to extend the scope of functions through custom tags, filters, functions and tests by using a purely object-oriented approach and the possibility to perform unit tests on these is an attractive tool for implementing individual requirements, especially for projects in the enterprise sector.
By the way, this tool is also used by the new storefront. Since plugins and individual themes form a multi-level inheritance hierarchy that is not supported by Twig by default, the developers have implemented two Shopware-specific TokenParsers that are used in the storefront with the “sw_include” and “sw_extends” tags. These two should be used instead of the default “include” and “extends” tags, thus ensuring that template blocks can be overwritten, e.g. by plugins.
For example, if you want to have one view inherited from another, make sure to use “sw_extends”:
The same applies if you want to include a template file in a view. The “sw_include” tag should also be used in this case:
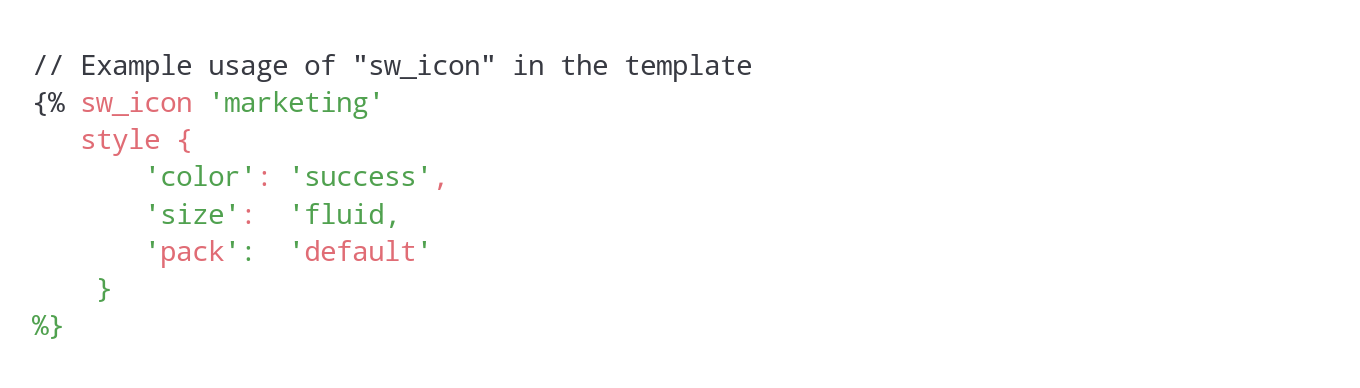
Icons & thumbnails — Of course, implementing little helpers to make daily working life easier for template developers is always a good idea. That is why “sw_icon” was created, allowing you to conveniently configure and load SVG icons:
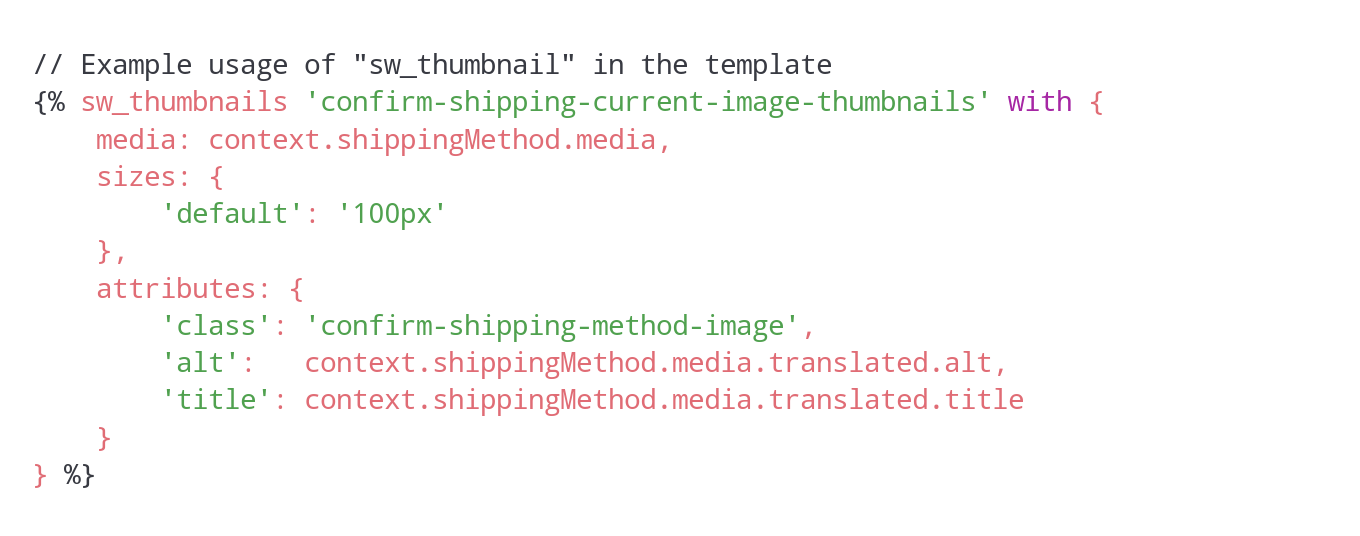
Using “sw_thumbnails”, which renders a <img> tag with correctly configured “srcset” and “sizes” attributes based on the provided parameters, is just as convenient:
Of course, the organisation of the Twig files in the storefront and their structure has somewhat changed compared to Shopware 5. However, there are no great technical intricacies here that would have to be explained in greater detail. So much for the structure layer for now.
Presentation layer
In today’s world, an online shop without a modern, user-centric look & feel has become unimaginable. The presentation layer allows us to bind the look of an application to HTML markup using CSS.
The rule of thumb here is: the more general the CSS definitions are, the more detached they are from the actual markup. The more specific they are, the faster changes in markup can lead to unwanted, visible side effects.
Since nowadays CSS is much more than just applying styles to selectors, CSS preprocessors have been in use for many years. These allow you to use syntactic rules and language constructs to make CSS creation more efficient.
To be more specific, a custom style sheet language extends the limited functionality of CSS through variables, functions, mixins and more. Since the browser can only process CSS, the generated files are pre-compiled by the preprocessor into valid CSS. This compilation is then loaded in HTML markup and interpreted by the browser.
Switching the preprocessor: from LESS to Sass
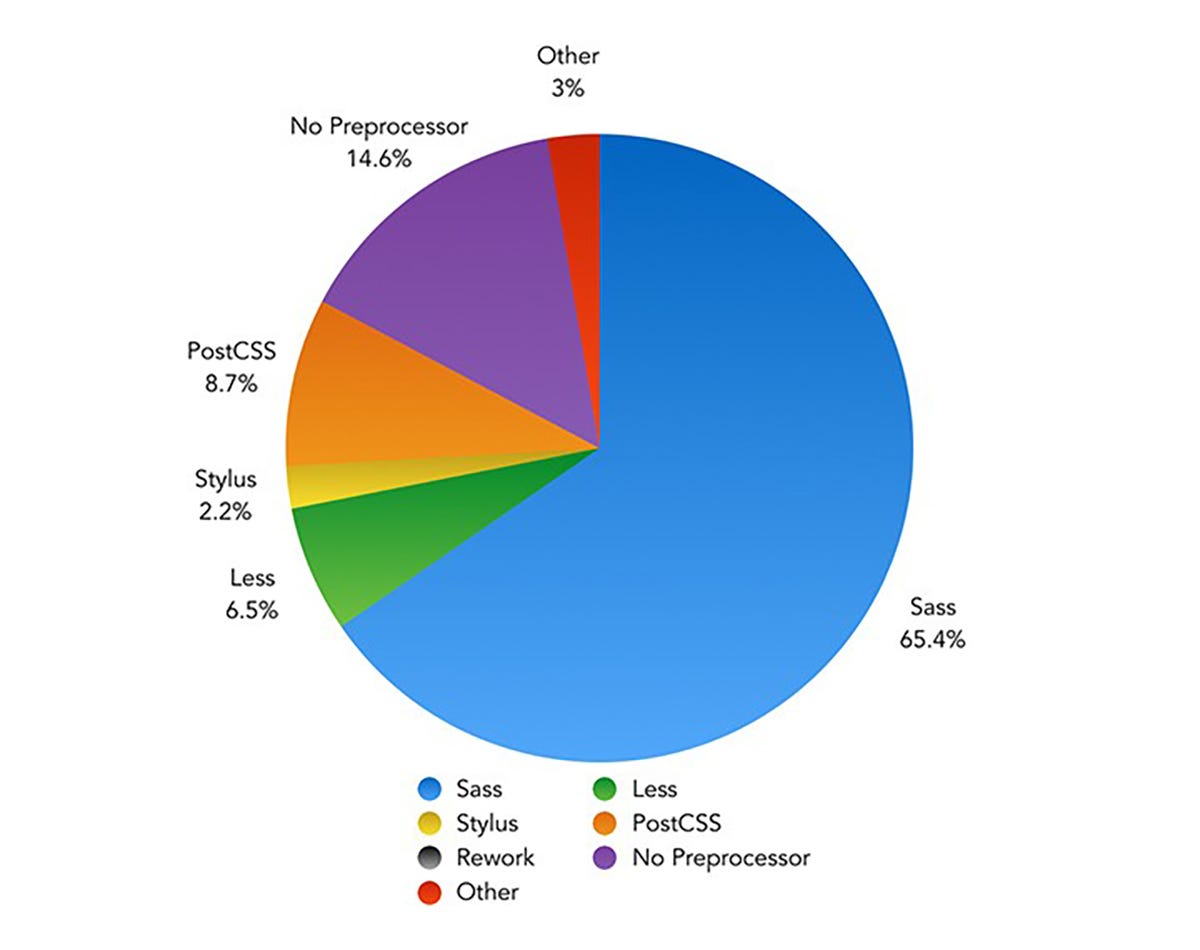
Anyone who has worked with Shopware 5 already knows the LESS style sheet language. With Shopware 6, a sensible switch to Sass has been made. When comparing frameworks, languages or tools, as usually, the devil is in the detail — the most famous CSS preprocessors (Sass, LESS, Stylus and PostCSS) differ about 20% from each other in terms of their functionality, and the remaining 80% are congruent. That is why, to claim that Sass is better, faster and cooler than LESS would be a purely subjective statement.
However, one criterion that speaks for the switch to Sass, and one that is not so easy to dismiss, is its widespread use. The diagram below shows the prevalence of various CSS preprocessors as determined by a survey. Sass clearly stands out from the competition:
Another argument for switching from LESS to Sass is the CSS framework. After comprehensive evaluation, the decision was made to use the established Bootstrap frontend CSS framework for Shopware 6 due to its similar market leadership compared to the alternatives available. With version 4 of the framework, source files are now written as Sass files (more precisely, using the SCSS syntax style for “Sassy CSS”, i.e. with the *.scss file extension). This is another aspect that strongly supports the switch to Sass.
Bootstrap 4: Taking advantage of source files
As mentioned above, the Bootstrap source files are available as Sass files. That’s why you can use the variables, mixins and functions defined in them for your own purposes. Information on which these are and how they can be used can be found in the official documentation.
Well, this is nothing really new here… after all, the already defined LESS constructs could be reused in Shopware 5. So, what exactly is the specific advantage for the new storefront?
Documentation of a de-facto standard — Instead of in-house implementations, the use of Bootstrap means that we relying, in a sense, on an already existing standard. Functions, mixins, etc. have already been tested thousands of times by the community alone, are regularly improved and extended, and are documented in detail. This is a circumstance that allows for rapid, targeted progress when making adjustments to the storefront.
Reduction to the essentials — Since many issues and problems (e.g. grid system, various components, browser-specific peculiarities, etc.) can already be considered addressed and solved thanks to the Bootstrap framework, the focus in the implementation of the new storefront is on what is really essential. By using the source files and also explicitly those components that are actually required in the storefront, the compilation, i.e. the CSS file created at the end, can also be reduced to the essentials. This, in turn, improves performance and the loading time of the storefront.
Keeping your SCSS DRY — DRY (Don’t Repeat Yourself) is a well-known paradigm of software engineering. It means that redundant code should be avoided or at least reduced.
Thanks to variables, mixins and functions as well as the ability to inherit from existing selectors (using the @extend command), definitions and constructs can be easily reused. Since Bootstrap brings along a large portfolio, new buttons, labels, notifications, grids, etc. can be created quickly and easily. This is a great advantage, especially if you need to quickly implement the rough structure of a view, but also, of course, when it comes to fine-tuning.
Extensibility — Thanks to the widespread use of Bootstrap, also in other web applications and systems, numerous third-party modules can already be consumed today and used for your own purposes in the storefront. Of course, certain necessary adjustments can never be avoided entirely. After all, the frontend is naturally very specific, or it depends on the respective project scope. However, in order to achieve success or even technical breakthroughs quickly, it is an essential advantage of using the Bootstrap 4 CSS framework in the new Shopware 6 storefront.
Corporate identity — Anyone who has already worked with Bootstrap knows that there are many variables that invite the user to create custom configurations. This way, you to make key adjustments in a central location, in order to adapt the entire look & feel to your needs. Thanks to the “!default” keyword variables within the Bootstrap source files, this is a pretty handy thing, especially with regard to the “skins” in the new storefront. The included “Shopware Skin” is a collection of SCSS files that is layered above the Bootstrap style sheet definitions, decorating the default theme of the new storefront in the Shopware CI. If it is not needed in a specific project, this skin can easily be removed or replaced by a custom skin.
Organisation is half the battle
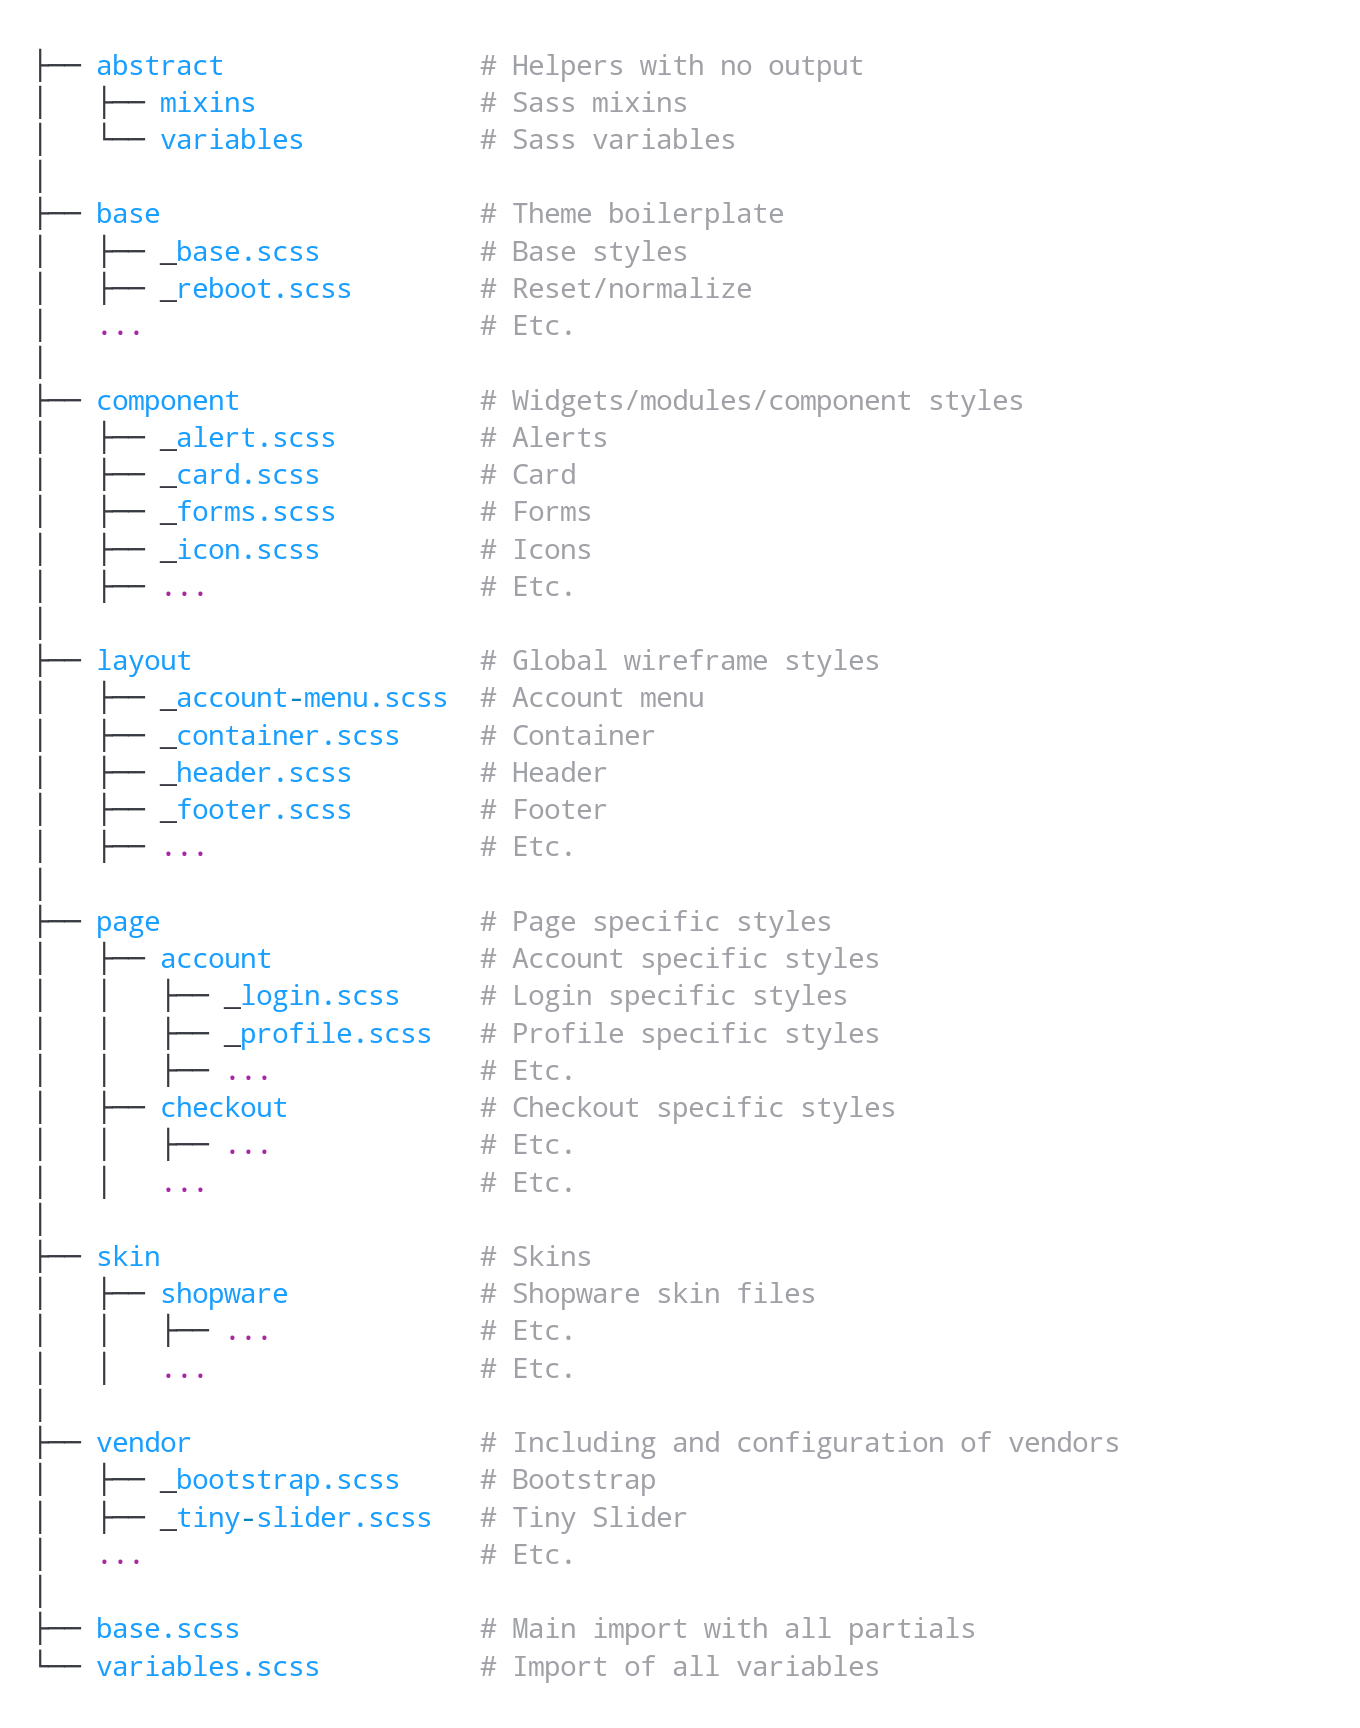
In order to structure the organisation of folders and files — an issue that is omnipresent in a software project — the new storefront basically follows the 7–1 pattern, an organisational pattern that has established itself in the Sass environment over time. Here, various responsibilities are logically categorised in seven separate sections (or folders).
The sample organisational structure of SCSS files below illustrates this categorisation of responsibilities:
This clear division not only allows for a clearer organisation of styles, it also reminds developers to be more conscious when making adjustments and to assign new files to the appropriate subject area in a more consistent manner.
Advice Components that are coupled rather loosely to other files can be easily migrated to other themes or even projects.
Behavioural layer
Last but not least, the structure and presentation layers are covered with the behavioural layer. This level offers everything users need for interactive operation. In the case of a web application, this is primarily done by the JavaScript (JS) scripting language.
In recent years, JS has aroused create interest in the programming world because the standardised ECMAScript language core, which JavaScript is based on, allows object-oriented code to be generated in a syntax similar to other class-based programming languages. This functionality is available as of version 6. And since the OOP-like syntax results in the use of principles found in software architecture (clean code principles, inheritance, composition, separation of concerns, etc.), the quality awareness in this area has also clearly changed for the better.
It quickly became clear that we will rely on ES6 and a class-based syntax for the development of the new storefront. This also led to the creation of various tools — i.e. helper classes — that take on a wide range of tasks in the new storefront. I would like to briefly highlight the most important ones below:
ViewportDetection — Whereas the “StateManager” was responsible for all sorts of things in Shopware 5, the Shopware 6 storefront is now equipped with a dedicated ViewportDetection class. In conjunction with CSS viewports provided by Bootstrap, this class allows you to react to the change of the viewport via specially created events:
In addition, there are separate events for each viewport and methods to restore the current viewport. It should be noted that this class deals exclusively with this issue (separation of concerns).
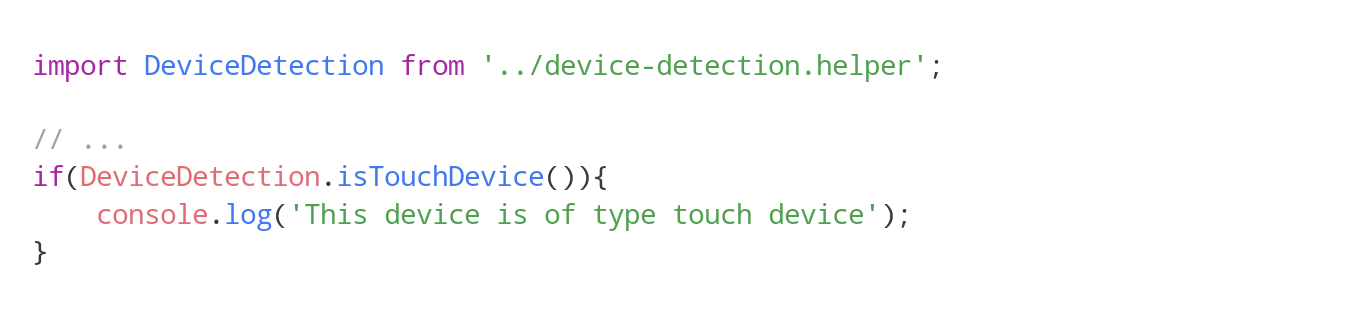
DeviceDetection — The DeviceDetection class, in turn, has the task of making Boolean expressions about the device used with the help of small, static functions. For example, if you want to find out whether the current device is a TouchDevice, you can do this easily as follows:
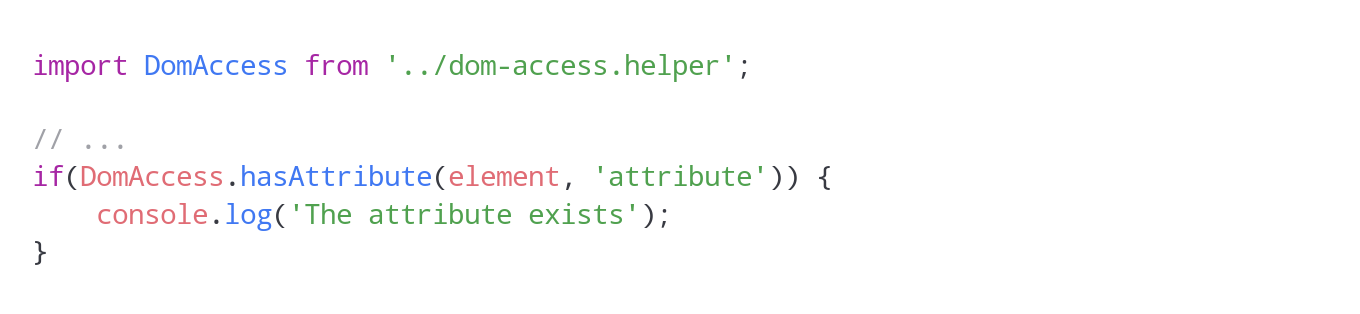
DomAccess — You want to quickly and reliably check whether a node element has an attribute? This is, among other things, the task of the DomAccess helper class. The class abstracts access to node elements, attributes and data attributes, and ensures that reliable results are returned.
Another example illustrates the additional convenience that this helper class provides. If you want to implement a class that should only be executed if the corresponding selector can be found as a condition in HTML markup, this can be done as follows:
An exception will be thrown internally if the specified query selector doesn’t return a result. This can then be responded to with try/catch. As a third optional parameter, it is also possible to switch off the strict mode so that a Boolean FALSE is returned if an element is not found. This makes checks for “!== typeof undefined”, etc. a thing of the past. Checking for “!== FALSE” will always be sufficient.
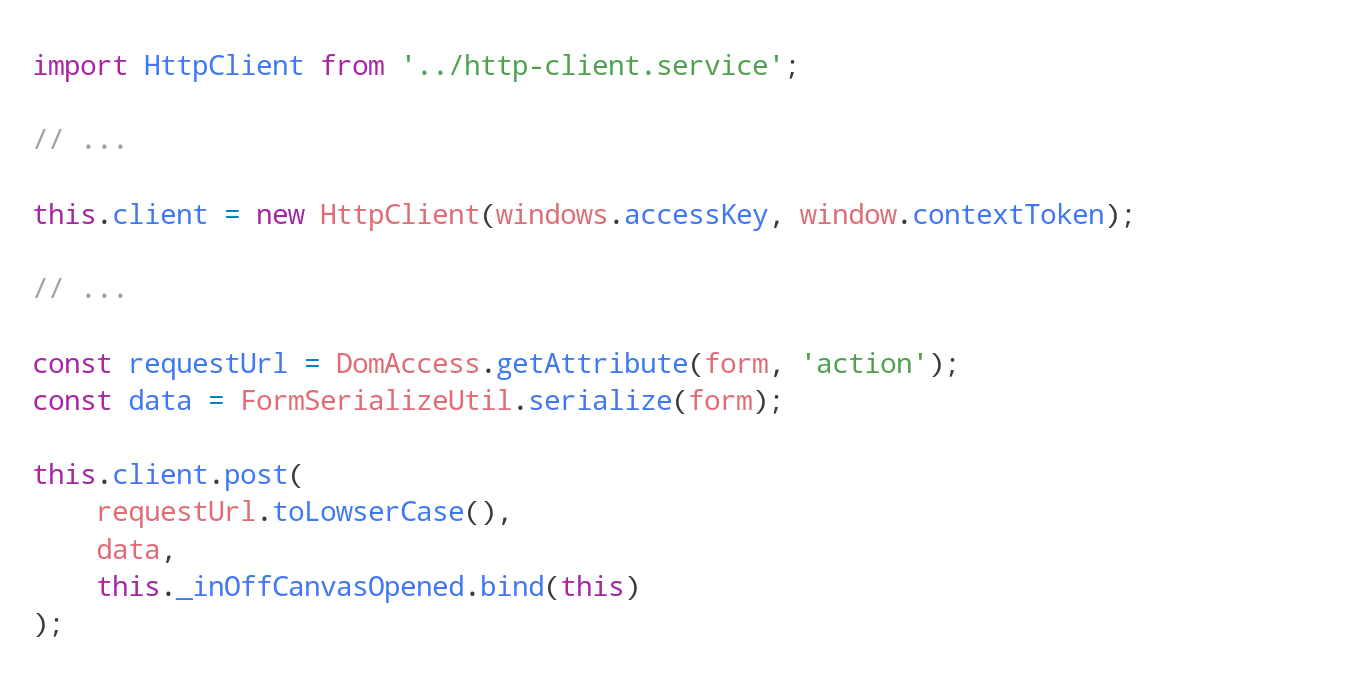
HttpClient — Anyone who has already worked with asynchronous requests in JavaScript knows what matters: cancelling existing, still active requests before placing a new one, using the correct request method, specifying callbacks, ContentType, and even setting access credentials using the new Shopware 6 API. Since all of this has now been moved behind an easy-to-use interface, the HttpClient class provides the basis for “easy-to-use” HTTP request handling without much overhead, as shown in the following extract:
Numerous other little helpers and features in the new storefront ensure a clear, modern JS code base that lets the developer achieve desired results quickly and adapt the functionality to his project-specific requirements.
Webpack module bundler
Finally, I would like to briefly touch on something that is essential for the use of the new technologies mentioned above from various points of view. While Grunt was still used as a task runner, e.g., to compile CSS and JS code in Shopware 5, Shopware 6 now comes with the Webpack module builder. International giants such as Airbnb, Trivago, Adobe, Slack and others have been relying on Webpack for some time now, and the module bundler has slowly but surely become a “state of the art” technology.
Thanks to Webpack, we can convert the JS code written in ECMAScript 6 into cross-browser-compatible JavaScript using the Babel compiler, for example. Moreover, thanks to numerous plugins and loaders, Webpack can handle the compilation of SCSS to CSS, the creation of browser-specific CSS instructions (autoprefixing), the minimisation of the compilations, etc.
This also opens up other opportunities that are particularly interesting for the enterprise sector. Just to venture a quick look into the future, Webpack allows realising “entry points” — small, bundled packages, so to speak, that only contain the code that is actually required for each view. This reduces unwanted side effects during customisation, the file sizes of CSS and JS compilations as well as the load for the client, i.e. the browser, because only the JavaScript is running that used in the context of the respective view. Of course, this is not possible without making further modifications. How these are implemented and the effort involved, however, will be explained in another article.
The fact that you have different requirements for the system environment in the development stage of a project compared to production mode can also be taken into account in the storefront area thanks to the flexible Webpack configuration. The available configuration files are:
webpack.base.config.js — contains the basic configuration that applies to all available environments
webpack.dev.config.js — contains the configurations that apply to Webpack in “dev” or “watch” mode
webpack.hot.config.js — configurations that explicitly apply to the built-in Webpack HMR mode
webpack.prod.config.js — a configuration specifically customised for production mode
The basic configuration and the specific configuration are merged for each set environment (dev|watch|hot|prod). This results in the final configuration of Webpack, which ultimately generates JS and CSS files, along with the necessary resources (fonts, images, etc.), which are pulled into the build folder and made available.
Detailed documentation is available on the official Webpack website and can be consulted for making your own adjustments.
Conclusion
Much has happened since Shopware 5. Some things have changed fundamentally to move with the times — to ensure more quality, more distinction, more possibilities — also in the storefront. This inevitably requires a certain degree of adjustment. However, it is the only way to bring Shopware 6 and the projects to be realised with it to a new level. The market is evolving, and so are the requirements. And the new Shopware 6 storefront gives you and your project all the options you need to continue to meet future needs.
Bachelor of Computer Science & Software Architect with a weakness for perfection and the awareness of human imperfection. Passionate mountain biker ????
Bachelor of Computer Science & Software Architect with a weakness for perfection and the awareness of human imperfection. Passionate mountain biker ????
Mit Shopware 6 wurde viel umgedacht, viel Raum für Neues geschaffen. Weil Shopware nicht nur eine reine Software für Anwender ist, sondern ebenso als eine Art Framework für Entwickler fungiert, sind auch die Anforderungen und Bedürfnisse aus der Developer Community ein wichtiges Thema bei der Weiterentwicklung.
Während sich der Löwenanteil wie so oft im Software-Business unter der Oberfläche befindet und sich zumeist den Blicken der Mehrheit entzieht, dreht sich im E-Commerce vieles aber auch um Optik, Look & Feel, Performance und Co. …Read more · 14 min read
Assume there is a new feature you are about to develop for your project or your customer’s wish. There are plenty of different ways how to deploy your code, how to handle several versions or to keep quality by using code analysis tools, for example. Deployment pipelines (CI/CD) allow you to take your brand new feature live. And in case of emergency they will easily let you rollback to previous state. But what if your feature requires changes to your database’s schema or data?
This is why “migrations” exist. Migrations are a concept or even more an additional functionality put on top of the database abstraction layer (DBAL) and object-relational mapping (ORM). It allows you to implement a some kinda “versioning” for your database schema and even your data itself. …Read more · 5 min read
This is the story of my good old friend, let’s call him John. He is software developer with body and soul. And he’s smart, of course he is! John is able to solve almost all the tasks assigned to him. But John also has a dark side… cleanliness is not his key strength. And I’m neither talking about he wouldn’t follow the company’s clean desk policy nor about his personal hygiene. Not at all! He is pretty messy about his work. Unfortunately! Because…
Not infrequently, unclean work leads to long-term errors. As always when talking about software, the biggest part lies beneath the water surface. No matter if it is complexity, the LOC (lines of code) itself or even the riskiest parts of its business logic. …Read more in The Startup · 9 min read
As you might know there is a bunch of loosely typed programming languages like PHP, Perl or JavaScript. Even if there might be tons and tons of questions and answers to talk about regarding this topic, this article is not about strong or weak typing, implicit or explicit type casting or anything like that.
This article is about non performers, average performers and top performers… about professionals and those who think they ‘d be… about programmers like you and me, no matter if you are novice or expert.
While being a web developer focusing on frontend development and my years as a software engineer for PHP based applications as well as an architect designing software and reviewing millions of lines of code I was in the happy position to gain lots of experience about how programmers develop. Some bloom over the years like a delicate plant. Others stand up, say “hi” and immediately brighten the room. It is so dependent on a variety of extrinsic and intrinsic influences, I could talk years about. …
[/expand]
Shopware 6 Storefront-Templates
Shopware 6 Storefront-Templates
Shopware 6: Templates
Twig templates in the Shopware 6 storefront
shopware/platform
Shopware 6 is an open source eCommerce platform realised by the ideas and the spirit of its community. – shopware/platform
[expand title=“mehr lesen…“]
Templates
The storefront theme is using Boostrap. Therefore the template structure is a derivative of the bootstrap starter template. The templating engine used is Twig. For styling SASS is used as CSS preprocessor. The bundling and transpiling of the javascript is done with Webpack.
block, element, sectionParts of the experience worldscomponentShared content templates form the basis of the pages.layoutLayout templates. Navigation, header and footer content templates are located here.pageThe concrete templates rendered by the page controllers. This directory contains full page templates as well as private local includes and the pagelet ajax response templates if necessary. utilitiesTechnical necessities used across the content and across all domain concepts.base.html.twigBase page layout of the storefront. This file mainly includes header and footer templates from /layout and provides blocks for the /page templates to overwrite.
Page templates
The page directory contains the entry points which are referenced by page controllers and rendered through the Twig engine. The structure is derived from the page controller naming.
Inside the directories are the actual templates rendered by the storefront. The inner structure depends on the domain context.
Override and extend templates
Due to the plugin and theme system in shopware it is possible that one storefront template gets extended by multiple plugins or themes, but Twig does not allow multi inheritance out of the box. Therefore we created custom twig functions sw_extends and sw_include, that work like twigs native extends or include, except that they allow for multi inheritance. So it is really important to use the sw_extends and sw_include, instead of the native extends and include.
sw_extends
To inherit a template file, you need to use {% sw_extends %}.
Example:
{# YourPlugin/Resources/views/storefront/layout/header/logo.html.twig #}

{% sw_extends '@Storefront/storefront/layout/header/logo.html.twig' %}

{# Add an <h2> with underneath the logo image block #}
{% block layout_header_logo_image %}
    {{ parent() }}
    <h2>Additional headline</h2>
{% endblock %}
sw_include
If you build your own feature and you need e.g. an element to display the price of the current product you can include existing partials with sw_include like this.
Example:
{# MyPlugin/Resources/views/storefront/page/product-detail/index.html.twig #}

<div class="my-theme an-alternative-product-view">
    ...

    {% block component_product_box_price %}
        {# use sw_include to include template partials #}
        {% sw_include '@Storefront/storefront/component/product/card/price-unit.html.twig' %}
    {% endblock %}

    ...
</div>
Inheritance order
The order of the inheritance is determined by the order you set in the theme.json of your active theme.
Styles Top Level
The stylesheets are written in SASS. The organization is inspired by the 7-1 pattern structure.
The base.scss is the global include file which references styles that are written as an extension of the bootstrap base. For further information just take a look at the excellent description at sass-guidelines.es.
Scripts Top Level
The storefront includes a set of JavaScript plugins providing different functionalities to the storefronts templates on the client side. The plugins are written as ES6 classes in vanilla JavaScript. Additionally since bootstrap is distributed with the jQuery library the storefront also contains this library.
The filter can be found in /src/Storefront/Framework/Twig/Extension/SwSanitizeTwigFilter.phpExamples:{{ unfilteredHTML|sw_sanitize }}Uses the default config{{ unfilteredHTML|sw_sanitize( {'div': ['style', ...]}, true ) }}allow only div tags + style attribute for div
[/expand]
Theme Mars – Flat Responsive Template
Theme Mars – Flat Responsive Template
Theme Mars – Flat Responsive Template
Version
Preis
Kaufversion
€ 299,00
Mietversion
€ 29,90
Testversion
Bundles
Starterset für Theme Mars Mit den Plugins: „Bildvorschau im Listing bei Mousehover“, „Erweitertes Menü Professionell“, „Infoseite für deaktivierte Artikel“ und „Theme Mars“ schaffen Sie die perfekten Voraussetzungen für einen neunen Start Ihres Shops 399,99 € * Statt 458,80 € *
„Theme Mars“ ist ein modernes Full Responsive-Template, konzipiert und entwickelt im modernen und trendigen Flat Design. Es ist ein Template, für jede Art von Shops, wie z.B.: Modedesign, Elektronik, Sport, Möbel und Bekleidung. Das Template enthält zusätzlich verschiedene Erweiterungen aus dem Hause „CoolBax“, welche sich auch alle optional an/abschalten lassen. Durch nachhaltige Programmierung und durch den strengen Einhalt der Shopware Konventionen ist hier ein hoher Qualitätsstandard garantiert.
Viele neuen Features, Erweiterungen und Verbesserungen sind ab der Version 2.5.0 hinzugekommen. Die Erstellung eines individuellen Templates ist nun noch einfacher, geht scheller und Sie sind unabhäniger von Agenturen!
NEU: Wählen Sie aus 16 Schriften die zwei Schriftarten
NEU: Globaler Benachrichtigungstext für z.B. Urlaubshinweise
NEU: Widget für die rechte, linke und unteren Bildschirmrand
Anbindungsmöglichkeiten an Google, Bing, Alexa und Pinterest
NEU: Einbindung eines Hinweistextes zu den Datenschutzrichtlinen
NEU: Erweiterte Farbeinstellung sowie Hintergrundbild möglich
Integration des Plugins: Breadcrumb Erweiterung (zum Plugin)
Integration des Plugins: Sticky Menü Professionell (zum Plugin)
Individuell konfigurierbare Top Bar
NEU: Logo Größe für Desktop, Tablet & Smartphone ändern
NEU: Kategorie Text über oder unter dem Listing anzeigen
NEU: Kategorie Banner über Sidebar und Listing anzeigen
NEU: Verschiedenen Animationen der Artikelbilder im Listing
NEU: Einblendung Promotion Boxen über und unter der Sidebar
Individuelle Anordnung der Filter und automatisches absenden
Anzeige des Lieferstatus schon im Listing
Erweiterte Konfigurationsfelder in dem Kategorien Modul
NEU: Einbindung Infobox, wenn Variantenauswahl pflicht ist
NEU: Einblendung der Bewertungen neben Artikelbeschreibung
Deaktivierte Varianten werden grau dargestellt
NEU: Erweiterung des Footers bis vier Zeilen und 9 Layouts möglich
25 Zahlungsarten und 13 Versandarten Icons verfügbar
NEU: Im Offcanvas Warenkorb können Banner hinterlegt werden
NEU: Neues Element in den Einkaufswelten „Banner-Zoom“
Einkaufswelten: Full-Width oder Boxed Layout mischen
100% Full Responsive
3 vorgefertigte Farbtemplates auf Wunsch auswählbar
Modernes und klares Design
Support & regelmäßige Updates
und sehr viel mehr…
Individuelle Gestaltung mit wenigen Klicks
Bestimmen Sie das Aussehen mittels über 100 Farbbereichen
Gestalten Sie Ihren Shops mit einem Hintergrundbild
Erweitern Sie den Footer um weitere drei Zeilen
Wählen Sie aus 16 unterschiedliche Schriftarten aus
Stellen Sie die Größe Ihres hinterlegten Logos individuell ein
Das „Theme Mars“ zeichnet sich durch sein professionelles Design und seine sehr anwendungsfreundliche Bedienung aus. Es lässt sich komplett ohne Programmierkenntnisse anpassen, wodurch jeder die Möglichkeit hat, seinen Shop individuell und einzigartig zu machen.
Umsatzfördernde Plugins und Featuers integriert
100% Responsive – Für alle Endgeräte otimiert
Weiterentwicklung und Updates des Templates
Nach Shopware Vorgaben entwickelt
Ausführliches Handbuch zum Theme
23 kostenlos enthaltene Plugins, welche Sie nicht verpassen sollten!
Dieses Theme bietet Ihnen nicht nur ein einzigartiges Layout für Ihren Shop, sondern enthält auch 22 kostenlose Plugins. Mit ihnen haben Sie zum einen die Möglichkeit ihren Shop individueller zu gestalten und wichtige Informationen (z.B. Versandverzögerung durch Betriebsurlaub) an den passenden Stellen auszugeben, zum anderen können Sie noch mehr Werbefläche nutzen (z.B. Promotion Boxen). Diese Plugins finden Sie teilweise nur in unseren Themes und sind nicht im Shopware Store käuflich zu erwerben.
Allgemeine Einstellungen
1. Schriftart: Sie haben hier die Möglichkeit zwei verschiedene Schriftarten zu nutzen. Die primäre Schriftart wird für Überschriften genutzt. Mit der sekundäre Schriftart ändern Sie alle anderen Texte, wie z. B. Beschreibungstexte und Menüpunkte.
2. Globaler Benachrichtigungstext: Am oberen oder unteren Bildschirmrand wird ein globaler Text für Ankündigungen (z.B. Betriebsurlaub oder Verkaufsaktionen) angezeigt.
3. Sidebar Widget: Am linken oder rechten Bildschirmrand wird eine Box für z. B. Informationen oder Werbeaktionen angeheftet. Die Box bleibt beim Scrollen immer an der gleichen Stelle.
4. Footer Info Widget: Im unteren Bildschirmrand kann eine Box mit z. B. Ihrer Service Hotline angeheftet werden. Die Box bleibt beim Scrollen immer an der gleichen Stelle.
5. Webmaster-Tools HTML-Tag Code: Behalten Sie mit diversen Tool von Google, Alexa, Bing oder Pinterest Ihre Webseite im Blick.
6. DSGVO Datenschutz Erweiterungen: An allen Stellen die personenbezogene Daten verarbeiten, sollten Sie einen Hinweis auf die Datenschutzbestimmungen platzieren – DSGVO seit 25.05.2018.
Header Einstellungen
7. Top Bar Zeigen Sie, über Ihrem Header, Ihre drei wichtigsten Vorteile prominent an. Über die Textbausteine: „description1“, „description2“ und „description3“ können Sie die Vorteile jederzeit anpassen.
8. Logo Größe Stellen Sie für jedes Endgerät individuell die Größe Ihres hinterlegten Logos ein
9. Sticky Menü Minimierter Header der beim Scrollen am oberen Bildschirmrand fixiert wird und sich erst wieder ausgeblendet, wenn der Header im sichtbaren Bereich erscheint.
10. Breadcrumb Erweitert Mittels eines Mouseover, auf eine Kategorie im Breadcrumb und einer kurzen Verweildauer, werden die jeweiligen Unterkategorien in einem Layer eingeblendet.
11. Scroll To Top Button Mittels Knopfdruck, können Ihre Kunden in Sekundenschnelle wieder an den Anfang der Seite gelangen. Der Button wird im unteren rechten Bildschirmrand eingeblendet.
Kategorie Einstellungen
12. Allgemeine Einstellungen Hier können Sie weitere grundlegende Einstellungen für die Ansicht in den Kategorien einstellen.
13. Promotion Boxen in Sidebar Sie haben die Möglichkeit über und unter der Sidebar Boxen mit z. B. Informationen oder Banner erscheinen zu lassen. Diese Informationen können auf allen Kategorie Seiten, Formularen und/oder Shopseiten angezeigt werden.
14. Filter in Sidebar Lassen Sie Ihre Filter prominent in der linken Sidebar erscheinen.
15. Artikelbild wechseln / zoomen Bei Mouseover können Sie die Artikelbilder per Animation hervorheben lassen. Sie haben hierfür zwei Möglichkeiten( 1. Variante: Bildzoom = Vergrößerung des Bildes / 2. Variante: Bildwechsel = Einblendung des zweiten Artikelbildes)
Detail Seiten Einstellungen
16. Infobox – Bitte wählen Sie eine Variante aus Lassen Sie eine Meldung bei Variantenartikel anzeigen, bei dem Kunden erst eine Variante wählen müssen. Über den Textbaustein „DetailBuyVariantInfo“ können Sie den Hinweistext verändern.
17. Bewertungen in der Beschreibung Präsentieren Sie Ihre Kundenbewertungen, auf der rechten Seite, neben der Artikelbeschreibung.
Footer Einstellungen
18. Footer Template Erweitern Sie Ihren Footer auf bis zu vier Zeilen. Für jede Zeile, die Sie nutzen möchten, wählen Sie ein Template aus. Jedes Template darf nur einmal gewählt werden. Über die Textbausteine können Sie die Spalten mit Inhalt füllen.
19. Einstellungen Zahlungsarten und Versandarten Legen Sie allgemeine Einstellungen für die Zahlungs- und Versandarten Icon fest.
20. Zahlungsarten anzeigen Präsentieren Sie prominent Ihre Zahlungsarten, welche Sie in Ihrem Shop anbieten
21. Versandarten anzeigen Präsentieren Sie prominent Ihre Versandarten, welche Sie in Ihrem Shop anbieten
Checkout Einstellungen
22. Offcanvas Warenkorb Hier können Sie ein verkaufsförderndes Banner für den Offcanvas Warenkorb hinterlegen.
23. Variantenanzeige Hier können Sie festlegen, ob die Varianten übersichtlich getrennt unter dem Artikelname angezeigt werden. Diese Anzeige kann bei Merkzettel, Account, Checkout, Dokumente und bei den E-Mails verwendet werden.
Neues für die Einkaufswelten
Gestalten Sie Ihre Einkaufswelten und Landingpages mit eigens entwickelten Elementen und Anpassungen von Coolbax um. Sie werten Ihre Einkaufswelt / Landingpage um ein vielfaches auf und Ihre Kunden erleben ein ganz neues Einkaufserlebnis. Die Erweiterungen sind, wie die enthaltenen Plugins, ebenfalls kostenlos enthalten.
Neue vordefinierte CSS Klassen Sie haben jetzt die Möglichkeit über eine vordefinierte CSS-Klassen die Darstellung des Textes zu verändern. Hierfür müssen Sie nur die entsprechende Klasse hinterlegen und der Text wird wie im Beispiel angezeigt.
Neues Element für die Einkaufswelten Das neue Bannerelement für die Einkaufswelten wird Sie begeistern. Banner-Zoom vergrößert das Bild bei MouseHover. Sie können für jedes einzelne Banner individuell bestimmen um wie viel es sich vergrößern soll und wie lange der Übergang dauert.
Die Erweiterten Farbeinstellungen
Die Farbgestaltung vom Theme Mars würde noch einmal aufgebohrt und um viele weitere Einstellungen erweitert. Zusammen mit den Einstellungen, welche bereits standardmäßig in Shopware enthalten sind, können Sie über 100 Farbveränderungen vornehmen.
Fragen Sie haben Fragen zum Plugin oder zur Einrichtung? Dann schauen Sie gerne bei unserem Handbuch vorbei oder Sie schreiben uns direkt an: info@coolbax.de
 28. Aug. 2020 um 14:18 Uhr
 1
1