functions.php – WordPress 6.2

Obwohl sie in Ihrem Design enthalten ist, ist die WordPress-Datei functions.php nicht darauf beschränkt, nur Anpassungen an Ihrem Design vorzunehmen.

Sie können an jedem Teil Ihrer Website Anpassungen vornehmen, ähnlich wie bei Plugins.

Hier sind einige gängige Arten von Anpassungen, die Sie mit der WordPress-Datei functions.php vornehmen können:

  • Ändern Sie das Kernverhalten von WordPress, z. B. wie viele Beiträge auf der Suchergebnisseite angezeigt werden oder welche Inhalte in den RSS-Feed Ihrer Website aufgenommen werden sollen.
  • Erstellen Sie Ihre eigenen benutzerdefinierten Shortcodes.
  • Fügen Sie Ihrer Website neue Inhalte oder Skripte hinzu, indem Sie beispielsweise ein Skript von Ihrem Live-Chat-Dienst auf bestimmten Seiten einfügen oder die Fußzeile Ihrer Website bearbeiten .

Das kratzt nur an der Oberfläche…

Da Sie mit der Datei functions.php statt statischem HTML benutzerdefinierte PHP-Codefragmente zu Ihrer Website hinzufügen können , sind der Art der Änderungen, die Sie vornehmen können, keine Grenzen gesetzt.

Wo befindet sich die WordPress-functions.php-Datei?

Die WordPress-Datei functions.php befindet sich zusammen mit anderen Theme-Dateien im Ordner Ihres aktiven Themes . Um die Datei zu finden, kannst du dich über FTP oder ein Dateimanager-Tool mit deinem Server verbinden und zu …/wp-content/themes/[aktiver-Theme-Name]/functions.php navigieren

Wenn Sie beispielsweise das beliebte OceanWP-Design verwenden , befindet sich die Datei functions.php unter …/wp-content/themes/oceanwp/functions.php

So arbeiten Sie sicher mit der Datei functions.php

Da das Arbeiten mit der WordPress-Datei functions.php das Hinzufügen von Code zu Ihrer Website beinhaltet, ist es wichtig, einige Best Practices zu befolgen, bevor Sie mit der Bearbeitung beginnen.

Sogar etwas so Einfaches wie ein fehlendes Komma oder Apostroph kann Fehler auf Ihrer Website auslösen , wie z. B. den WordPress White Screen of Death .

In neueren Versionen von WordPress ist WordPress besser darin geworden, diese Fehler eleganter zu behandeln, z. B. durch Anzeigen der Meldung „Auf Ihrer Website ist ein kritischer Fehler aufgetreten“ oder durch Prüfen auf PHP-Fehler, bevor Ihre Änderungen gespeichert werden.

Aber trotzdem – um Probleme zu vermeiden, empfehlen wir immer, diese Best Practices zu befolgen…

Testen Sie Ihren functions.php-Code auf einer Staging-Site

Bevor Sie Code-Snippets von functions.php zu Ihrer Live-WordPress-Site hinzufügen, empfehlen wir immer, sie zuerst auf einer Staging-Version Ihrer Site zu testen. Auf diese Weise können Sie nach potenziellen Fehlern suchen und überprüfen, ob das Code-Snippet wie vorgesehen funktioniert.

Die Info

Eine „Staging-Site“ ist eine identische Kopie Ihrer Live-Website, die sich in einer sicheren, privaten Sandbox befindet. Damit können Sie Änderungen testen, ohne den Wartungsmodus auf Ihrer Live-Site verwenden zu müssen .

Verwenden Sie immer ein untergeordnetes Design, wenn Sie die Datei functions.php bearbeiten

Da sich die WordPress-Datei functions.php im Code Ihres WordPress-Themes befindet , überschreibt Ihr Theme die Datei functions.php, wenn Sie Ihr Theme aktualisieren .

Um zu vermeiden, dass die Änderungen, die Sie an der Datei functions.php Ihres Themes vorgenommen haben, überschrieben werden, sollten Sie immer ein untergeordnetes WordPress-Theme verwenden und Ihre Codeschnipsel zur Datei functions.php im untergeordneten Design hinzufügen .

Wenn Sie ein Child-Theme verwenden, können Sie das Parent-Theme bei Bedarf immer noch aktualisieren, aber alle Ihre functions.php-Anpassungen werden niemals überschrieben.

Um mehr zu erfahren, lesen Sie unsere vollständige Anleitung zum Erstellen eines untergeordneten WordPress-Themes .

2 functions.php Dateialternativen, die besser sein könnten

Während die WordPress-Datei functions.php eine einfache Möglichkeit bietet, Ihrer Website Code-Snippets hinzuzufügen, gibt es einige Alternativen zu functions.php, die in den meisten Situationen eine bessere Lösung bieten:

  1. Verwenden eines Code-Manager-Plugins
  2. Speichern von Codeschnipseln in einem benutzerdefinierten Plugin

Diese Alternativen können einige Vorteile gegenüber der Verwendung der Datei functions.php haben:

  • Nicht an Ihr Design gebunden – das bedeutet, dass Ihre functions.php-Anpassungen immer noch vorhanden sind, wenn Sie jemals das Design ändern.
  • Bessere Organisation – diese Alternativen erleichtern die Organisation Ihrer Code-Snippets, was hilfreich sein kann, wenn Sie planen, Ihrer Website viele Code-Snippets hinzuzufügen.
  • Mehr Kontrolle – im Falle eines Code-Manager-Plug-ins erhalten Sie hilfreiche Optionen wie das Aktivieren/Deaktivieren eines Snippets mithilfe einer Umschaltfläche, das Ausführen von Snippets nur im Frontend oder Backend und mehr.

Verwenden Sie ein Code Manager-Plugin

Ein Code-Manager-Plug-in ist ein Plug-in, das Ihnen eine benutzerfreundliche Oberfläche zum Hinzufügen und Bearbeiten von Code-Snippets bietet, die sonst in der Datei functions.php landen würden.

Eine der beliebtesten Optionen ist das kostenlose Code Snippets-Plugin , aber Sie können auch andere Plugins finden, die ähnliche Funktionen bieten.

Mit Code-Snippets können Sie Ihre functions.php-Code-Snippets aus dem WordPress-Dashboard hinzufügen, komplett mit Optionen, um …

  • Fügen Sie einen Titel und eine Beschreibung hinzu.
  • Organisieren Sie Ihre Snippets mithilfe von Tags.
  • Führen Sie das Snippet nur auf einem bestimmten Teil Ihrer Website aus.
Hinzufügen eines Code-Snippets im Code-Snippets-Plugin.

Sie können dann alle Ihre Snippets in einer Liste sehen und sie nach Bedarf einfach aktivieren/deaktivieren.

So verwalten Sie Snippets in Code Snippets.

Da es sich bei Code Snippets um ein Plugin handelt, sind alle Ihre Code-Snippets auch dann noch vorhanden, wenn Sie das WordPress-Theme ändern .

Erstellen Sie ein Plug-in für benutzerdefinierte Funktionen

Eine weitere Alternative zur WordPress-Datei functions.php besteht darin, einfach Ihr eigenes benutzerdefiniertes Plugin zu erstellen, um die Code-Snippets aufzunehmen.

Auch wenn dies kompliziert klingen mag, ist es tatsächlich viel einfacher, als es scheint.

So funktioniert das:

  1. Erstellen Sie einen Ordner auf Ihrem lokalen Computer für Ihr Plugin.
  2. Erstellen Sie eine einzelne .php-Datei in diesem Ordner und bearbeiten Sie sie mit Ihrem bevorzugten Texteditor.
  3. Fügen Sie die folgende Codevorlage zur Datei hinzu.
  4. Fügen Sie Ihre functions.php-Code-Snippets zur Datei hinzu
<?php

/**
* Plugin Name: My Custom Code Snippets
* Description: This is a custom plugin to house code snippets.
* Author: Kinsta
* Version: 1.0
*/

/* Add the first code snippet below this comment - use the comment to explain what it does. */
[CODE]

/* Add the second code snippet below this comment. */'
[CODE]

/* Continue as needed. */
[CODE]

?>

Dann müssen Sie nur noch das Plugin in WordPress installieren und aktivieren. Hier sind 2 Möglichkeiten, dies zu tun:

  1. Verbinde dich über FTP/SFTP mit deinem Server und lade den benutzerdefinierten Plugin-Ordner in den Ordner wp-content/plugins hoch . Gehen Sie dann zur Plugin- Liste und aktivieren Sie das Plugin.
  2. Verwenden Sie Ihren Computer, um eine ZIP-Datei des Ordners zu erstellen. Gehen Sie dann zu Plugins → Neu hinzufügen und laden Sie die .zip-Datei hoch, um sie wie jedes andere Plugin zu installieren.

So greifen Sie auf die WordPress-Datei functions.php zu: 2 Optionen

Es gibt verschiedene Möglichkeiten, auf die WordPress-Datei functions.php zuzugreifen und sie zu bearbeiten. Hier sind 2 der vielseitigsten Methoden, die auf jedem Host funktionieren:

  1. WordPress In-Dashboard-Design-Code-Editor.
  2. SFTP und Ihren eigenen Code-Editor.

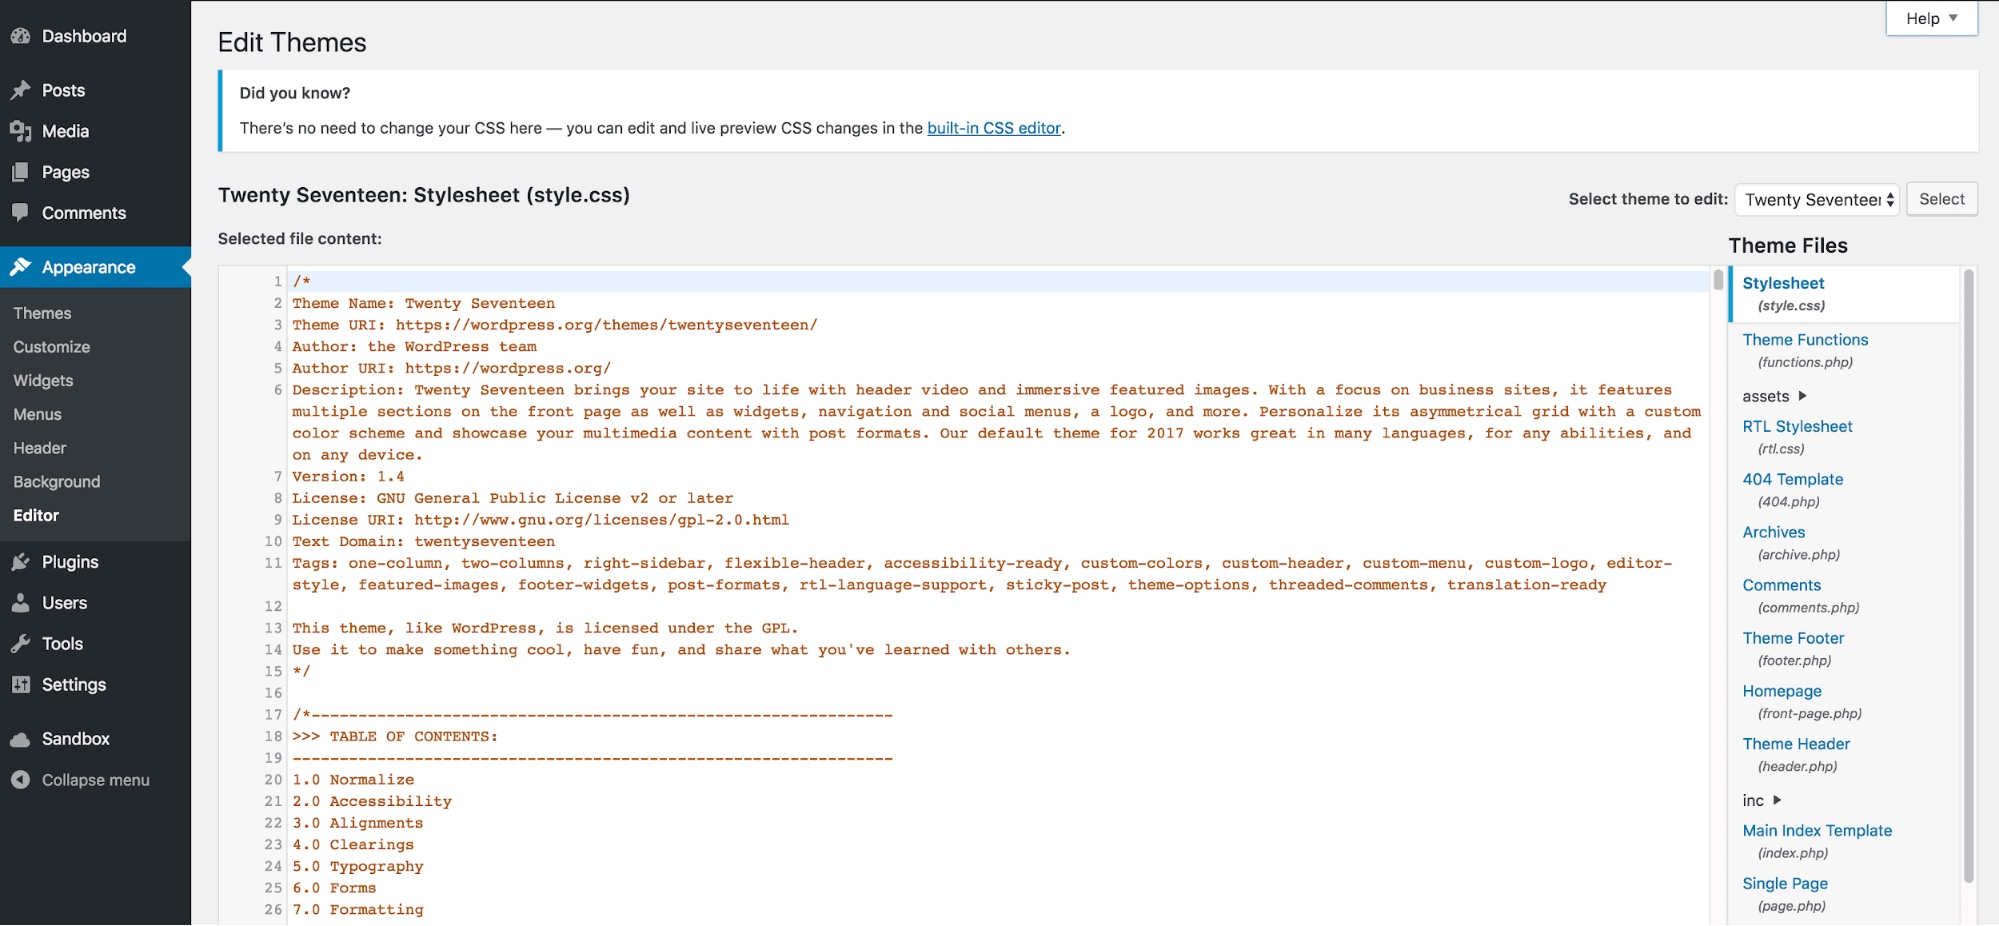
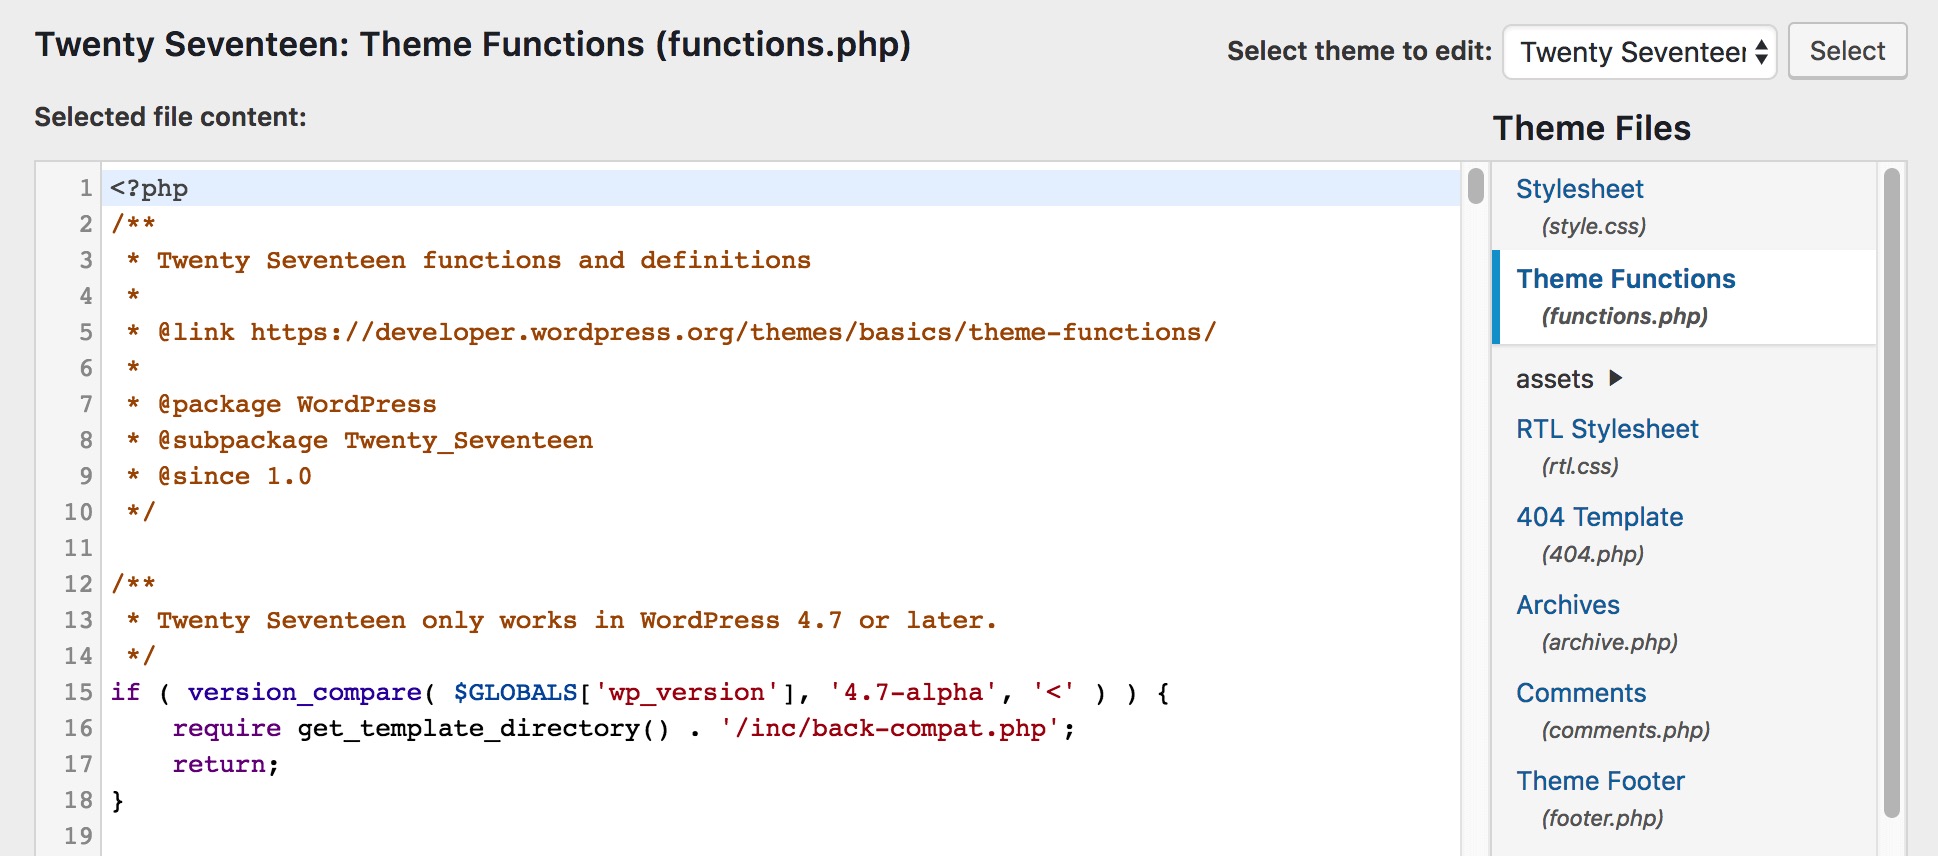
1. Verwenden Sie den WordPress In-Dashboard Theme Code Editor

Standardmäßig können Sie mit WordPress den gesamten Code Ihres Themes von Ihrem WordPress-Dashboard aus bearbeiten, einschließlich der Datei functions.php:

  1. Öffnen Sie Ihr WordPress-Dashboard.
  2. Gehen Sie zu Darstellung → Designdatei-Editor .
  3. Wählen Sie die Datei Designfunktionen (functions.php) in der Liste Designdateien auf der rechten Seite aus.
  4. Fügen Sie Ihre Änderungen im Code-Editor hinzu.
  5. Klicken Sie auf die Schaltfläche Datei aktualisieren , um Ihre Änderungen zu speichern.
So bearbeiten Sie die Datei functions.php von Ihrem WordPress-Dashboard aus.

Abgesehen davon möchten viele Leute die WordPress-Dateibearbeitung im Dashboard deaktivieren, um die Sicherheit zu verbessern . In diesem Fall können Sie die nächste Methode verwenden.

2. Verwenden Sie SFTP + Ihren eigenen Code-Editor

Für eine andere Möglichkeit, die WordPress-Functions.php-Datei zu bearbeiten, kannst du dich über FTP/SFTP mit deinem Server verbinden und die Datei auf diese Weise bearbeiten.

Hier ist wie:

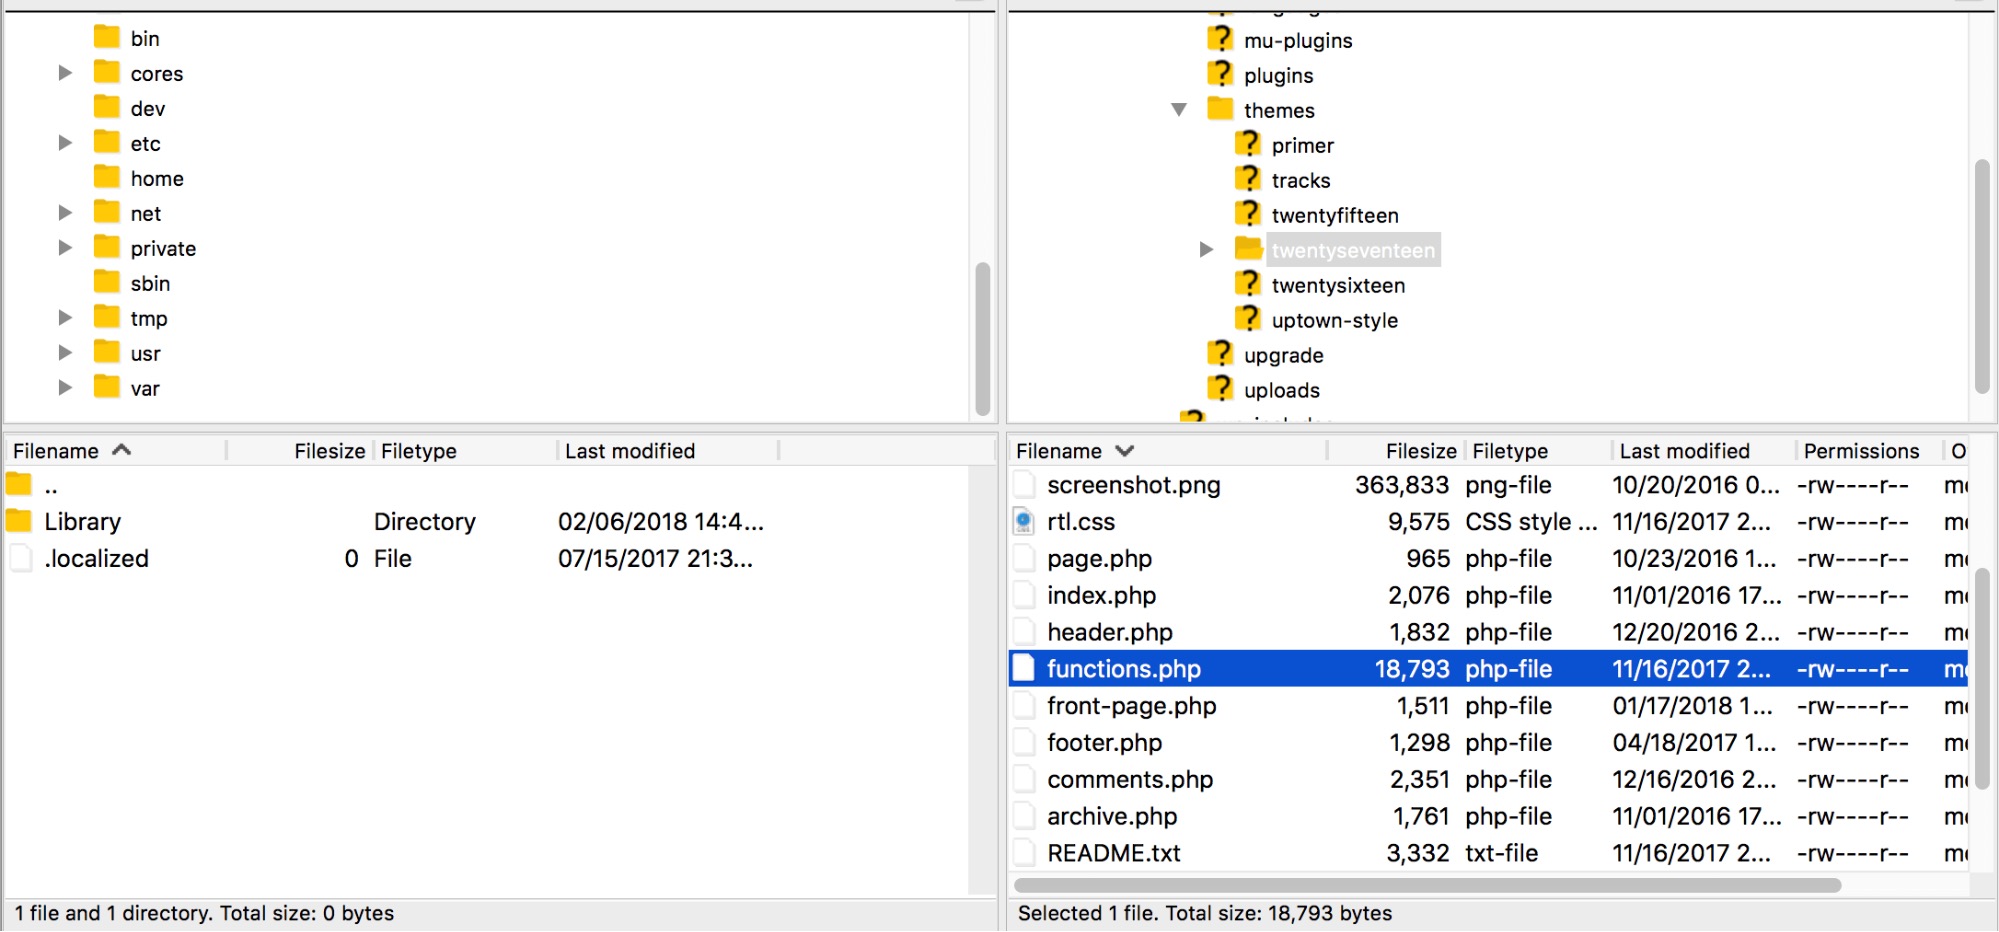
  1. Laden Sie einen FTP-Client herunter , falls Sie dies noch nicht getan haben – wir verwenden den kostenlosen FileZilla-Client für die Screenshots.
  2. Stellen Sie mit Ihren FTP-Anmeldeinformationen eine Verbindung zu Ihrem Server her – so verwenden Sie SFTP für die Verbindung .
  3. Navigieren Sie über die Ordnerstruktur zu …/wp-content/themes/[Ihr-aktives-Child-Theme]
  4. Klicken Sie mit der rechten Maustaste auf die Datei functions.php und wählen Sie Bearbeiten .
So bearbeiten Sie die Datei functions.php mit FileZilla.

Dadurch sollte die Datei auf Ihren lokalen Computer heruntergeladen und automatisch in einem Texteditor geöffnet werden. Sie können der Datei jetzt Ihre Code-Snippets hinzufügen.

FileZilla öffnet die Datei in einem lokalen Texteditor – zB Sublime Text.

Wenn Sie fertig sind, speichern Sie Ihre Änderungen und schließen Sie die Datei.

FileZilla sollte dann eine Aufforderung anzeigen, die bearbeitete Version erneut auf Ihren Server hochzuladen.

Stellen Sie sicher, dass Sie die Datei functions.php erneut hochladen, sobald Sie Ihre Änderungen vorgenommen haben.

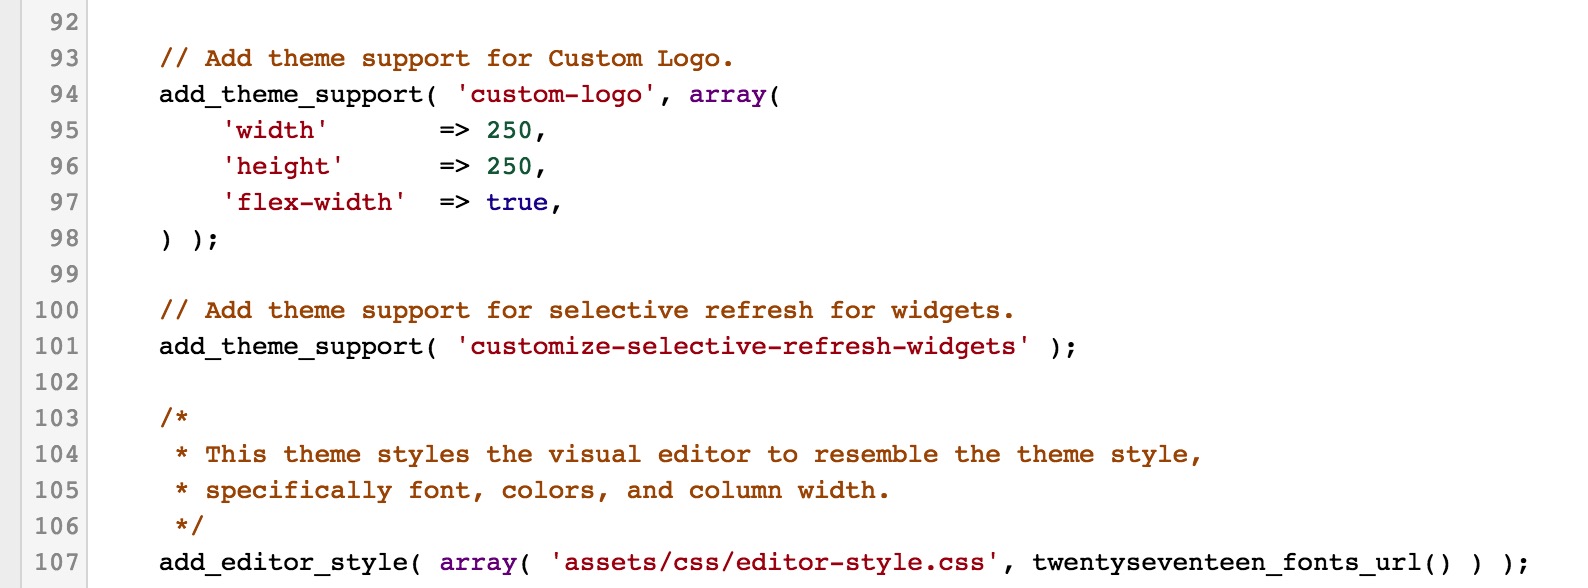
Die wichtigsten nützlichen Funktionen, die Sie Ihrer WordPress-Datei functions.php hinzufügen können

Nachdem Sie nun wissen, wie Sie die WordPress-Datei functions.php bearbeiten, gehen wir einige der nützlichsten Code-Snippets von functions.php durch, die Sie Ihrer Website hinzufügen können.

Datum der letzten Änderung in Blogbeiträgen anzeigen

Standardmäßig zeigen die meisten Themen das Datum an, an dem Sie einen Blogbeitrag veröffentlicht haben. Wenn Sie jedoch regelmäßig alte Inhalte aktualisieren und aktualisieren, möchten Sie möglicherweise auch das Datum der letzten Änderung anzeigen (oder das Veröffentlichungsdatum durch das Datum der letzten Änderung ersetzen).

Dies lässt nicht nur Ihre menschlichen Besucher wissen, dass Sie den Inhalt noch aktualisieren, sondern zeigt Google auch, dass Ihr Inhalt aktuell ist.

function show_last_updated( $content ) {
$u_time = get_the_time('U');
$u_modified_time = get_the_modified_time('U');
if ($u_modified_time >= $u_time + 86400) {
$updated_date = get_the_modified_time('F jS, Y');
$updated_time = get_the_modified_time('h:i a');
$custom_content .= '<p class="last-updated-date">Recently updated on '. $updated_date . ' at '. $updated_time .'</p>';
}
$custom_content .= $content;
return $custom_content;
}
add_filter( 'the_content', 'show_last_updated' );

Weitere Einzelheiten finden Sie in unserem vollständigen Beitrag, der das Datum der letzten Änderung in WordPress zeigt .

Deaktivieren Sie die WordPress-Symbolleiste für bestimmte Benutzer

Standardmäßig zeigt WordPress die WordPress-Symbolleiste für alle angemeldeten Benutzer an, die die integrierten WordPress-Benutzerrollen verwenden . Dies gilt nicht unbedingt für benutzerdefinierte Rollen, wie z. B. die Benutzerrolle „Kunde“ für WooCommerce-Shops .

Wenn Sie dies ändern möchten, können Sie die WordPress-Symbolleiste für bestimmte Benutzerrollen mithilfe eines Code-Schnipsels functions.php ausblenden.

Dieses Beispiel würde die Admin-Symbolleiste für Benutzer mit der Benutzerrolle „Autor“ einstellen.

add_filter( 'show_admin_bar', function( $show ) {
if ( current_user_can( 'author' ) ) {
return false;
}
return $show;
} );

Verzögern Sie das Erscheinen von Beiträgen im RSS-Feed

Standardmäßig werden Inhalte in Ihrem RSS-Feed angezeigt, sobald Sie sie veröffentlichen. Dies kann Content-Scrapern die Möglichkeit geben , Ihre Inhalte zu scrapen und in Google zu indizieren, bevor Google Ihren ursprünglichen Beitrag überhaupt indiziert.

Um zu vermeiden, dass jemand anderes die Anerkennung für Ihre Inhalte erhält, können Sie das Erscheinen von Beiträgen in Ihrem RSS-Feed verzögern.

Dies wird Content Scraper zwar nicht vollständig stoppen, bedeutet aber, dass Sie Google Zeit geben können, Ihre Inhalte zuerst zu indizieren.

Hier ist das Code-Snippet – Sie können die Zahl – in diesem Beispiel „30“ – in die Anzahl der Minuten ändern, die die Verzögerung betragen soll:

function kinsta_delay_feed_content($where) {

global $wpdb;

if ( is_feed() ) {
// timestamp in WP-format
$now = gmdate('Y-m-d H:i:s');

// value for wait; + device
$wait = '30'; // integer

// http://dev.mysql.com/doc/refman/5.0/en/date-and-time-functions.html#function_timestampdiff
$device = 'MINUTE'; //MINUTE, HOUR, DAY, WEEK, MONTH, YEAR

// add SQL-sytax to default $where
$where .= " AND TIMESTAMPDIFF($device, $wpdb->posts.post_date_gmt, '$now') > $wait ";
}
return $where;
}

add_filter('posts_where', 'kinsta_delay_feed_content');

Bestimmte Kategorien vom RSS-Feed ausschließen

Zusätzlich zum Verzögern des Erscheinens von Inhalten im RSS-Feed kann es auch Situationen geben, in denen Sie ganze Kategorien von Blogbeiträgen ausschließen möchten, damit sie nicht im RSS-Feed Ihrer Website erscheinen.

Um dies zu erreichen, können Sie das folgende Code-Snippet functions.php verwenden:

function kinsta_exclude_category_rss($query) {
if ($query->is_feed) {
$query->set('cat','-38');
}
return $query;
}
add_filter('pre_get_posts','kinsta_exclude_category_rss');

Stellen Sie sicher, dass Sie die Beispiel-Kategorie-ID – „38“ – durch die tatsächlichen Kategorie-IDs ersetzen, die Sie ausschließen möchten (und entfernen Sie nicht das Minuszeichen).

So finden Sie die ID-Nummer:

  1. Gehen Sie zu Beiträge → Kategorien , um eine Liste aller Kategorien auf Ihrer Website anzuzeigen.
  2. Klicken Sie unter der Kategorie, die Sie ausschließen möchten, auf Bearbeiten .
  3. Sehen Sie sich die URL der Bearbeitungsseite in der Adressleiste Ihres Browsers an. Die Kategorie-ID ist die Zahl, die nach ?taxonomy=category&tag_ID=X kommt .

Wenn die URL beispielsweise https://yoursite.com/wp-admin/term.php?taxonomy=category&tag_ID=38&post_type=post lautet , lautet die Kategorie-ID 38 .

Begrenzen Sie WordPress-Revisionen nach Beitragstyp

Um zu vermeiden, dass die Datenbank Ihrer Website aufgebläht wird, sollten Sie die Anzahl der zu speichernden Post-Revisionen begrenzen.

Während eine Möglichkeit, WordPress-Beitragsrevisionen seitenweit einzuschränken , darin besteht, die wp-config.php-Datei deiner Website zu bearbeiten , möchtest du vielleicht unterschiedliche Anzahlen von Revisionen für verschiedene Beitragstypen speichern – z. B. Blog-Beiträge im Vergleich zu WooCommerce-Produkten.

Mit diesem Code-Snippet von functions.php können Sie genau das tun. Um es zu Ihrem eigenen zu machen, ändern Sie den Beitragstyp – in diesem Beispiel „Beitrag“ – in den tatsächlichen Beitragstyp, den Sie steuern möchten, und die Zahl – in diesem Beispiel „5“ – in die Anzahl der Revisionen, die Sie speichern möchten.

function kinsta_post_revisions_by_type( $revisions, $post ) {

if( 'post' == $post->post_type ) {
$revisions = 5;
}

return $revisions;

}

add_filter( 'wp_revisions_to_keep', 'kinsta_post_revisions_by_type', 10, 2 );

* Hinweis – Sie bearbeiten den „post“, der unmittelbar nach der „if“-Anweisung kommt. Zum Targeting von Produkten würde diese Zeile beispielsweise so aussehen:

if( 'product' == $post->post_type ) {

Deaktivieren Sie die WordPress-Suchfunktion

Wenn Ihre Website keine Suchfunktion benötigt, sollten Sie die WordPress-Suchfunktion deaktivieren , um potenziellen Missbrauch zu verhindern.

Selbst wenn Sie beispielsweise kein Suchfeld auf Ihrer Website anzeigen, können Bots dennoch die Suchfunktion verwenden, indem sie Ihrer URL ?s=[Suchbegriff] hinzufügen.

Dazu können Sie das folgende Code-Snippet hinzufügen:

function kinsta_disable_wp_search( $query, $error = true ) {

if ( is_search() ) {
$query->is_search = false;
$query->query_vars[s] = false;
$query->query[s] = false;

// to error
if ( $error == true )
$query->is_404 = true;
}
}

add_action( 'parse_query', 'kinsta_disable_wp_search' );
add_filter( 'get_search_form', create_function( '$a', "return null;" ) );

Wenn jemand versucht, die Suchfunktion direkt zu verwenden, gibt Ihre Website stattdessen eine 404-Seite zurück.

Erstellen Sie Ihre eigenen benutzerdefinierten Shortcodes (zB aktuelles Jahr)

WordPress-Shortcodes sind wirklich praktische Verknüpfungen, mit denen Sie dynamische Inhalte in Ihre Website einbetten können.

Während viele WordPress-Plugins auf Shortcodes angewiesen sind, um ihre Funktionalität zu verbessern, können Sie auch Ihre eigenen benutzerdefinierten Shortcodes erstellen, indem Sie die WordPress-Datei functions.php und die Funktion add_shortcode() verwenden .

Ein häufiger Anwendungsfall ist beispielsweise die Erstellung eines Shortcodes, der das aktuelle Jahr anzeigt. Auf diese Weise können Sie automatisch das aktuelle Jahr in all Ihren Inhalten anzeigen, ohne jeden 1. Januar alles manuell aktualisieren zu müssen.

Um einen solchen Shortcode zu erstellen, können Sie den folgenden Code verwenden:

function year_shortcode() {
$year = date('Y');
return $year;
}
add_shortcode('currentyear', 'year_shortcode');

Wenn Sie dann den Shortcode [aktuelles Jahr] zu Ihren Inhalten hinzufügen, wird dieser automatisch durch das tatsächliche Jahr ersetzt – z. B. 2023.

Shortcodes in Beitragstiteln zulassen

Standardmäßig führt WordPress keine Shortcodes aus, die Sie im Titelfeld Ihres Beitrags platzieren. Wenn Sie Shortcodes in WordPress-Beitragstiteln verwenden möchten, können Sie diese Funktionalität aktivieren, indem Sie der WordPress-Datei functions.php ein einfaches Code-Snippet hinzufügen.

In Kombination mit dem vorherigen Code-Snippet können Sie beispielsweise automatisch das aktuelle Jahr in den Beitragstitel einfügen, indem Sie den Shortcode [aktuelles Jahr] hinzufügen.

add_filter( 'the_title', 'do_shortcode' );

Anmeldefehler ausblenden, um die Sicherheit zu verbessern

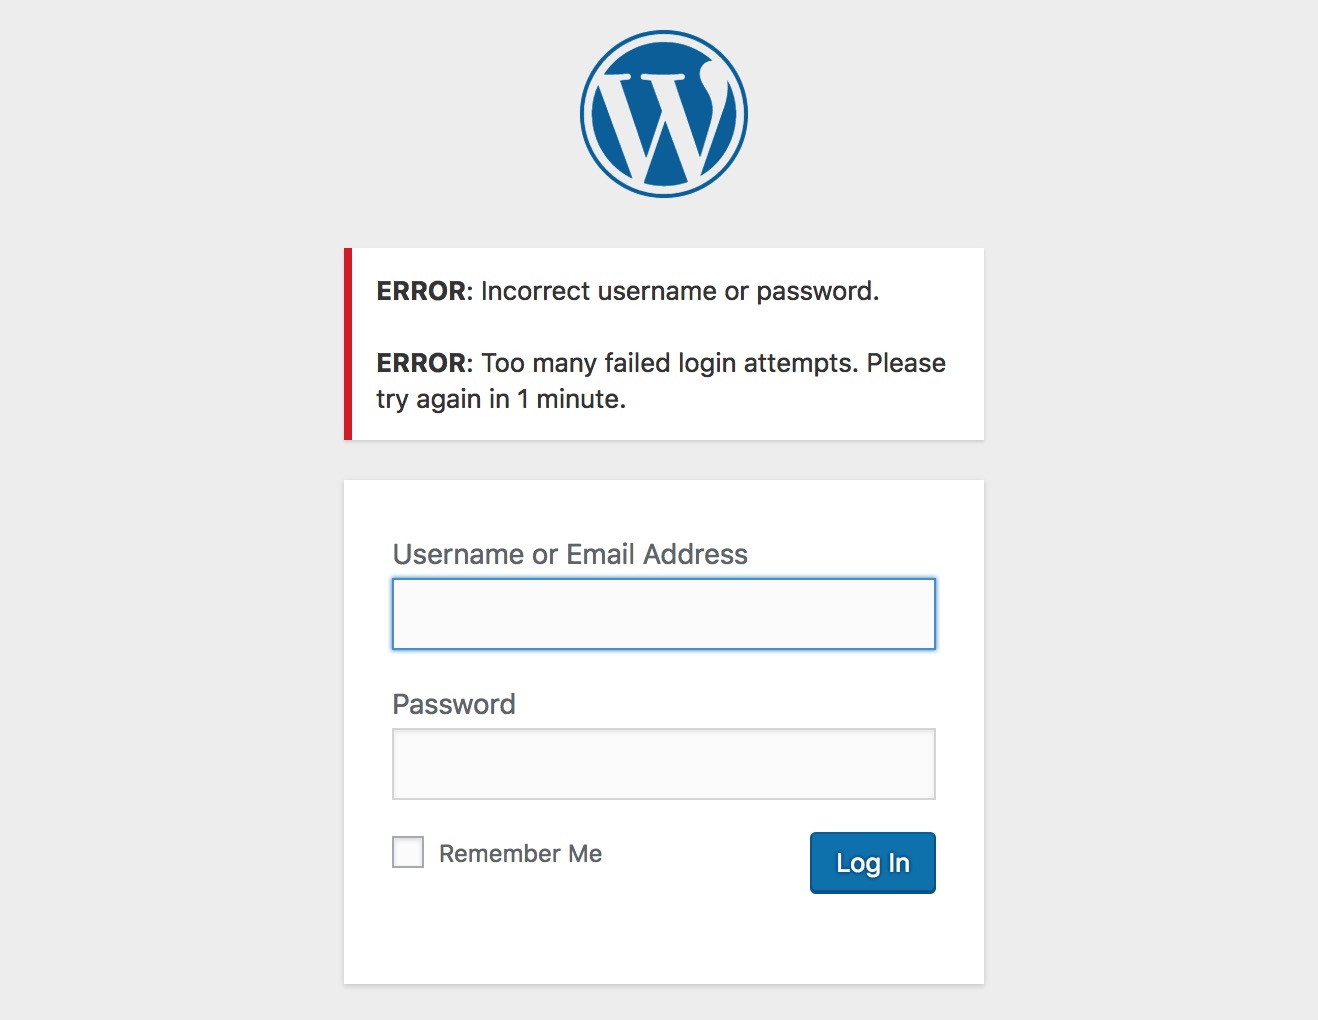
Standardmäßig zeigt WordPress bei fehlgeschlagenen Anmeldeversuchen eine erklärende Nachricht an. Diese Nachricht kann einige Informationen preisgeben, z. B. ob eine bestimmte E-Mail-Adresse auf Ihrer Website registriert ist oder nicht (selbst wenn das Passwort falsch ist).

Um zu vermeiden, dass möglicherweise vertrauliche Informationen preisgegeben werden, können Sie diese Anmeldefehler ausblenden, indem Sie das folgende Code-Snippet zu Ihrer Datei functions.php hinzufügen.

function kinsta_hide_login_errors(){
return 'These are not valid credentials';
}
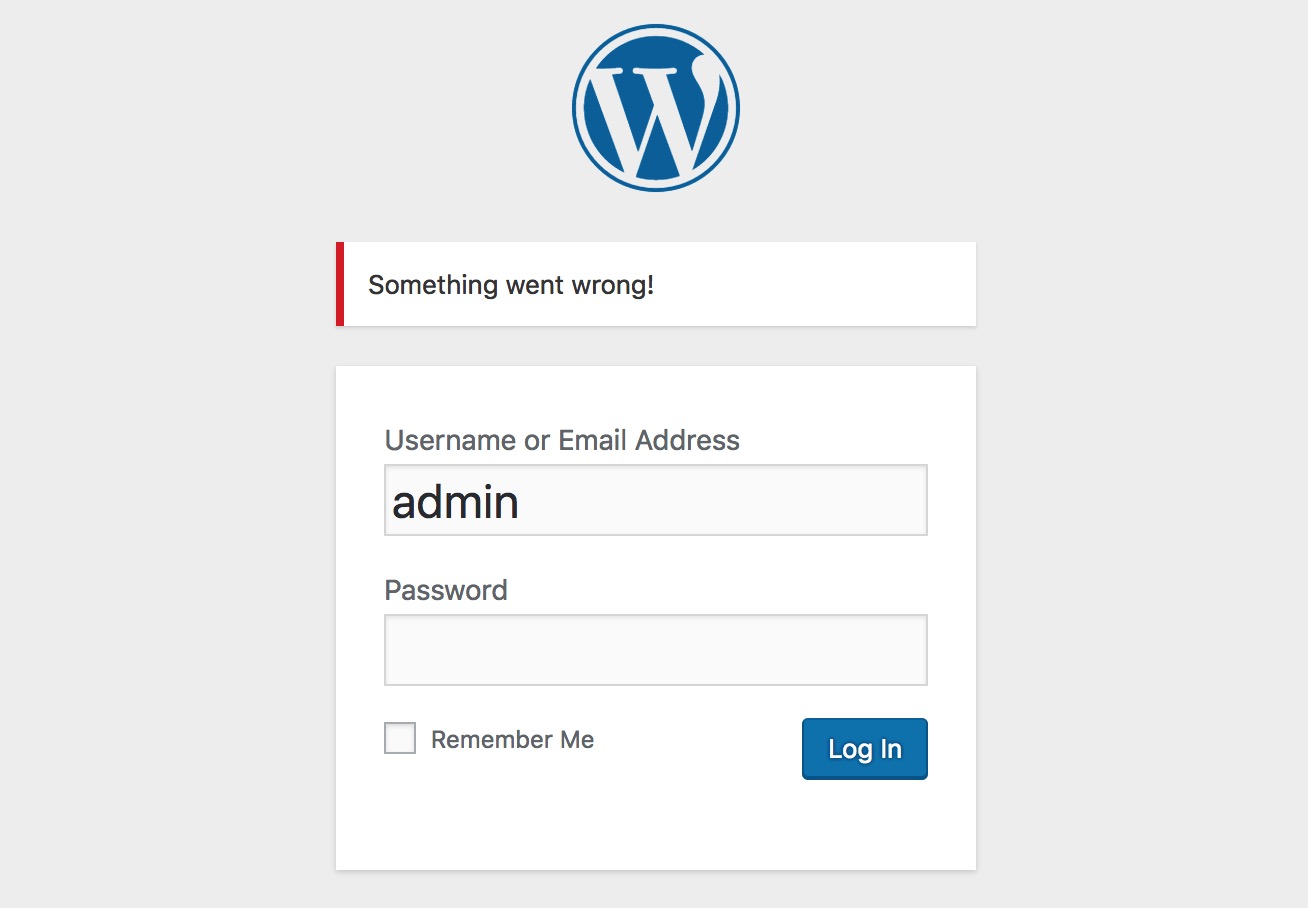
add_filter( 'login_errors', 'kinsta_hide_login_errors' );

Dieses Snippet ersetzt den standardmäßigen Anmeldefehlertext durch die folgende Meldung – Dies sind keine gültigen Anmeldeinformationen .

Sie können den Text nach Ihren Wünschen anpassen – vermeiden Sie jedoch Bindestriche, Schrägstriche oder andere Zeichen, da dies zu Fehlern führen kann (es sei denn, Sie „escapen“ diese Zeichen).

Ändern Sie die Ausschnittlänge

Standardmäßig zeigt der WordPress-Auszug die ersten 55 Wörter eines Beitrags.

Wenn Sie dies anpassen möchten, können Sie das folgende Code-Snippet in die Datei functions.php einfügen.

function kinsta_change_excerpt_length($length) {
return 90;
}
add_filter('excerpt_length', 'kinsta_change_excerpt_length');

Das obige Code-Snippet ändert die Länge des Auszugs auf 90 Wörter. Wenn Sie eine andere Anzahl bevorzugen, können Sie „90“ durch die genaue Anzahl der Wörter ersetzen, die Sie verwenden möchten.

Entfernen Sie die WordPress-Versionsnummer

Um es böswilligen Akteuren zu erschweren, zu erkennen, welche Version von WordPress Sie verwenden, entfernen einige Benutzer gerne die WordPress-Versionsnummer aus dem Frontend-Code Ihrer Website.

Dazu können Sie Ihrer Datei functions.php die folgenden Codeschnipsel hinzufügen.

function kinsta_hide_version() {
return '';
}
add_filter('the_generator', 'kinsta_hide_version');

Richten Sie die WordPress-Paginierung ein

Wenn Sie mit der Funktionsweise der Paginierung in Ihrem Design nicht zufrieden sind, können Sie ein functions.php-Code-Snippet verwenden, um das Paginierungsverhalten anzupassen oder sogar Ihr eigenes Paginierungssystem zu erstellen.

Wenn Sie an dieser Art von Modifikation interessiert sind, haben wir eine vollständige Anleitung zur WordPress-Paginierung , die einige Beispiele für functions.php-Code-Snippets für Sie enthält.

Ändern Sie, wie viele Ergebnisse auf der Suchlistenseite enthalten sein sollen

WordPress bietet Ihnen eine In-Dashboard-Option, um zu steuern, wie viele Beiträge auf Archivseiten aufgelistet werden sollen ( Einstellungen → Lesen ).

Dadurch ändert sich jedoch die Nummer für alle Archivseiten. Was ist, wenn Sie nur eine andere Nummer für die Suchergebnisseite verwenden möchten?

Dazu können Sie dieses Snippet zu Ihrer functions.php-Datei hinzufügen – stellen Sie sicher, dass Sie die Zahl („12“ in diesem Beispiel) auf die tatsächliche Anzahl der Ergebnisse ändern, die Sie anzeigen möchten, bevor Sie zusätzliche Ergebnisse paginieren.

function kinsta_search_results_list() {
if ( is_search() )
set_query_var('posts_per_archive_page', 12);
}

add_filter('pre_get_posts', 'kinsta_search_results_list');

Fügen Sie ausgewählte Bilder in den WordPress-RSS-Feed ein

Wenn Sie die vorgestellten Bilder Ihrer Posts in Ihren RSS-Feed-Inhalt aufnehmen möchten , können Sie das folgende Snippet zu Ihrer functions.php-Datei hinzufügen.

function kinsta_featured_image_rss($content) {
global $post;
if ( has_post_thumbnail( $post->ID ) ){
$content = '<div>' . get_the_post_thumbnail( $post->ID, 'full', array( 'style' => 'margin-bottom: 15px;' ) ) . '</div>' . $content;
}
return $content;
}

add_filter('the_excerpt_rss', 'kinsta_featured_image_rss');
add_filter('the_content_feed', 'kinsta_featured_image_rss');

Wie geschrieben, wird das obige Code-Snippet das Bild in voller Größe einfügen. Um eine andere Thumbnail-Größe zu verwenden, können Sie „Full“ auf eine andere Thumbnail-Größe ändern – zB „Large“ oder „Medium“.

Upload-Unterstützung für Dateitypen hinzufügen (z. B. SVG)

Standardmäßig blockiert WordPress das Hochladen bestimmter Dateitypen, z. B. SVG-Dateien .

Um die Unterstützung für diese blockierten Dateitypen zu aktivieren, können Sie das folgende Code-Snippet zur WordPress-Datei functions.php hinzufügen:

function kinsta_myme_types($mime_types){
$mime_types['svg'] = 'image/svg+xml';
return $mime_types;
}
add_filter('upload_mimes', 'kinsta_myme_types', 1, 1);

Dieses Code-Snippet ermöglicht nur SVG-Uploads, aber Sie können es ändern, um bei Bedarf Unterstützung für andere Dateitypen hinzuzufügen.

Ausblenden von WordPress-Update-Nörgeln für Nicht-Administratoren

Standardmäßig zeigt WordPress allen Benutzern mit Dashboard-Zugriff Dashboard-weite Nachrichten an, wenn ein neues Update verfügbar ist .

Selbst wenn die Rolle eines Benutzers es ihm nicht erlaubt, das Update anzuwenden, weist die Dashboard-Meldung diesen Benutzer an, sich an den Administrator zu wenden.

Um dies anzupassen, können Sie dieses Code-Snippet verwenden, um Update-Benachrichtigungen für alle Nicht-Administrator-Benutzer auszublenden:

function kinsta_hide_update_nag() {
if ( ! current_user_can( 'update_core' ) ) {
remove_action( 'admin_notices', 'update_nag', 3 );
}
}

add_action('admin_menu','kinsta_hide_update_nag');

Für einige andere Variationen sieh dir unsere Anleitung zum Deaktivieren von WordPress-Update-Benachrichtigungen an .

Ändern Sie die Qualität der automatischen JPEG-Optimierung

Obwohl nicht jeder von dieser Funktion weiß, komprimiert WordPress automatisch JPEG-Bilder , wenn Miniaturansichten für Ihre Website erstellt werden, nachdem Sie Bilder hochgeladen haben.

Seit WordPress 4.5 hat WordPress die Standardqualitätsstufe auf 82 eingestellt (wobei 100 eine Null-Komprimierung ist).

Wenn Sie diese Qualitätsstufe höher oder niedriger machen möchten, können Sie das folgende Code-Snippet zu Ihrer Datei functions.php hinzufügen – stellen Sie sicher, dass Sie die Zahl („90“ in diesem Beispiel) auf die tatsächliche Qualitätsstufe ändern, die Sie verwenden möchten :

add_filter( 'jpeg_quality', create_function( '', 'return 90;' ) );

Best Practices für die Organisation Ihrer WordPress-functions.php-Datei

Wenn Sie nur die WordPress-Datei functions.php verwenden, um ein paar Codeschnipsel hinzuzufügen, müssen Sie sich wahrscheinlich keine Gedanken über die Organisation machen.

Wenn Sie Ihrer Website jedoch viele Code-Snippets hinzufügen, kann dies schnell unhandlich und komplex werden, wenn Sie einige Best Practices für die Organisation von functions.php-Dateien nicht befolgen.

Hier sind ein paar Best Practices, um Ihre Code-Snippets zu organisieren…

Fügen Sie Codekommentare hinzu, um alles zu erklären

Wenn Sie Ihrer functions.php-Datei zum ersten Mal ein Code-Snippet hinzufügen, wissen Sie genau, was das Snippet bewirkt und warum Sie es hinzugefügt haben. Aber wenn Sie ein Jahr später auf die Datei functions.php zurückblicken, sind die Dinge vielleicht nicht so klar.

Um dies zu vermeiden, sollten Sie jedem Snippet Codekommentare hinzufügen, die erklären, was das Snippet tut und warum Sie es hinzugefügt haben.

Code-Kommentare sind Text, der nicht von WordPress ausgeführt wird, aber den menschliche Benutzer lesen können, um zu verstehen, was das Code-Snippet tut.

Um einen einzeiligen Codekommentar hinzuzufügen, können Sie dieses Format verwenden:

// This is a single-line code comment

Um einen mehrzeiligen Codekommentar hinzuzufügen, können Sie dieses Format verwenden:

/**
* This is a code comment that spans multiple lines
* This text is also in the same comment
* This is the last line in the code comment
*/

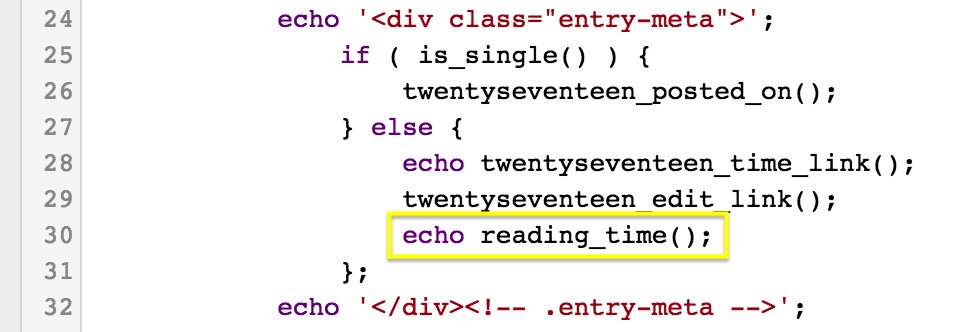
Hier ist ein Beispiel dafür, wie Sie Codekommentare verwenden könnten – Sie können sehen, dass der Kommentar vor jedem Snippet erklärt, was das Snippet tut.

Ein Beispiel für die Verwendung von Codekommentaren zum Dokumentieren von Snippets in der Datei functions.php.

Verwenden Sie Dateien einschließen, um Snippets in verschiedene Dateien aufzuteilen

Wenn Sie wirklich viele Codeschnipsel haben, können Sie sie in separaten Dateien speichern, anstatt nur die Datei functions.php zu verwenden.

Anschließend können Sie diese Codeschnipsel mithilfe von include oder require in die Datei functions.php einfügen. Mike Schinkel hat ein gutes Beispiel dafür, wie Sie dies auf StackExchange tun könnten.

Betrachten Sie eine der functions.php-Alternativen von oben

Wenn Sie feststellen, dass Ihre Datei functions.php etwas unübersichtlich wird, bevorzugen Sie vielleicht eine der Funktionen.php-Alternativen, die wir zuvor beschrieben haben.

Das kostenlose Code-Snippets-Plug-in macht es beispielsweise sehr einfach, alles zu organisieren, da Sie jedes Code-Snippet separat hinzufügen können, komplett mit seinem eigenen Titel und seiner eigenen Beschreibung. Sie können auch Tags verwenden, um Ihre Snippets zu organisieren.


How to Disable WordPress Admin Bar for All Users Except Administrators

Do you want to easily disable the admin bar in WordPress?

By default, you can easily disable the WordPress admin bar for any user from the dashboard. But this method can take time if you have a lot of registered users on your site.

In this article, we’ll show you how to disable the WordPress admin bar for all users except administrators.

Disabling WordPress admin bar for all users except administrators

What is WordPress Admin Bar?

By default, WordPress displays an admin bar on the top for all logged-in users. This toolbar is visible in the WordPress admin area as well as all other pages when you are logged in.

WordPress admin bar

The WordPress admin toolbar contains useful shortcuts to different WordPress sections. The shortcuts available in the admin bar change based on a users’ role and permissions in WordPress.

However, when viewing the public pages on the front-end of your website, the admin bar can be a bit distracting. It may also affect your website’s design and user experience.

Luckily, there are multiple ways to easily disable the WordPress admin bar for all users except administrators.

Video Tutorial

https://www.youtube.com/embed/25WBldgArAk?version=3&rel=0&fs=1&showsearch=0&showinfo=1&iv_load_policy=1&wmode=transparentSubscribe to WPBeginnerhttps://www.youtube.com/subscribe_embed?usegapi=1&channel=wpbeginner&layout=default&count=default&origin=https%3A%2F%2Fwpbeginner.com&gsrc=3p&ic=1&jsh=m%3B%2F_%2Fscs%2Fapps-static%2F_%2Fjs%2Fk%3Doz.gapi.en.vQiXRrxCe40.O%2Fam%3DAQ%2Fd%3D1%2Frs%3DAGLTcCMBxIGVyXSdvvcs43a64yHt_P7dfg%2Fm%3D__features__#_methods=onPlusOne%2C_ready%2C_close%2C_open%2C_resizeMe%2C_renderstart%2Concircled%2Cdrefresh%2Cerefresh&id=I0_1448178294715&parent=https%3A%2F%2Fwpbeginner.com

If you’d prefer written instructions, just keep reading.

Method 1. Disabling The WordPress Admin Bar for Any User

WordPress allows each user to disable the admin bar by simply editing their user profile. As a site owner, you can also edit other user’s profiles and disable the admin bar for them.

If you want to disable the admin bar for any particular user in WordPress, you’ll need to edit their user profile.

Simply go to the Users » All Users page and then click on the ‘edit’ link for any user you want to disable the admin bar for.

Edit user settings

This will bring you to the user profile editor page. From here, uncheck the box next to the ‘Show toolbar when viewing site’ option.

Disable admin bar

Scroll down and click the ‘Update User’ button to save your changes.

This will disable the admin bar for that particular user when they visit the website.

Site without admin bar

If you have a handful of users, then you can go ahead and manually disable the admin bar for all of them. However, if you run a membership site with a lot of users, then this method wouldn’t work.

Luckily, there are other ways to quickly disable the admin bar for all users except administrators.

Method 2. Disable Admin Bar for All Users Except Admins with a Plugin

This method allows you to quickly disable the WordPress admin for all users.

First, you need to install and activate the Hide Admin Bar Based on User Roles plugin. For more details, see our step by step guide on how to install a WordPress plugin.

Upon activation, go to the Settings » Hide Admin Bar Settings page. From here, check the boxes next to the user roles where you want to disable the admin bar.

Hide Admin settings with a plugin

Don’t forget to click on the ‘Save Changes’ button to store your settings.

Method 3. Disable Admin Bar for All Users Except Administrators Using Code

This method requires you to add code to your WordPress theme files. If you have not done this before, then check out our guide on how to copy and paste code snippets in WordPress.

Simply add the following code to your theme’s functions.php file or a site-specific plugin.

add_action('after_setup_theme', 'remove_admin_bar');
function remove_admin_bar() {
if (!current_user_can('administrator') && !is_admin()) {
  show_admin_bar(false);
}
}

This code checks if the current user is not an administrator, and they are not viewing the admin dashboard. If both conditions match, then it will disable the WordPress admin bar.

Don’t forget to save your changes and check your website to make sure everything is working fine.

Method 4. Disable Admin Bar for All Users Including Admins

What if you wanted to disable the admin bar for all users including yourself and any other administrator on your site?

You can do this by modifying the code we showed earlier.

Simply add the following code to your theme’s functions.php file or a site-specific plugin.

/* Disable WordPress Admin Bar for all users */
add_filter( 'show_admin_bar', '__return_false' );

This code will disable the admin bar for all users when viewing the public pages of your website. All users will still be able to see the toolbar inside the WordPress admin dashboard.

We hope this article helped you learn how to disable the WordPress admin bar for all users except administrators. You may also want to see our ultimate WordPress security guide and our comparison of the best WordPress page builder for creating custom page layouts without any code.


functions.php – wichtige codes

Your Guide to the WordPress Functions.php File

In this article, we’ll take an in-depth look at the WordPress functions file. We’ll discuss how it works and where you can find it. Finally, we’ll show you some interesting tweaks you can make to your functions.php file.

To get involved in WordPress development, you first need to understand how the platform’s most important files work. WordPress makes it pretty easy to begin tinkering with your site. However, it can be difficult to know where to start — or predict what your changes will actually do.

A perfect place to learn is with the functions.php file, which is also known as the functions file. This is a common location for making changes and adding code to WordPress. By editing this file, you can accomplish several useful things, such as adding Google Analytics to your site, creating custom menus, or displaying a post’s estimated reading time.

What Is the functions.php File?

WordPress Functions Theme Support

The WordPress functions.php file comes included with all free and premium WordPress themes. To the untrained eye, it may not look like much, but the functions file is a powerful tool that enables you to do a lot of interesting things.

The WordPress Codex describes the functions file like this:

“You can use it to call functions, both PHP and built-in WordPress, and to define your own functions. You can produce the same results by adding code to a WordPress Plugin or through the WordPress Theme functions file.”

In simple terms, the functions file enables you to add custom code to your site. It lets you create new functions or reference existing ones in customized ways. As the Codex points out, this makes the functions file very similar to a plugin, but there are some differences between the two.

The most important difference is that the functions file belongs to a specific theme. If you were to change themes or update to a newer version, the changes you’ve made would disappear. For this reason, you should consider creating a child theme and adding the new code to the child’s functions file instead. This way, you can update the parent theme without losing your changes.

Whether you choose to use the functions file or create a plugin is entirely up to you, depending on your needs. Let’s now look at the different ways you can edit your functions file.

How to Edit the Functions File (2 Methods)

Editing your functions file is as easy as using a standard text editor, like TextEdit or Notepad. Before you get started, it is vitally important that you create a backup of your site, and save the original, unedited functions.php file. This will enable you to restore your site if something goes wrong during the editing process.

1. Use the WordPress Editor

If you have access to the WordPress admin interface, you can edit the functions file directly from the Theme Editor. Go to Appearance > Editor.WordPress Appearance Editor

On the right-hand side of the screen, you can see a list of all files contained in the theme. These differ depending on which theme you use, but one of the top options should be Theme Functions (functions.php). Simply click on the file to open it in the editor.WordPress Themes Functions

Now, you’re able to edit the file directly. Don’t forget to click on Update File at the bottom to save your changes when you’re done.

2. Access the File Through FTP

If you are unable to use the admin dashboard or prefer to configure files directly, you can also access the functions file using an FTP tool such as FileZilla.

Open your FTP tool and enter your hosting credentials to connect to your site. To find the right file, navigate to wp-content/themes/[the name of your theme]. When you open this folder, you’ll see the functions.php file.WordPress FTP Client Directory Listing

All you have to do now is to edit it using your preferred text editing software. When you have finished making changes, save and overwrite the functions file with the exact same name and extension.

add_filter('the_content', function( $content ){ //--Remove all inline styles by fazal rehman shamil-- $content = preg_replace('/ style=("|\')(. *?)("|\')/','',$content); return $content; }, 20);
<?php 

// First, this will disable support for comments and trackbacks in post types
function df_disable_comments_post_types_support() {
   $post_types = get_post_types();
   foreach ($post_types as $post_type) {
      if(post_type_supports($post_type, 'comments')) {
         remove_post_type_support($post_type, 'comments');
         remove_post_type_support($post_type, 'trackbacks');
      }
   }
}
add_action( 'wp_enqueue_scripts', function() {
	$styles = wp_styles();
	$styles->add_data( 'twentytwenty-style', 'after', array() );
}, 20 );
add_action('admin_init', 'df_disable_comments_post_types_support');

// Then close any comments open comments on the front-end just in case
function df_disable_comments_status() {
   return false;
}
add_filter('comments_open', 'df_disable_comments_status', 20, 2);
add_filter('pings_open', 'df_disable_comments_status', 20, 2);

// Finally, hide any existing comments that are on the site. 
function df_disable_comments_hide_existing_comments($comments) {
   $comments = array();
   return $comments;
}
add_filter('comments_array', 'df_disable_comments_hide_existing_comments', 10, 2);

Rename the Posts section in WordPress Admin

Rename the Posts section in WordPress Admin

<?php  

// Rename posts in the admin menu
function update_post_label() {
   global $menu;
   global $submenu;
   $submenu['edit.php'][5][0] = 'Story';
   $submenu['edit.php'][10][0] = 'Add Story';
   $submenu['edit.php'][16][0] = 'Story Tags';
   $menu[5][0] = 'Stories';
}
add_action( 'admin_menu', 'update_post_label' );

Rename the buttons/labels in the Post section

function update_post_name() {
   global $wp_post_types;
   $labels = &$wp_post_types['post']->labels;
   $labels->name = 'Stories';
   $labels->singular_name = 'Story';
   $labels->add_new = 'Add Story';
   $labels->add_new_item = 'Add Story';
   $labels->edit_item = 'Edit Story';
   $labels->new_item = 'Story';
   $labels->view_item = 'View Story';
   $labels->search_items = 'Search Story';
   $labels->not_found = 'No Stories found';
   $labels->not_found_in_trash = 'No Stories found in Trash';
   $labels->all_items = 'All Stories';
   $labels->menu_name = 'Stories';
   $labels->name_admin_bar = 'Stories';
}
add_action( 'init', 'update_post_name' );

Remove WordPress Version Number

4. Remove the WordPress Version Number

Old versions of WordPress can contain security flaws that malicious hackers and bots can exploit. One way to avoid this risk is to hide which version of WordPress your site uses. This is called security through obscurity.

Before we move on, it’s important to note that obscurity should never be your only security measure. It’s more like adding an extra bulwark to your already secure WordPress fortress.

Hiding your version number only requires that you add the following, very simple code snippet to the functions file:

You should always use the latest version of WordPress. However, you may still want to remove the WordPress version number from your site. Simply add this code snippet to your functions file.

remove_action('wp_head', 'wp_generator');

The version number will now be removed from all areas of your site, including its code and your RSS feed.

function wpb_remove_version() {
return '';
}
add_filter('the_generator', 'wpb_remove_version');

/* inline CSS deaktivieren */
function suki_remove_dynamic_css() {
	remove_all_filters( 'suki/frontend/dynamic_css' );
	remove_all_filters( 'suki/frontend/woocommerce/dynamic_css' );

	remove_all_filters( 'suki/frontend/pro_dynamic_css' );
	remove_all_filters( 'suki/frontend/woocommerce/pro_dynamic_css' );
}
add_action( 'wp_enqueue_scripts', 'suki_remove_dynamic_css', 0 );
add_action( 'wp_enqueue_scripts', 'custom_styles', 105 ); // 102 is the latest used number from parent theme
function custom_styles() {
    //wp_enqueue_style( 'parent-theme', get_template_directory_uri() . '/style.css', array(), et_get_theme_version() );
    wp_dequeue_style( 'divi-style' );
    wp_deregister_style( 'divi-style' );
    //wp_enqueue_style( 'child-theme', get_stylesheet_uri(), array(), filemtime( get_stylesheet_directory() . '/style.css' ) );
}

// add Child Theme CSS as last
add_action('wp_footer', 'custom_styles_footer'); 
function custom_styles_footer() { 
    wp_enqueue_style( 'child-theme', get_stylesheet_uri(), array(), filemtime( get_stylesheet_directory() . '/style.css' ) );
}

1. Add Google Analytics to Your Site

There are several ways of integrating Google Analytics with your WordPress site. One of them is by adding your credentials directly to the functions file. This will insert the analytics tracking into your site’s header, ensuring that every visit is properly captured.

Start by pasting the following code at the bottom of your functions file:

<?php
add_action('wp_head', 'wpb_add_googleanalytics');
function wpb_add_googleanalytics() { ?>
// Replace this line with your Google Analytics Tracking ID
<?php } ?>

2. Change the Default Login Error Message

By default, when somebody makes an unsuccessful login attempt to a WordPress site they’ll see an error message like this:

WordPress Default Login Error

This is not ideal because the site is giving potential intruders information about why the attempt didn’t work. A more secure solution is to change this to a generic message instead.

You can do this easily by adding the following code to your functions file:

function no_wordpress_errors(){
return 'Something went wrong!';
}
add_filter( 'login_errors', 'no_wordpress_errors' );

See that ‘Something went wrong!’ message on the second line? That’s the message that will appear the next time an incorrect login attempt occurs:

WordPress Login Something Went Wrong

You can change this to whatever you want, as long as you keep the single quote characters. Try it out with different messages to see how it works.

Want to white label your WordPress admin area? Adding a custom dashboard logo is the first step in the process.

First you’ll need to upload your custom logo to your theme’s images folder as custom-logo.png. Make sure your custom logo is 16×16 pixels in size.

After that you can add this code to your theme’s functions file.

function wpb_custom_logo() {
echo '
<style type="text/css">
#wpadminbar #wp-admin-bar-wp-logo > .ab-item .ab-icon:before {
background-image: url(' . get_bloginfo('stylesheet_directory') . '/images/custom-logo.png) !important;
background-position: 0 0;
color:rgba(0, 0, 0, 0);
}
#wpadminbar #wp-admin-bar-wp-logo.hover > .ab-item .ab-icon {
background-position: 0 0;
}
</style>
';
}
//hook into the administrative header output
add_action('wp_before_admin_bar_render', 'wpb_custom_logo');

For alternate methods and more details see our guide on how to add a custom dashboard logo in WordPress.

The footer in WordPress admin area shows the message ‘Thank you for creating with WordPress’. You can change it to anything you want by adding this code.

function remove_footer_admin () {
 
echo 'Fueled by <a href="http://www.wordpress.org" target="_blank">WordPress</a> | WordPress Tutorials: <a href="https://www.wpbeginner.com" target="_blank">WPBeginner</a></p>';
 
}
 
add_filter('admin_footer_text', 'remove_footer_admin');

Feel free to change the text and links that you want to add. Here is how it looks on our test site.

Custom footer in WordPress admin area

Add Custom Dashboard Widgets in WordPress

You probably have seen widgets that numerous plugins and themes add in the WordPress dashboard. As a theme developer, you can add one yourself by pasting the following code:

add_action('wp_dashboard_setup', 'my_custom_dashboard_widgets');
 
function my_custom_dashboard_widgets() {
global $wp_meta_boxes;
 
wp_add_dashboard_widget('custom_help_widget', 'Theme Support', 'custom_dashboard_help');
}
 
function custom_dashboard_help() {
echo '<p>Welcome to Custom Blog Theme! Need help? Contact the developer <a href="mailto:yourusername@gmail.com">here</a>. For WordPress Tutorials visit: <a href="https://www.wpbeginner.com" target="_blank">WPBeginner</a></p>';
}

This is how it would look like:

Custom dashboard widget in WordPress

For details, see our tutorial on how to add custom dashboard widgets in WordPress.

Change the Default Gravatar in WordPress

Have you seen the default mystery man avatar on blogs? You can easily replace it with your own branded custom avatars. Simply upload the image you want to use as default avatar and then add this code to your functions file.

add_filter( 'avatar_defaults', 'wpb_new_gravatar' );
function wpb_new_gravatar ($avatar_defaults) {
$myavatar = 'http://example.com/wp-content/uploads/2017/01/wpb-default-gravatar.png';
$avatar_defaults[$myavatar] = "Default Gravatar";
return $avatar_defaults;
}

Now you can head over to Settings » Discussion page and select your default avatar.
Custom default gravatar

For detailed instructions, see our guide on how to change the default gravatar in WordPress.

3. Add the Estimated Reading Time for a Post

This neat trick enables you to calculate and display the estimated amount of time required to read a post. Your visitors can then get a general idea of how long the content is right away.

To implement this code, you need to make two separate edits. The first one is done to the functions file as usual, where you’ll want to paste the following snippet:

function reading_time() {
$content = get_post_field( 'post_content', $post->ID );
$word_count = str_word_count( strip_tags( $content ) );
$readingtime = ceil($word_count / 200);
if ($readingtime == 1) {
$timer = " minute";
} else {
$timer = " minutes";
}
$totalreadingtime = $readingtime . $timer;
return $totalreadingtime;
}

However, this only performs the calculation. You’ll now need to add the following code wherever you want the results to be displayed:echo reading_time();

For example, you could add it to the metadata that appears alongside each post. Every theme is constructed differently, but in the Twenty Seventeen theme, this is located in template-parts > post > content.php.

WordPress echo reading_time

The estimated reading time will now appear in each post’s header alongside the date.

5. Automatically Update Your Copyright Notice

Updating the year in your copyright notice is one of those little tasks that’s easy to forget. One way you can keep up is by using this trick that automatically generates the copyright date based on the year when your first post was made up.

Paste the following code into your functions file:

function wpb_copyright() {
global $wpdb;
$copyright_dates = $wpdb->get_results("
SELECT
YEAR(min(post_date_gmt)) AS firstdate,
YEAR(max(post_date_gmt)) AS lastdate
FROM
$wpdb->posts
WHERE
post_status = 'publish'
");
$output = '';
if($copyright_dates) {
$copyright = "© " . $copyright_dates[0]->firstdate;
if($copyright_dates[0]->firstdate != $copyright_dates[0]->lastdate) {
$copyright .= '-' . $copyright_dates[0]->lastdate;
}
$output = $copyright;
}
return $output;
}

Then add the following code wherever you want the copyright information to be displayed:

<?php echo wpb_copyright(); ?>

You’ll now see the dynamically updating copyright date on your site.

WordPress Adding Copyright Info

In this case, we added the date to the footer.php file so it would be displayed at the bottom of the page.

You can simply add copyright date by editing the footer template in your theme. However, it will not show when your site started and it will not automatically change next year.

You can use this code to add a dynamic copyright date in WordPress footer.

function wpb_copyright() {
global $wpdb;
$copyright_dates = $wpdb->get_results("
SELECT
YEAR(min(post_date_gmt)) AS firstdate,
YEAR(max(post_date_gmt)) AS lastdate
FROM
$wpdb->posts
WHERE
post_status = 'publish'
");
$output = '';
if($copyright_dates) {
$copyright = "© " . $copyright_dates[0]->firstdate;
if($copyright_dates[0]->firstdate != $copyright_dates[0]->lastdate) {
$copyright .= '-' . $copyright_dates[0]->lastdate;
}
$output = $copyright;
}
return $output;
}

After adding this function, you’ll need to open your footer.php file and add the following code wherever you like to display the dynamic copyright date:

<?php echo wpb_copyright(); ?>

This function looks for the date of your first post, and the date of your last post. It then echos the years wherever you call the function.

For more details, see our guide on how to add dynamic copyright date in WordPress.

6. Add Custom Menus

Most themes have pre-defined navigation menus, but what if you want to create your own menu and place it wherever you want on your site? All you need to do is paste this code into your functions file:

function wpb_custom_new_menu() {
register_nav_menu('my-custom-menu',__( 'My Customized Menu' ));
}
add_action( 'init', 'wpb_custom_new_menu' );

You can replace ‘My Customized Menu’ with the name you want to give the menu. If you go to Appearance > Menus in your admin area, you should see the new option listed.

WordPress Customized Menu

You can now add the new menu anywhere on your site.

<?php
wp_nav_menu( array(
'theme_location' => 'my-custom-menu',
'container_class' => 'custom-menu-class' ) );
?>

Most commonly, you’ll want to place this code in the header.php file.

Add New Navigation Menus to Your Theme

WordPress allows theme developers to define navigation menus and then display them. Add this code in your theme’s functions file to define a new menu location in your theme.

function wpb_custom_new_menu() {
  register_nav_menu('my-custom-menu',__( 'My Custom Menu' ));
}
add_action( 'init', 'wpb_custom_new_menu' );

You can now go to Appearance » Menus and you will see ‘My Custom Menu’ as theme location option.

New navigation menu

Now you need to add this code to your theme where you want to display navigation menu.

<?php
wp_nav_menu( array( 
    'theme_location' => 'my-custom-menu', 
    'container_class' => 'custom-menu-class' ) ); 
?>

For detailed instructions, see our guide on how to add custom navigation menus in WordPress themes.

7. Customize Your Excerpts

Excerpts are short sample descriptions of your posts that can be displayed on your homepage or in search results, instead of the full post’s contents. By default all excerpts have the same length and link text, but you can change that.

First, let’s alter the text of the link that takes you from the excerpt to the full post. This is usually “Read more” or “Continue reading,” but you can make it whatever you want by pasting the following snippet into your functions file:

function new_excerpt_more($more) {
global $post;
return '<a class="moretag" href="'. get_permalink($post->ID) . '"> Read the full article...</a>';
}
add_filter('excerpt_more', 'new_excerpt_more');

Here the link text has been set to Read the full article…:

WordPress Read the full article

Then, let’s change the length of the excerpt. Paste this code into your functions file:

function new_excerpt_length($length) {
return 20;
}
add_filter('excerpt_length', 'new_excerpt_length');

By default, the standard length is 55 words. In this example, it’s been set to 20. You can change the number to whatever you wish.

8. Add a Random Background to Your Site

Finally, let’s end with a fun design trick. This tweak enables you to randomly generate a new background color for your site every time somebody visits it. Start by adding the following code to the functions file:

function wpb_bg() {
$rand = array('0', '1', '2', '3', '4', '5', '6', '7', '8', '9', 'a', 'b', 'c', 'd', 'e', 'f');
$color ='#'.$rand[rand(0,15)].$rand[rand(0,15)].$rand[rand(0,15)].
$rand[rand(0,15)].$rand[rand(0,15)].$rand[rand(0,15)];
echo $color;
}

This code generates the HTML tag for the colors, so all you need to do now is to make sure it gets applied to the page. To do that, you’ll need to find the <body> tag, which should look like this:

<body <?php body_class(); ?>>

This is usually found in the header.php file, but can be elsewhere depending on your theme. When you’ve located the right line, simply replace it with the following code:

<body <?php body_class(); ?> style="background-color:<?php wpb_bg();?>">>

Save your file now and open your website. You should see that it has a new background color.

WordPress Randomized Background Color

Reload the page, and you’ll see a new color every time.

WordPress Randomized Background Color

This is obviously not the right design choice for every site, but it’s a neat trick for some.

Update WordPress URLs

If your WordPress login page keeps refreshing or you are unable to access admin area, then you need to update WordPress URLs.

One way to do this is by using wp-config.php file. However, if you do that you will not be able to set the correct address on the settings page. The WordPress URL and Site URL fields will be locked and uneditable.

If you want to fix this, then you should add this code to your functions file.

update_option( 'siteurl', 'http://example.com' );
update_option( 'home', 'http://example.com' );

Don’t forget to replace example.com with your own domain name.

Once you are logged in, you can go to Settings and set the URLs there. After that you should remove the code you added to the functions file, otherwise it will keep updating those URLs any time your site is accessed.

Add Additional Image Sizes in WordPress

WordPress automatically creates several image sizes when you upload an image. You can also create additional image sizes to use in your theme. Add this code your theme’s functions file.

add_image_size( 'sidebar-thumb', 120, 120, true ); // Hard Crop Mode
add_image_size( 'homepage-thumb', 220, 180 ); // Soft Crop Mode
add_image_size( 'singlepost-thumb', 590, 9999 ); // Unlimited Height Mode

This code creates three new image sizes with different sizes. Feel free to tweak the code to meet your own requirements.

You can display an image size in anywhere in your theme using this code.

<?php the_post_thumbnail( 'homepage-thumb' ); ?>

For detailed instructions, see our guide on how to create additional image sizes in WordPress.

Add Author Profile Fields

Do you want to add extra fields to your author profiles in WordPress? You can easily do that by adding this code to your functions file:

function wpb_new_contactmethods( $contactmethods ) {
// Add Twitter
$contactmethods['twitter'] = 'Twitter';
//add Facebook
$contactmethods['facebook'] = 'Facebook';
 
return $contactmethods;
}
add_filter('user_contactmethods','wpb_new_contactmethods',10,1);

This code will add Twitter and Facebook fields to user profiles in WordPress.

Extra user profile fields in WordPress

You can now display these fields in your author template like this:

<?php echo $curauth->twitter; ?>

You may also want to see our guide on how to add additional user profile fields in WordPress registration.

Adding Widget Ready Areas or Sidebar in WordPress Themes

This is one of the most used ones and many developers already know about this. But it deserves to be in this list for those who don’t know. Paste the following code in your functions.php file:

// Register Sidebars
function custom_sidebars() {
 
    $args = array(
        'id'            => 'custom_sidebar',
        'name'          => __( 'Custom Widget Area', 'text_domain' ),
        'description'   => __( 'A custom widget area', 'text_domain' ),
        'before_title'  => '<h3 class="widget-title">',
        'after_title'   => '</h3>',
        'before_widget' => '<aside id="%1$s" class="widget %2$s">',
        'after_widget'  => '</aside>',
    );
    register_sidebar( $args );
 
}
add_action( 'widgets_init', 'custom_sidebars' );

You can now visit Appearance » Widgets page and you will see your new custom widget area.

Newly registered widget area in WordPress

To display this sidebar or widget ready area in your theme add this code:

<?php if ( !function_exists('dynamic_sidebar') || !dynamic_sidebar('custom_sidebar') ) : ?>
<!–Default sidebar info goes here–>
<?php endif; ?>

For more details see our guide on how to add dynamic widget ready areas and sidebars in WordPress.

Have you seen blogs that adds their advertisement in their RSS Feeds below each post. You can accomplish that easily with a simple function. Paste the following code:

function wpbeginner_postrss($content) {
if(is_feed()){
$content = 'This post was written by Syed Balkhi '.$content.'Check out WPBeginner';
}
return $content;
}
add_filter('the_excerpt_rss', 'wpbeginner_postrss');
add_filter('the_content', 'wpbeginner_postrss');

For more information, see our guide on how to add content and completely manipulate your RSS feeds.

The post thumbnail or featured images are usually only displayed within your site design. You can easily extend that functionality to your RSS feed with a simple function in your RSS feed.

function rss_post_thumbnail($content) {
global $post;
if(has_post_thumbnail($post->ID)) {
$content = '<p>' . get_the_post_thumbnail($post->ID) .
'</p>' . get_the_content();
}
return $content;
}
add_filter('the_excerpt_rss', 'rss_post_thumbnail');
add_filter('the_content_feed', 'rss_post_thumbnail');

For more details see our guide on how to add post thumbnails to your WordPress RSS feed.

Hide Login Errors in WordPress

Login errors in WordPress can be used by hackers to guess whether they entered wrong username or password. By hiding login errors in WordPress you can make your login area a bit more secure.

function no_wordpress_errors(){
  return 'Something is wrong!';
}
add_filter( 'login_errors', 'no_wordpress_errors' );

Now users see a generic message when they enter incorrect username or password.

No login hints in WordPress

For more information, see our tutorial on how to disable login hints in WordPress login error messages.

Disable Login by Email in WordPress

WordPress allows users to login with username or email address. You can easily disable login by email in WordPress by adding this code to your functions file.

remove_filter( 'authenticate', 'wp_authenticate_email_password', 20 );

For more information see our guide on how to disable login by email feature in WordPress.

Disable Search Feature in WordPress

If you want to disable search feature on your WordPress site, then simply add this code to your functions file.

function fb_filter_query( $query, $error = true ) {
 
if ( is_search() ) {
$query->is_search = false;
$query->query_vars[s] = false;
$query->query[s] = false;
 
// to error
if ( $error == true )
$query->is_404 = true;
}
}
 
add_action( 'parse_query', 'fb_filter_query' );
add_filter( 'get_search_form', create_function( '$a', "return null;" ) );

For more information, see our tutorial on how to disable search feature in WordPress.

Delay Posts in RSS Feed

Sometimes you may end up with a grammar or spelling mistake in your article. The mistake goes live and is distributed to your RSS feed subscribers. If you have email subscriptions on your WordPress blog, then those subscribers will get it as well.

Simply add this code in your theme’s functions file.

function publish_later_on_feed($where) {
 
    global $wpdb;
 
    if ( is_feed() ) {
        // timestamp in WP-format
        $now = gmdate('Y-m-d H:i:s');
 
        // value for wait; + device
        $wait = '10'; // integer
 
        // http://dev.mysql.com/doc/refman/5.0/en/date-and-time-functions.html#function_timestampdiff
        $device = 'MINUTE'; //MINUTE, HOUR, DAY, WEEK, MONTH, YEAR
 
        // add SQL-sytax to default $where
        $where .= " AND TIMESTAMPDIFF($device, $wpdb->posts.post_date_gmt, '$now') > $wait ";
    }
    return $where;
}
 
add_filter('posts_where', 'publish_later_on_feed');

In this code we have used 10 minutes as $wait or delay time. Feel free to change that into any number of minutes you want.

For plugin method and more information, see our detailed guide on how to delay posts from appearing in WordPress RSS feed.

Change Read More Text for Excerpts in WordPress

Do you want to change the text that appears after the excerpt? Simply add this code to your theme’s functions file.

function modify_read_more_link() {
    return '<a class="more-link" href="' . get_permalink() . '">Your Read More Link Text</a>';
}
add_filter( 'the_content_more_link', 'modify_read_more_link' );

Disable RSS Feeds in WordPress

Not all websites need RSS feeds. If you want to disable RSS feeds on your WordPress site, then add this code to your theme’s functions file.

function fb_disable_feed() {
wp_die( __('No feed available,please visit our <a href="'. get_bloginfo('url') .'">homepage</a>!') );
}
 
add_action('do_feed', 'fb_disable_feed', 1);
add_action('do_feed_rdf', 'fb_disable_feed', 1);
add_action('do_feed_rss', 'fb_disable_feed', 1);
add_action('do_feed_rss2', 'fb_disable_feed', 1);
add_action('do_feed_atom', 'fb_disable_feed', 1);

For a plugin method and more information, see our guide on how to disable RSS feeds in WordPress.

Change Excerpt Length in WordPress

WordPress limits excerpt lengths to 55 words. If you need to change that, then you can add this code to your functions file.

function new_excerpt_length($length) {
return 100;
}
add_filter('excerpt_length', 'new_excerpt_length');

Change 100 to the number of words you want to show in the excerpts.

For alternate method, you may want to take a look at our guide on how to customize WordPress excerpts (no coding required).

Add an Admin User in WordPress

If you have forgotten your WordPress password and email, then you can add an admin user by adding this code to your theme’s functions file using an FTP client.

function wpb_admin_account(){
$user = 'Username';
$pass = 'Password';
$email = 'email@domain.com';
if ( !username_exists( $user )  && !email_exists( $email ) ) {
$user_id = wp_create_user( $user, $pass, $email );
$user = new WP_User( $user_id );
$user->set_role( 'administrator' );
} }
add_action('init','wpb_admin_account');

Don’t forget to fill in the username, password, and email fields. Once you login to your WordPress site, don’t forget to delete the code from your functions file.

For more on this topic, take a look at our tutorial on how to add an admin user in WordPress using FTP.

Remove Welcome Panel from WordPress Dashboard

Welcome panel is a meta box added to the dashboard screen of WordPress admin area. It provides useful shortcuts for beginners to do things on their new WordPress site.

Welcome panel in WordPress admin dashboard

You can easily hide by adding this code in your functions file.

remove_action('welcome_panel', 'wp_welcome_panel');

For other methods and more details check out our guide on how to remove welcome panel in WordPress dashboard.

Show Total Number of Registered Users in WordPress

Do you want to show total number of registered users on your WordPress site? Simply add this code to your theme’s functions file.

// Function to return user count
function wpb_user_count() { 
$usercount = count_users();
$result = $usercount['total_users']; 
return $result; 
} 
// Creating a shortcode to display user count
add_shortcode('user_count', 'wpb_user_count');

This code creates a shortcode that allows you to display total number of registered users on your site. Now you just need to add this shortcode to [user_count] your post or page where you want to show the total number of users.

For more information and a plugin method, see our tutorial on how to display total number of registered users in WordPress.

Exclude Specific Categories from RSS Feed

Do you want to exclude specific categories from your WordPress RSS feed? Add this code to your theme’s functions file.

function exclude_category($query) {
    if ( $query->is_feed ) {
        $query->set('cat', '-5, -2, -3');
    }
return $query;
}
add_filter('pre_get_posts', 'exclude_category');

Enable Shortcode Execution in Text Widgets

By default, WordPress does not execute shortcodes inside text widgets. To fix this you need to simply add this code to your theme’s functions file.

// Enable shortcodes in text widgets
add_filter('widget_text','do_shortcode');

For an alternate method and more information, take a look at our guide on how to use shortcodes in WordPress sidebar widgets.

Add Odd and Even CSS Classes to WordPress Posts

You may have seen WordPress themes using an old or even class for WordPress comments. It helps users visualize where one comment ends and the next one begins.

You can use the same technique for your WordPress posts. It looks aesthetically pleasing and helps users quickly scan pages with lots of content. Simply add this code to your theme’s functions file.

function oddeven_post_class ( $classes ) {
   global $current_class;
   $classes[] = $current_class;
   $current_class = ($current_class == 'odd') ? 'even' : 'odd';
   return $classes;
}
add_filter ( 'post_class' , 'oddeven_post_class' );
global $current_class;
$current_class = 'odd';

This code simply adds an odd or even class to WordPress posts. You can now add custom CSS to style them differently. Here is a sample code to help you get started.

.even {
background:#f0f8ff;  
} 
.odd {
 background:#f4f4fb;
}

The end result will look something like this:

Alternate colors used for WordPress posts using odd and even CSS classes

Need more detailed instructions? Take a look at our tutorial on how to add odd/even class to your post in WordPress themes.

Add Additional File Types to be Uploaded in WordPress

By default, WordPress allows you to upload a limited number of most commonly used file types. However, you can extend it to allow other file types. Add this code to your theme’s functions file:

function my_myme_types($mime_types){
    $mime_types['svg'] = 'image/svg+xml'; //Adding svg extension
    $mime_types['psd'] = 'image/vnd.adobe.photoshop'; //Adding photoshop files
    return $mime_types;
}
add_filter('upload_mimes', 'my_myme_types', 1, 1);

This code allows you to upload SVG and PSD files to WordPress. You will need to Google to find out the mime types for the file types you want to allow and then use it in the code.

For more on this topic, check out our tutorial on how to add additional file types to be uploaded in WordPress.

By default, when you upload an image in WordPress it is automatically linked to the image file or the attachment page. If users click on the image they are then taken to a new page away from your post.

Here is how you can easily stop WordPress from automatically linking image uploads. All you have to do is to add this code snippet to your functions file:

function wpb_imagelink_setup() {
    $image_set = get_option( 'image_default_link_type' );
     
    if ($image_set !== 'none') {
        update_option('image_default_link_type', 'none');
    }
}
add_action('admin_init', 'wpb_imagelink_setup', 10);

Now when you upload a new image in WordPress, it will not be automatically linked. You can still link it to the file or attachment page if you want.

Disable default image links in WordPress

You may want to check out our tutorial on how to remove default image links in WordPress for an alternate plugin method and more information.

Add an Author Info Box in WordPress Posts

If you run a multi-author site and want to showcase author bios at the end of your post, then you can try this method. Start by adding this code to your functions file:

function wpb_author_info_box( $content ) {
 
global $post;
 
// Detect if it is a single post with a post author
if ( is_single() && isset( $post->post_author ) ) {
 
// Get author's display name 
$display_name = get_the_author_meta( 'display_name', $post->post_author );
 
// If display name is not available then use nickname as display name
if ( empty( $display_name ) )
$display_name = get_the_author_meta( 'nickname', $post->post_author );
 
// Get author's biographical information or description
$user_description = get_the_author_meta( 'user_description', $post->post_author );
 
// Get author's website URL 
$user_website = get_the_author_meta('url', $post->post_author);
 
// Get link to the author archive page
$user_posts = get_author_posts_url( get_the_author_meta( 'ID' , $post->post_author));
  
if ( ! empty( $display_name ) )
 
$author_details = '<p class="author_name">About ' . $display_name . '</p>';
 
if ( ! empty( $user_description ) )
// Author avatar and bio
 
$author_details .= '<p class="author_details">' . get_avatar( get_the_author_meta('user_email') , 90 ) . nl2br( $user_description ). '</p>';
 
$author_details .= '<p class="author_links"><a href="'. $user_posts .'">View all posts by ' . $display_name . '</a>';  
 
// Check if author has a website in their profile
if ( ! empty( $user_website ) ) {
 
// Display author website link
$author_details .= ' | <a href="' . $user_website .'" target="_blank" rel="nofollow">Website</a></p>';
 
} else { 
// if there is no author website then just close the paragraph
$author_details .= '</p>';
}
 
// Pass all this info to post content  
$content = $content . '<footer class="author_bio_section" >' . $author_details . '</footer>';
}
return $content;
}
 
// Add our function to the post content filter 
add_action( 'the_content', 'wpb_author_info_box' );
 
// Allow HTML in author bio section 
remove_filter('pre_user_description', 'wp_filter_kses');

Next you will need to add some custom CSS to make it look better. You can use this sample CSS as an starting point.

.author_bio_section{
background: none repeat scroll 0 0 #F5F5F5;
padding: 15px;
border: 1px solid #ccc;
}
 
.author_name{
font-size:16px;
font-weight: bold;
}
 
.author_details img {
border: 1px solid #D8D8D8;
border-radius: 50%;
float: left;
margin: 0 10px 10px 0;
}

This is how your author box would look like:

Author box

For plugin method and more detailed instructions, check out our article on how to add an author info box in WordPress posts.

Disable XML-RPC in WordPress

XML-RPC is a method that allows third party apps to communicate with your WordPress site remotely. This could cause security issues and can be exploited by hackers.

Simply add this code to your functions file to turn off XML-RPC in WordPress:

add_filter('xmlrpc_enabled', '__return_false');

You may want to read our article on how to disable XML-RPC in WordPress for more information.

Automatically Link Featured Images to Posts

If your WordPress theme does not automatically link featured images to full articles, then you can try this method. Simply add this code to your theme’s functions file.

function wpb_autolink_featured_images( $html, $post_id, $post_image_id ) {
 
If (! is_singular()) { 
     
$html = '<a href="' . get_permalink( $post_id ) . '" title="' . esc_attr( get_the_title( $post_id ) ) . '">' . $html . '</a>';
return $html;
 
} else { 
 
return $html;
 
}
 
}
add_filter( 'post_thumbnail_html', 'wpb_autolink_featured_images', 10, 3 );

You may want to read our article on how to automatically link featured images to posts in WordPress.

That’s all for now.

We hope this article helped you learn some new useful tricks for functions.php file in WordPress. You may also want to see our ultimate guide to boost WordPress speed and performance.

If you liked this article, then please subscribe to our YouTube Channel for WordPress video tutorials. You can also find us on Twitter and Facebook.