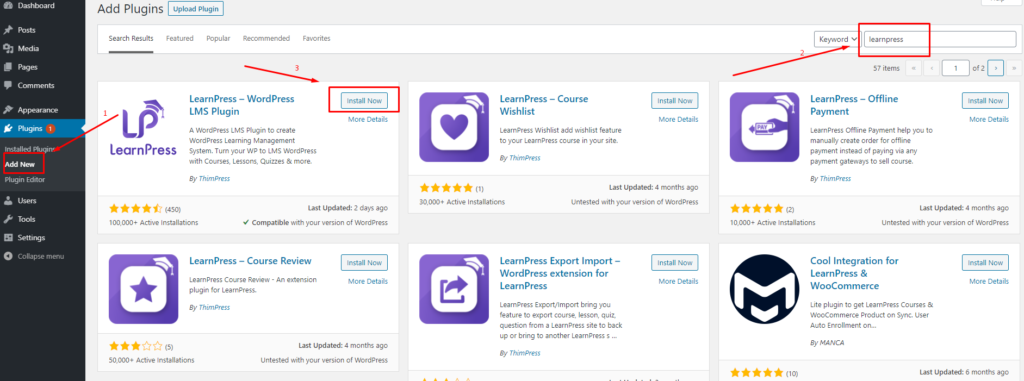
Follow the below steps to install our plugin LearnPress via WordPress Plugin Search:
Über die WordPress-Suche
Befolgen Sie die folgenden Schritte, um unser Plugin LearnPress über die WordPress-Plugin-Suche zu installieren:
Schritt 1. Besuchen Sie Dashboard > Plugins > Neu hinzufügen
Schritt 2. Geben Sie „LearnPress“ in die Suchleiste ein
Schritt 3. Sie sehen Learnpress – WordPress LMS Plugin. Klicken Sie auf Jetzt installieren
Schritt 4. Aktivieren Sie das LearnPress-Plugin
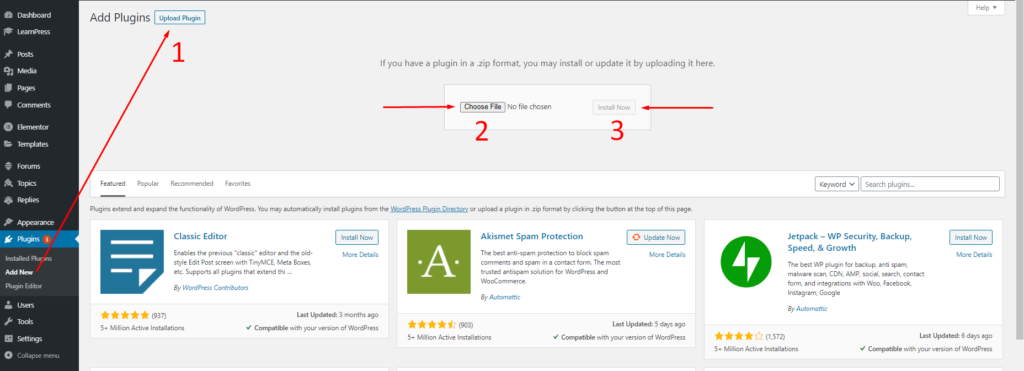
Über den Upload des WordPress-Admin-Plugins:
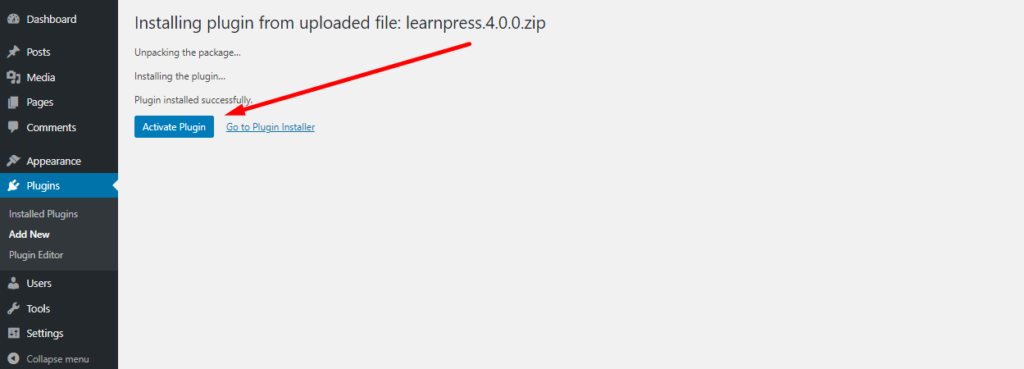
Sie können das Plugin LearnPress auch über die Upload-Option im Admin-Bereich installieren. Zuerst müssen Sie unser Plugin LearnPress von hier herunterladen: https://wordpress.org/plugins/learnpress/ Die Plugin-Datei muss eine ZIP -Datei sein. Befolgen Sie die folgenden Schritte, um das Plugin LearnPress über das Hochladen des WordPress-Admin-Plugins zu installieren: 1. Besuchen Sie Dashboard > Plugins > Neu hinzufügen > Klicken Sie auf die Schaltfläche „Plugin . “ hochladen Schritt Computer und klicken Jetzt installieren
Schritt 3. Aktivieren Sie das LearnPress-Plugin
Per FTP
Die dritte Möglichkeit, das Plugin LearnPress zu installieren, ist die Verwendung von FTP. Zuerst müssen Sie unser Plugin LearnPress von hier herunterladen: https://wordpress.org/plugins/learnpress/ Die Plugin-Datei muss eine ZIP -Datei sein. Führen Sie die folgenden Schritte aus, um das Plugin LearnPress über FTP zu installieren:
Schritt 1. Ihrem FTP-Konto FTP-Software an, um auf Ihren Host-Webserver zuzugreifen
Schritt 2 . Extrahieren learnpress.zip Datei
Schritt 3. den extrahierten Ordner leanpress in wp-content/plugins Ordner
Schritt 4. Aktivieren Sie das LeanrPress-Plugin im Dashboard > Installierte Plugins
HINWEIS
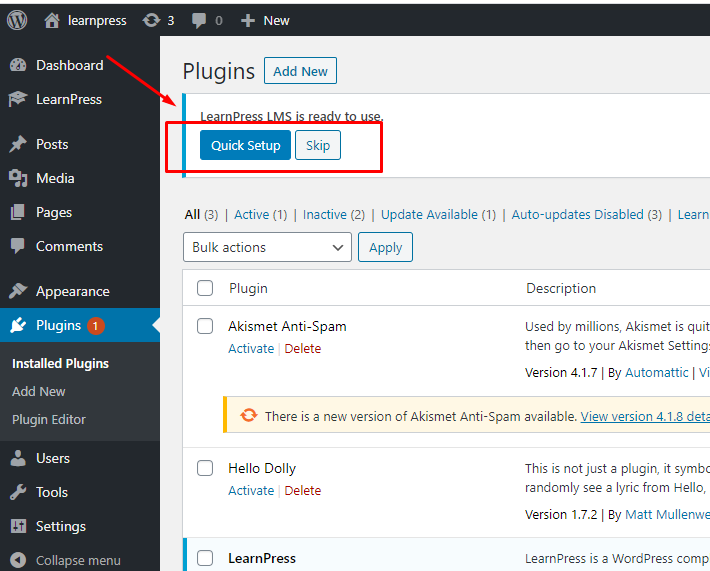
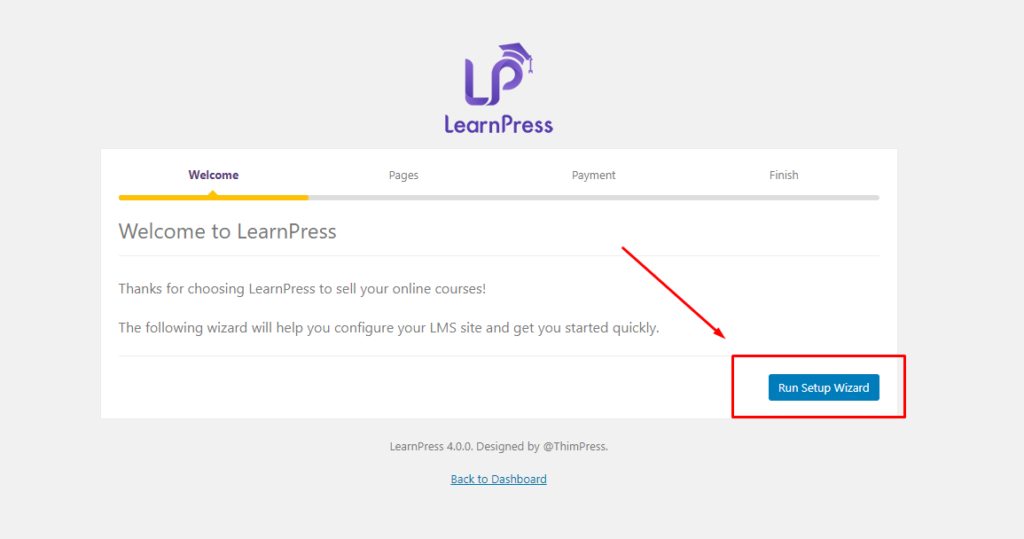
Nachdem Sie Learnpress installiert/aktiviert haben, müssen Sie einige grundlegende Informationen konfigurieren, bevor Sie Ihre Website veröffentlichen. Sie können auf die Schnelleinrichtung , um sie zu konfigurieren:
Der Bildschirm zeigt Setup-Optionen für Learnpress
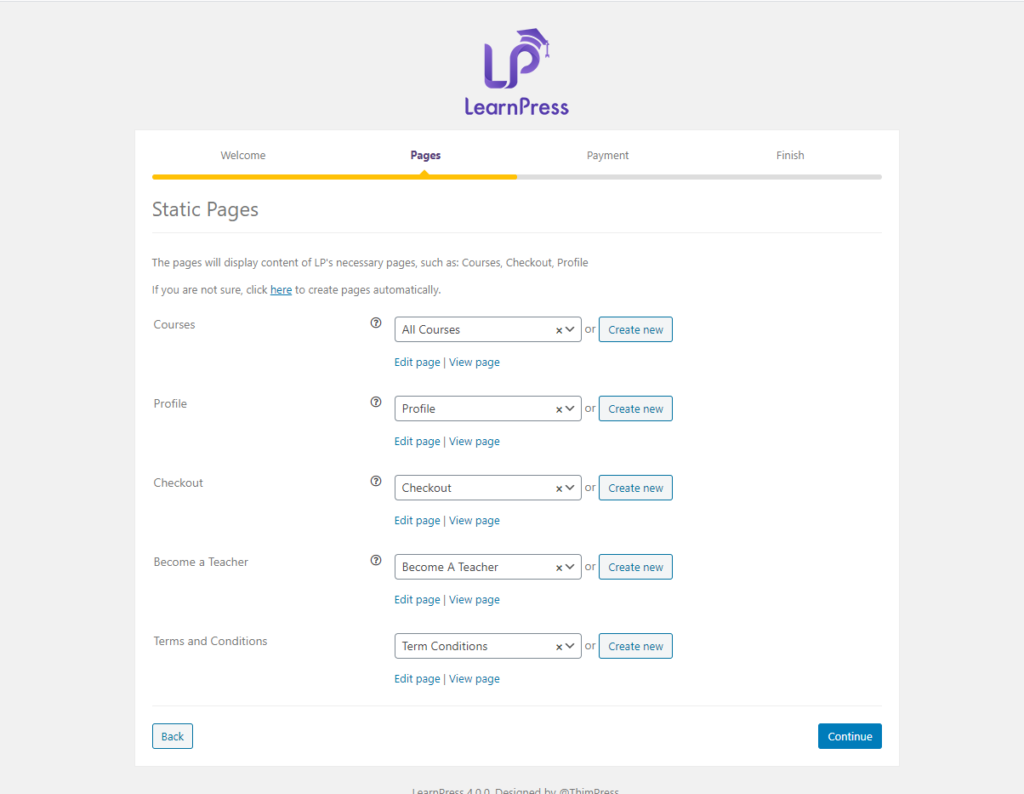
Statische Seite: Wir haben Standardseiten, wenn Sie unser Plugin installieren, Sie können die Seiten ändern, wenn Sie möchten.
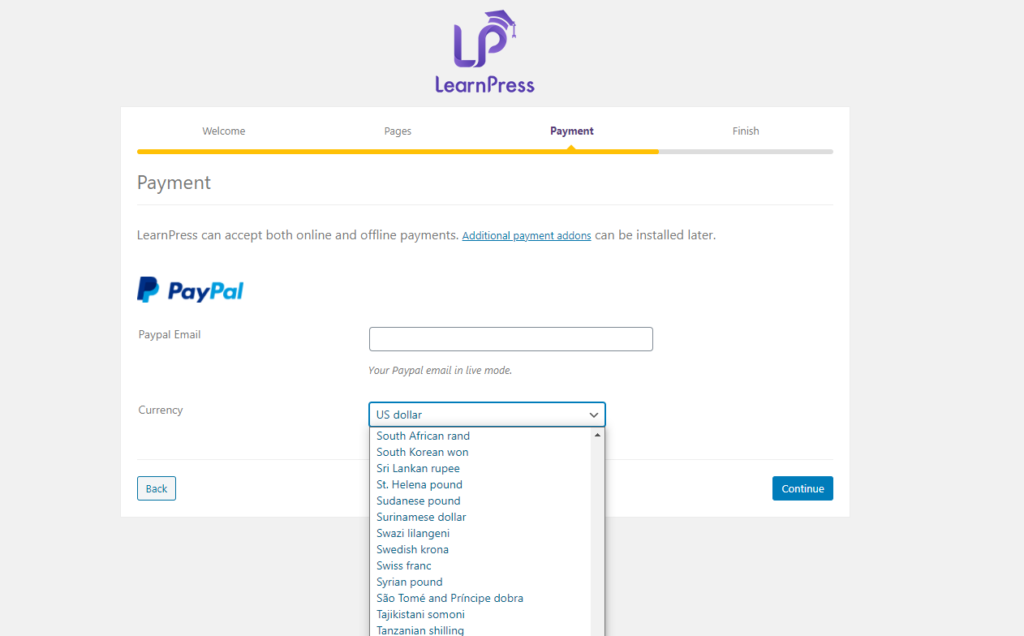
Zahlung: Sie können Ihr Paypal-E-Mail-Konto und die Währung konfigurieren, die auf Ihrer Website angezeigt werden. klicken Weiter , um mit dem nächsten Schritt fortzufahren.
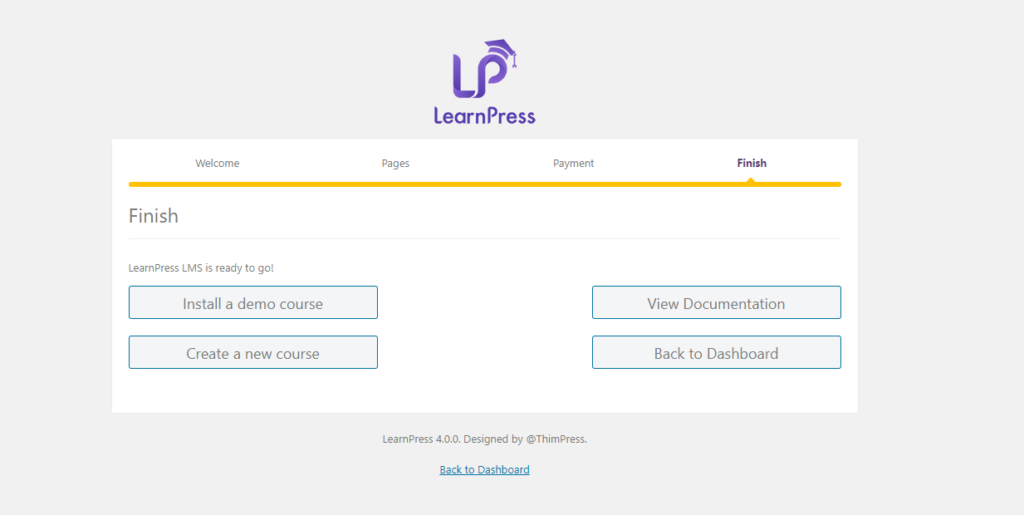
Fertigstellen: Sie können einen Demokurs installieren, einen neuen Kurs erstellen, unsere Dokumentation anzeigen oder zu Ihrem Dashboard zurückkehren.
Wie kann man die Website-Geschwindigkeit schneller verbessern?
Dieser Artikel ist für diejenigen unter Ihnen, die wahrscheinlich denken, dass Ihre Website so langsam ist. Also muss wohl nachgebessert werden. Wir alle wissen, dass Geschwindigkeit für jede Website wichtig ist. Wenn Ihre Website zu langsam ist, werden Ihre Kunden Ihre Website nicht besuchen und Sie werden keine guten Einnahmen erzielen.
How to Disable WordPress Admin Bar for All Users Except Administrators
Do you want to easily disable the admin bar in WordPress?
By default, you can easily disable the WordPress admin bar for any user from the dashboard. But this method can take time if you have a lot of registered users on your site.
In this article, we’ll show you how to disable the WordPress admin bar for all users except administrators.
What is WordPress Admin Bar?
By default, WordPress displays an admin bar on the top for all logged-in users. This toolbar is visible in the WordPress admin area as well as all other pages when you are logged in.
However, when viewing the public pages on the front-end of your website, the admin bar can be a bit distracting. It may also affect your website’s design and user experience.
Luckily, there are multiple ways to easily disable the WordPress admin bar for all users except administrators.
Video Tutorial
https://www.youtube.com/embed/25WBldgArAk?version=3&rel=0&fs=1&showsearch=0&showinfo=1&iv_load_policy=1&wmode=transparentSubscribe to WPBeginnerhttps://www.youtube.com/subscribe_embed?usegapi=1&channel=wpbeginner&layout=default&count=default&origin=https%3A%2F%2Fwpbeginner.com&gsrc=3p&ic=1&jsh=m%3B%2F_%2Fscs%2Fapps-static%2F_%2Fjs%2Fk%3Doz.gapi.en.vQiXRrxCe40.O%2Fam%3DAQ%2Fd%3D1%2Frs%3DAGLTcCMBxIGVyXSdvvcs43a64yHt_P7dfg%2Fm%3D__features__#_methods=onPlusOne%2C_ready%2C_close%2C_open%2C_resizeMe%2C_renderstart%2Concircled%2Cdrefresh%2Cerefresh&id=I0_1448178294715&parent=https%3A%2F%2Fwpbeginner.com
If you’d prefer written instructions, just keep reading.
Method 1. Disabling The WordPress Admin Bar for Any User
WordPress allows each user to disable the admin bar by simply editing their user profile. As a site owner, you can also edit other user’s profiles and disable the admin bar for them.
If you want to disable the admin bar for any particular user in WordPress, you’ll need to edit their user profile.
Simply go to the Users » All Users page and then click on the ‘edit’ link for any user you want to disable the admin bar for.
This will bring you to the user profile editor page. From here, uncheck the box next to the ‘Show toolbar when viewing site’ option.
Scroll down and click the ‘Update User’ button to save your changes.
This will disable the admin bar for that particular user when they visit the website.
If you have a handful of users, then you can go ahead and manually disable the admin bar for all of them. However, if you run a membership site with a lot of users, then this method wouldn’t work.
Luckily, there are other ways to quickly disable the admin bar for all users except administrators.
Method 2. Disable Admin Bar for All Users Except Admins with a Plugin
This method allows you to quickly disable the WordPress admin for all users.
Upon activation, go to the Settings » Hide Admin Bar Settings page. From here, check the boxes next to the user roles where you want to disable the admin bar.
Don’t forget to click on the ‘Save Changes’ button to store your settings.
Method 3. Disable Admin Bar for All Users Except Administrators Using Code
This code checks if the current user is not an administrator, and they are not viewing the admin dashboard. If both conditions match, then it will disable the WordPress admin bar.
Don’t forget to save your changes and check your website to make sure everything is working fine.
Method 4. Disable Admin Bar for All Users Including Admins
What if you wanted to disable the admin bar for all users including yourself and any other administrator on your site?
You can do this by modifying the code we showed earlier.
/* Disable WordPress Admin Bar for all users */ add_filter( 'show_admin_bar', '__return_false');
This code will disable the admin bar for all users when viewing the public pages of your website. All users will still be able to see the toolbar inside the WordPress admin dashboard.
We hope this article helped you learn how to disable the WordPress admin bar for all users except administrators. You may also want to see our ultimate WordPress security guide and our comparison of the best WordPress page builder for creating custom page layouts without any code.
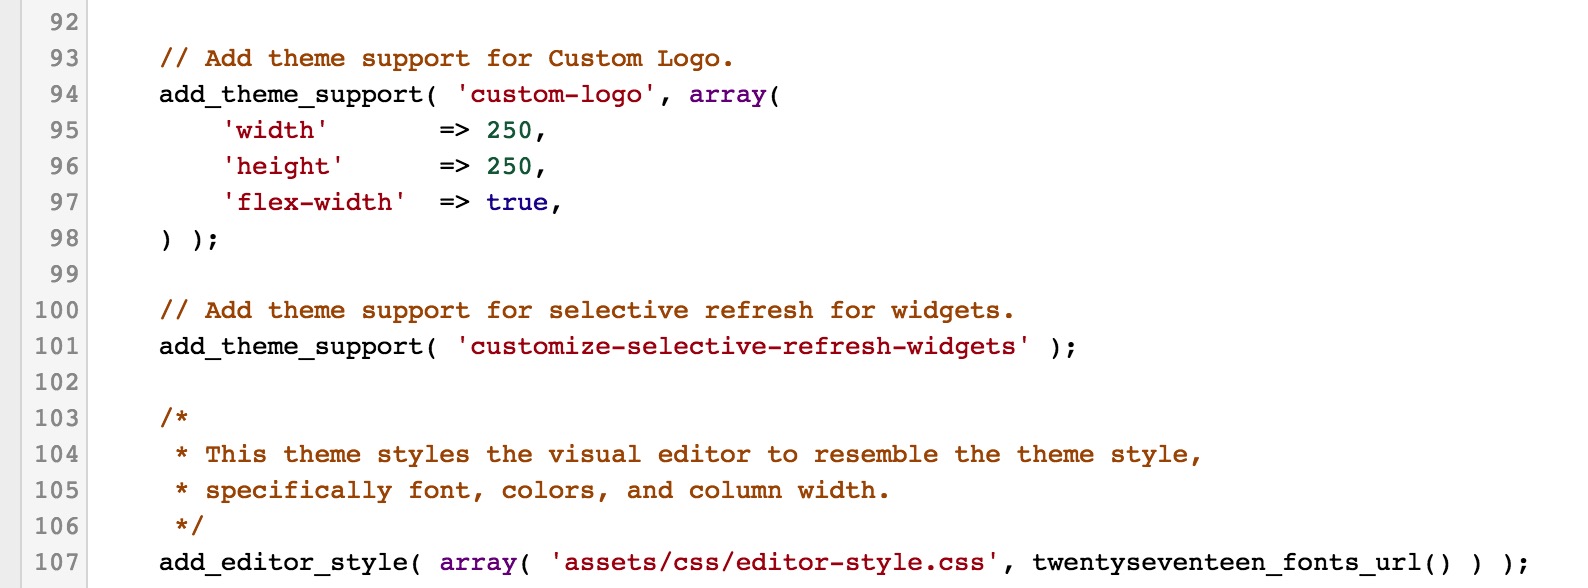
functions.php – wichtige codes
Your Guide to the WordPress Functions.php File
In this article, we’ll take an in-depth look at the WordPress functions file. We’ll discuss how it works and where you can find it. Finally, we’ll show you some interesting tweaks you can make to your functions.php file.
To get involved in WordPress development, you first need to understand how the platform’s most important files work. WordPress makes it pretty easy to begin tinkering with your site. However, it can be difficult to know where to start — or predict what your changes will actually do.
A perfect place to learn is with the functions.php file, which is also known as the functions file. This is a common location for making changes and adding code to WordPress. By editing this file, you can accomplish several useful things, such as adding Google Analytics to your site, creating custom menus, or displaying a post’s estimated reading time.
What Is the functions.php File?
The WordPress functions.php file comes included with all free and premium WordPress themes. To the untrained eye, it may not look like much, but the functions file is a powerful tool that enables you to do a lot of interesting things.
“You can use it to call functions, both PHP and built-in WordPress, and to define your own functions. You can produce the same results by adding code to a WordPress Plugin or through the WordPress Theme functions file.”
In simple terms, the functions file enables you to add custom code to your site. It lets you create new functions or reference existing ones in customized ways. As the Codex points out, this makes the functions file very similar to a plugin, but there are some differences between the two.
The most important difference is that the functions file belongs to a specific theme. If you were to change themes or update to a newer version, the changes you’ve made would disappear. For this reason, you should consider creating a child theme and adding the new code to the child’s functions file instead. This way, you can update the parent theme without losing your changes.
Whether you choose to use the functions file or create a plugin is entirely up to you, depending on your needs. Let’s now look at the different ways you can edit your functions file.
How to Edit the Functions File (2 Methods)
Editing your functions file is as easy as using a standard text editor, like TextEdit or Notepad. Before you get started, it is vitally important that you create a backup of your site, and save the original, unedited functions.php file. This will enable you to restore your site if something goes wrong during the editing process.
1. Use the WordPress Editor
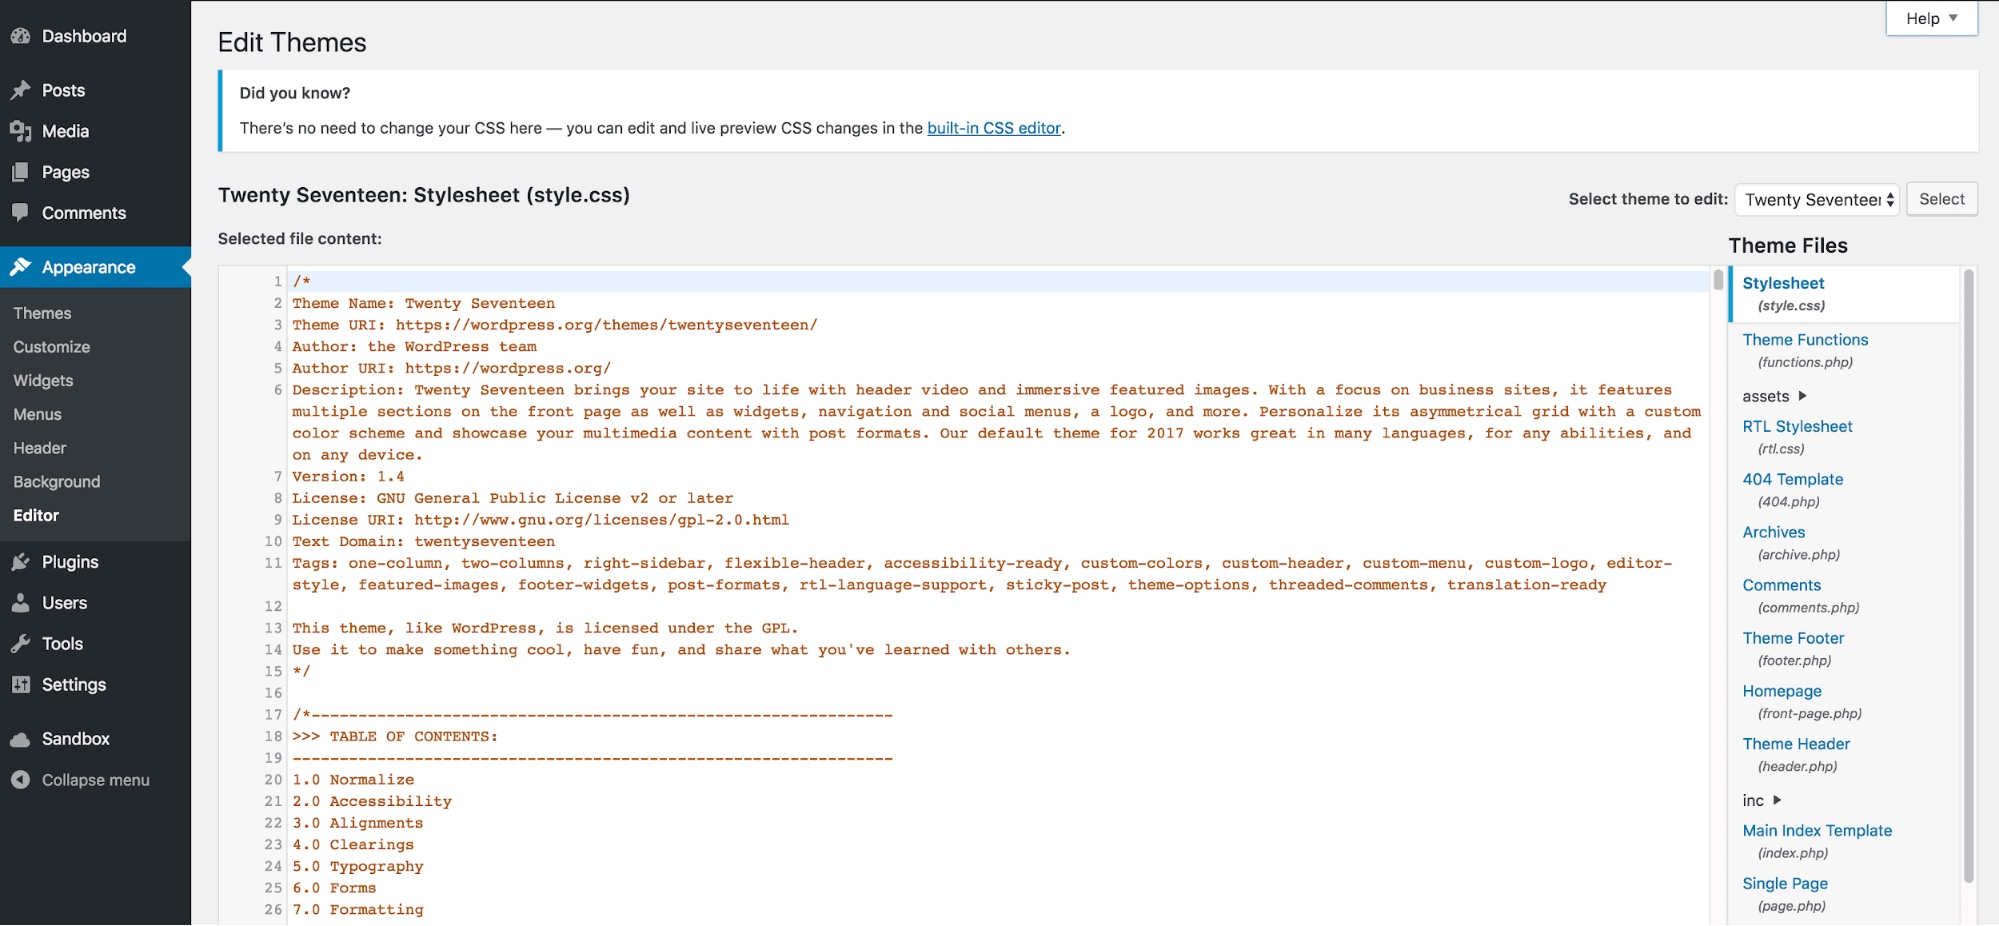
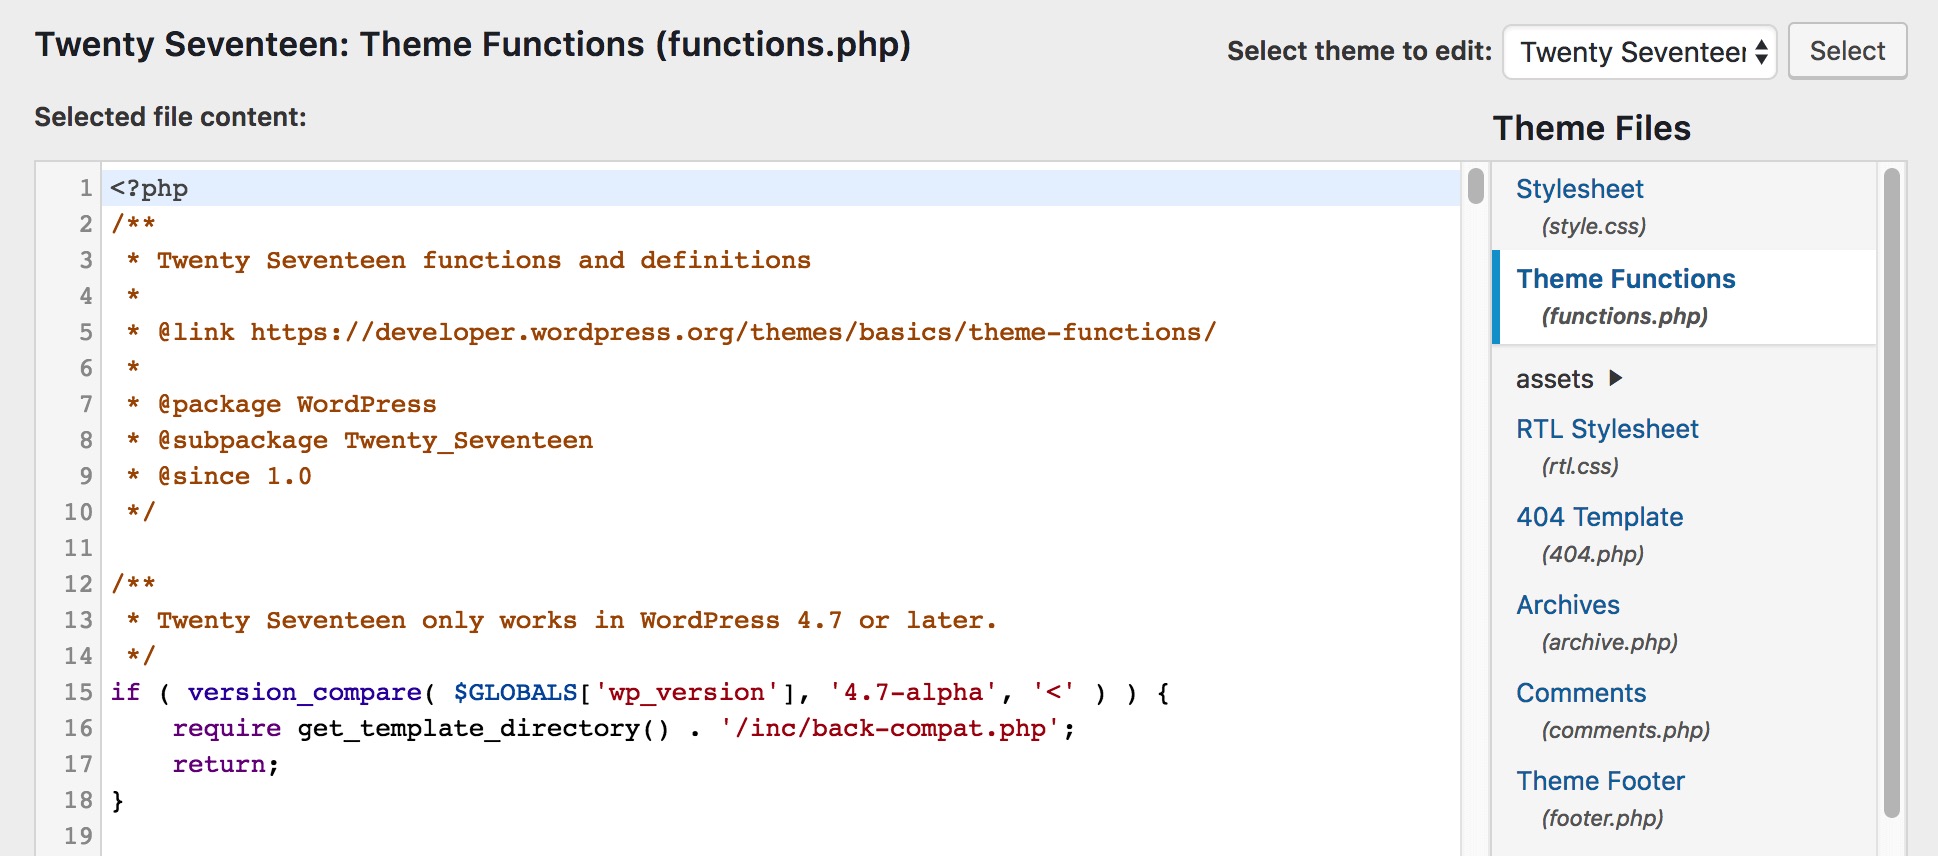
If you have access to the WordPress admin interface, you can edit the functions file directly from the Theme Editor. Go to Appearance > Editor.
On the right-hand side of the screen, you can see a list of all files contained in the theme. These differ depending on which theme you use, but one of the top options should be Theme Functions (functions.php). Simply click on the file to open it in the editor.
Now, you’re able to edit the file directly. Don’t forget to click on Update File at the bottom to save your changes when you’re done.
2. Access the File Through FTP
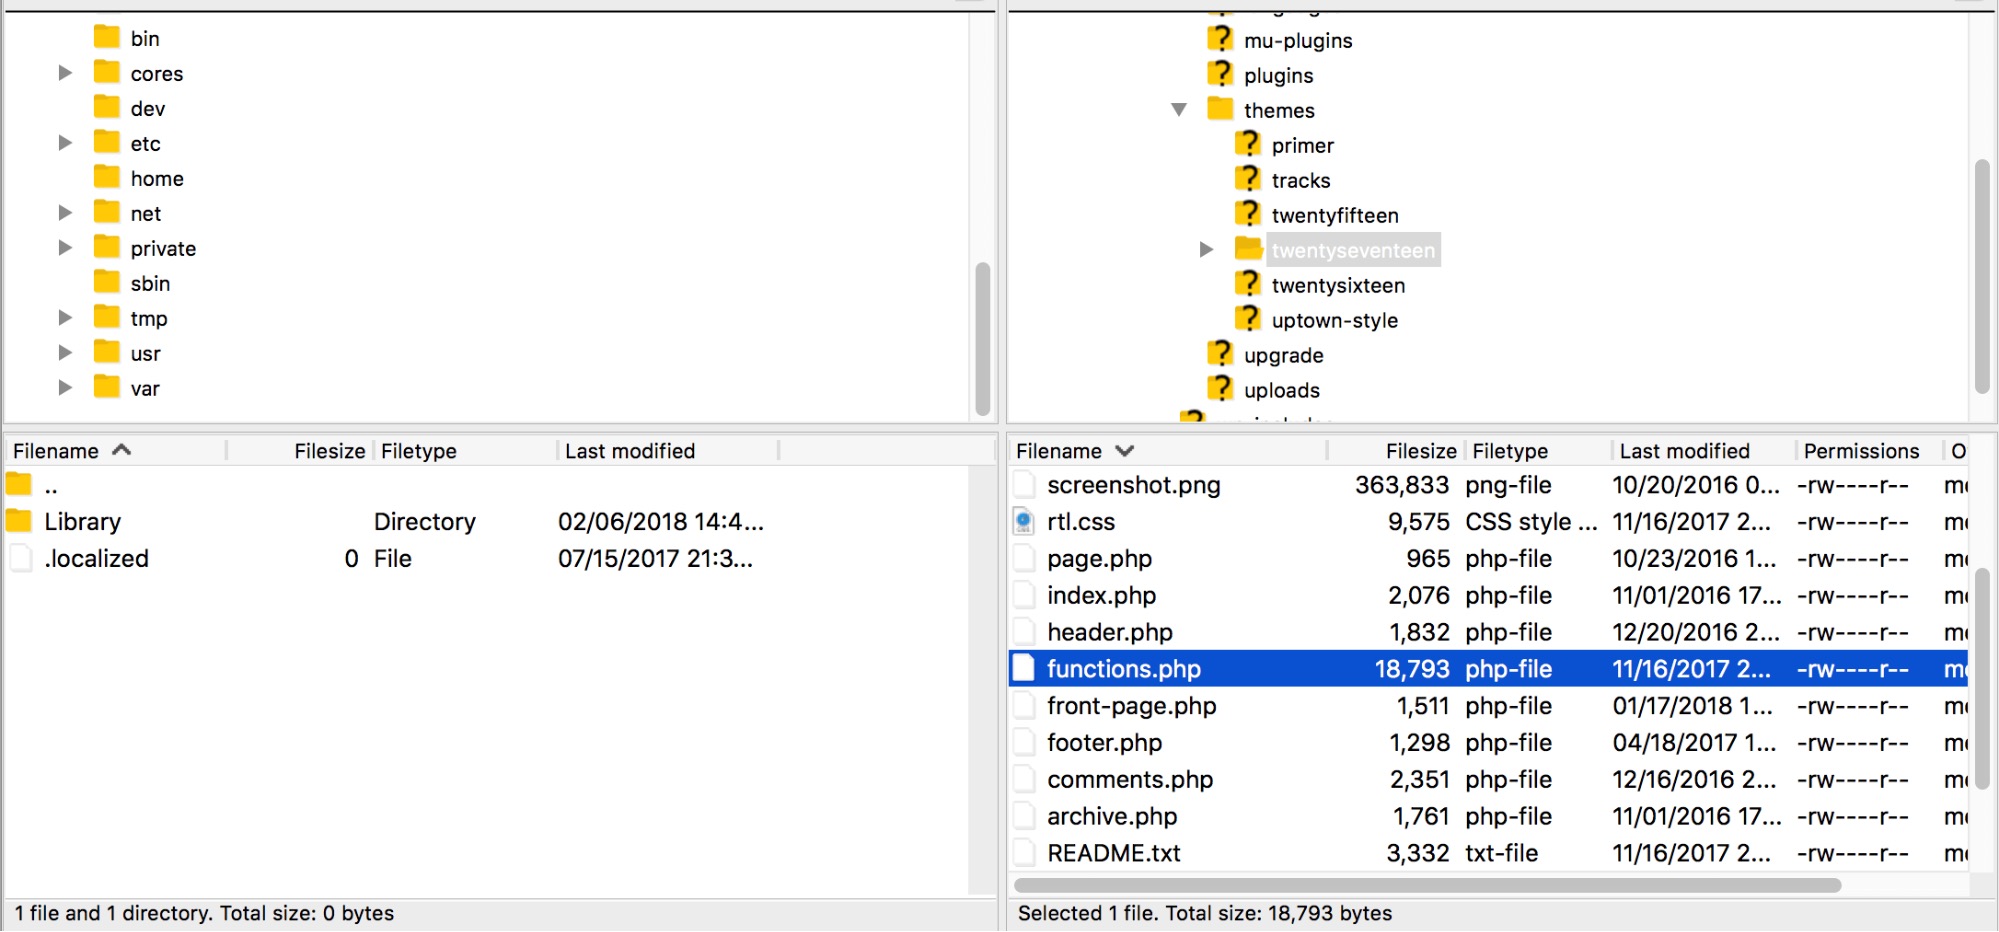
If you are unable to use the admin dashboard or prefer to configure files directly, you can also access the functions file using an FTP tool such as FileZilla.
Open your FTP tool and enter your hosting credentials to connect to your site. To find the right file, navigate to wp-content/themes/[the name of your theme]. When you open this folder, you’ll see the functions.php file.
All you have to do now is to edit it using your preferred text editing software. When you have finished making changes, save and overwrite the functions file with the exact same name and extension.
<?php

// First, this will disable support for comments and trackbacks in post types
function df_disable_comments_post_types_support() {
   $post_types = get_post_types();
   foreach ($post_types as $post_type) {
      if(post_type_supports($post_type, 'comments')) {
         remove_post_type_support($post_type, 'comments');
         remove_post_type_support($post_type, 'trackbacks');
      }
   }
}
WordPress Code: Completely disable comments using functions.php
The code below will completely disable any commenting and trackback features in WordPress. It is in response to the usual issue whereby you think comments have been completely turned-off only to get a notification that there are a new comments waiting moderation.
add_action('admin_init', 'df_disable_comments_post_types_support');

// Then close any comments open comments on the front-end just in case
function df_disable_comments_status() {
   return false;
}
add_filter('comments_open', 'df_disable_comments_status', 20, 2);
add_filter('pings_open', 'df_disable_comments_status', 20, 2);

// Finally, hide any existing comments that are on the site.
function df_disable_comments_hide_existing_comments($comments) {
   $comments = array();
   return $comments;
}
add_filter('comments_array', 'df_disable_comments_hide_existing_comments', 10, 2);

Rename the Posts section in WordPress Admin
Rename the Posts section in WordPress Admin
<?php

// Rename posts in the admin menu
function update_post_label() {
   global $menu;
   global $submenu;
   $submenu['edit.php'][5][0] = 'Story';
   $submenu['edit.php'][10][0] = 'Add Story';
   $submenu['edit.php'][16][0] = 'Story Tags';
   $menu[5][0] = 'Stories';
}
add_action( 'admin_menu', 'update_post_label' );
Old versions of WordPress can contain security flaws that malicious hackers and bots can exploit. One way to avoid this risk is to hide which version of WordPress your site uses. This is called security through obscurity.
Before we move on, it’s important to note that obscurity should never be your only security measure. It’s more like adding an extra bulwark to your already secure WordPress fortress.
Hiding your version number only requires that you add the following, very simple code snippet to the functions file:
You should always use the latest version of WordPress. However, you may still want to remove the WordPress version number from your site. Simply add this code snippet to your functions file.
remove_action('wp_head', 'wp_generator');
The version number will now be removed from all areas of your site, including its code and your RSS feed.
With the hook wp_footer I could load the custom CSS later!
add_action( 'wp_enqueue_scripts', 'custom_styles', 105 ); // 102 is the latest used number from parent theme
function custom_styles() {
    //wp_enqueue_style( 'parent-theme', get_template_directory_uri() . '/style.css', array(), et_get_theme_version() );
    wp_dequeue_style( 'divi-style' );
    wp_deregister_style( 'divi-style' );
    //wp_enqueue_style( 'child-theme', get_stylesheet_uri(), array(), filemtime( get_stylesheet_directory() . '/style.css' ) );
}

// add Child Theme CSS as last
add_action('wp_footer', 'custom_styles_footer');
function custom_styles_footer() {
    wp_enqueue_style( 'child-theme', get_stylesheet_uri(), array(), filemtime( get_stylesheet_directory() . '/style.css' ) );
}
1. Add Google Analytics to Your Site
There are several ways of integrating Google Analytics with your WordPress site. One of them is by adding your credentials directly to the functions file. This will insert the analytics tracking into your site’s header, ensuring that every visit is properly captured.
Start by pasting the following code at the bottom of your functions file:
<?php
add_action('wp_head', 'wpb_add_googleanalytics');
function wpb_add_googleanalytics() { ?>
// Replace this line with your Google Analytics Tracking ID
<?php } ?>
2. Change the Default Login Error Message
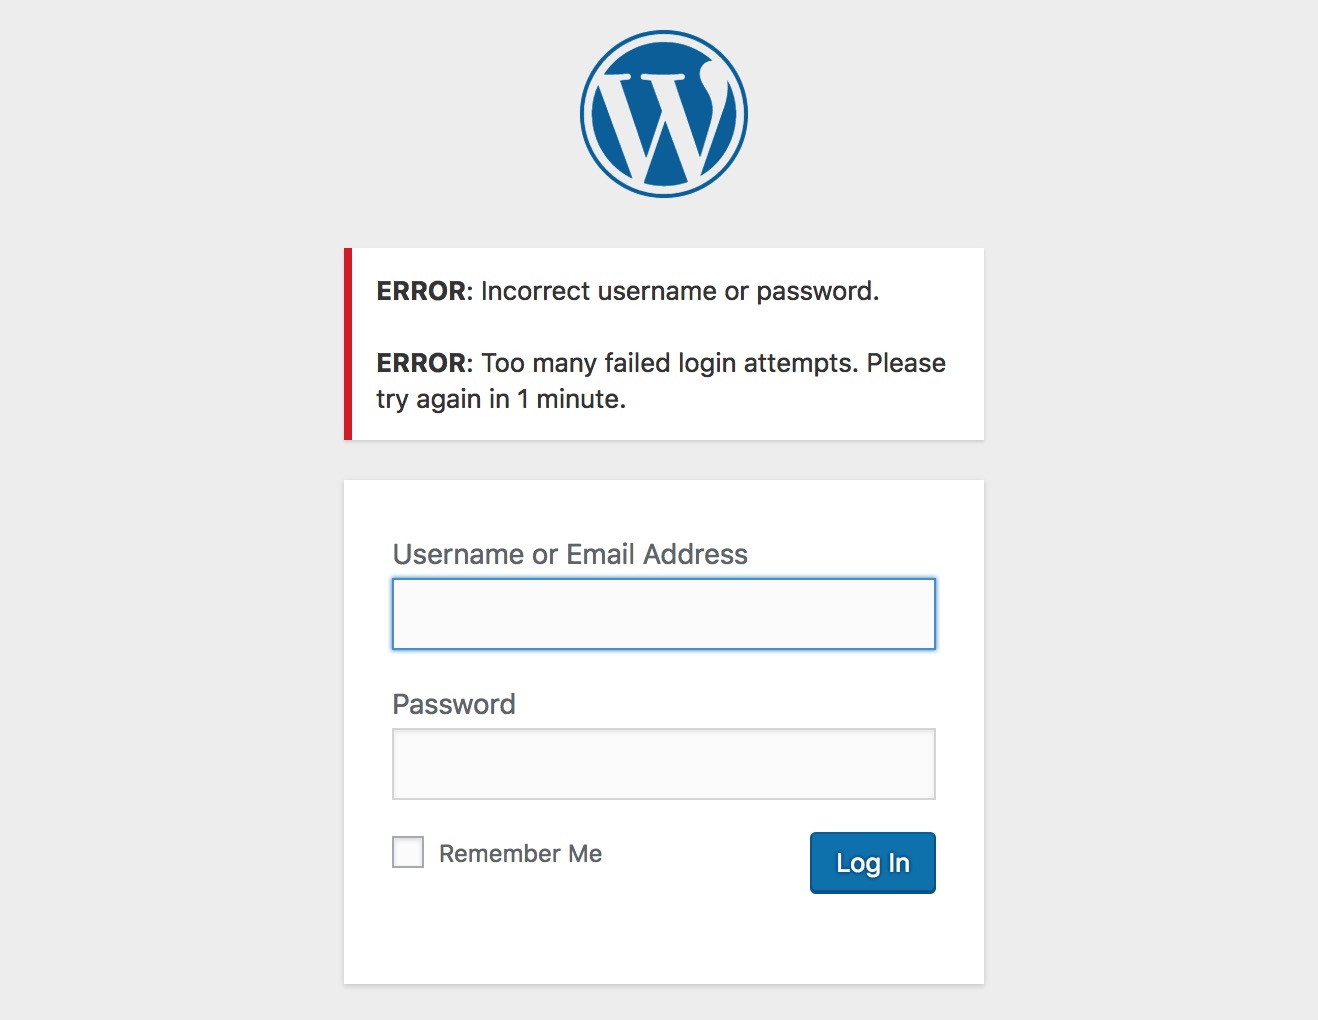
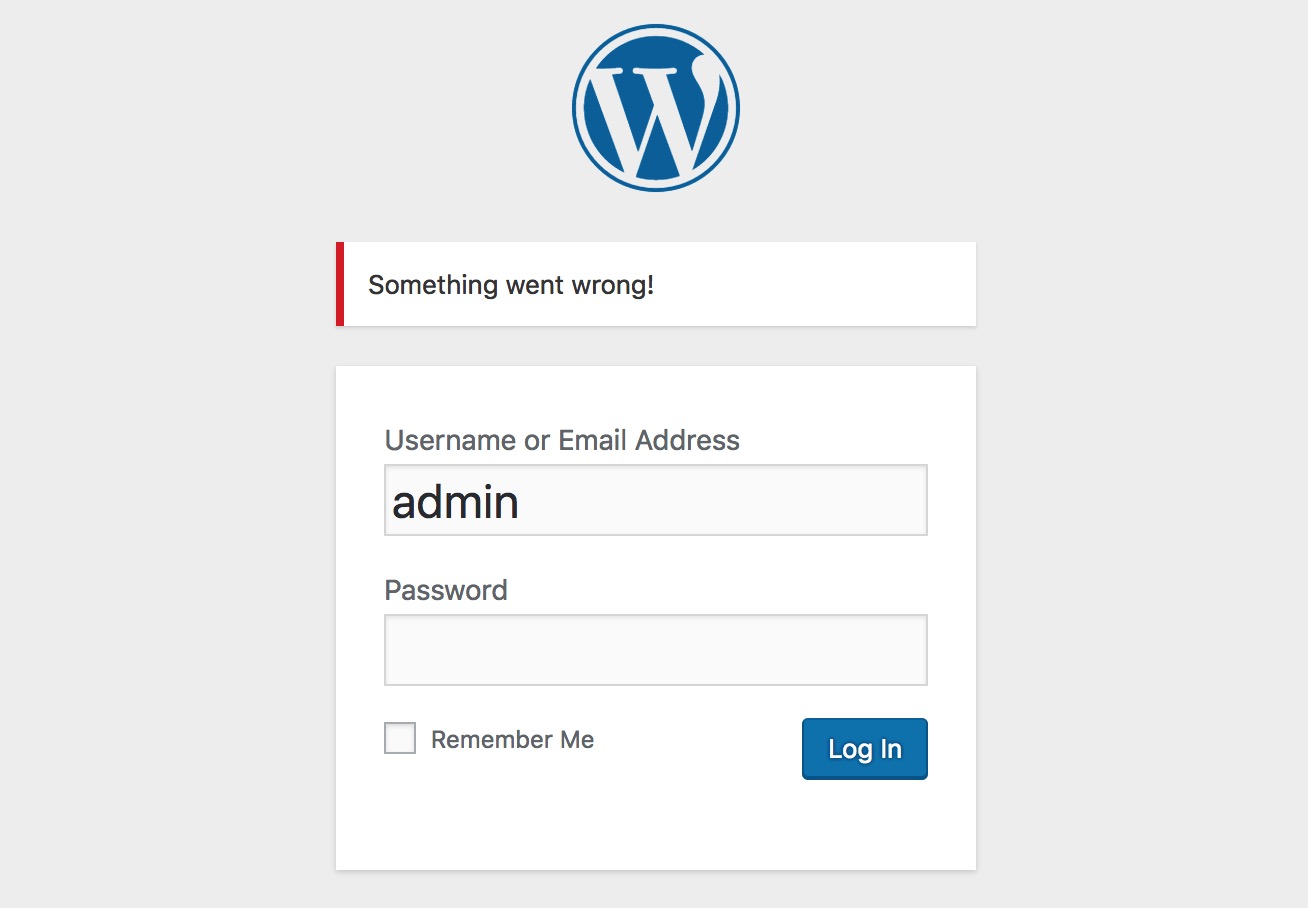
By default, when somebody makes an unsuccessful login attempt to a WordPress site they’ll see an error message like this:
This is not ideal because the site is giving potential intruders information about why the attempt didn’t work. A more secure solution is to change this to a generic message instead.
You can do this easily by adding the following code to your functions file:
function no_wordpress_errors(){
return 'Something went wrong!';
}
add_filter( 'login_errors', 'no_wordpress_errors' );
See that ‘Something went wrong!’ message on the second line? That’s the message that will appear the next time an incorrect login attempt occurs:
You can change this to whatever you want, as long as you keep the single quote characters. Try it out with different messages to see how it works.
Add a Custom Dashboard Logo
Want to white label your WordPress admin area? Adding a custom dashboard logo is the first step in the process.
First you’ll need to upload your custom logo to your theme’s images folder as custom-logo.png. Make sure your custom logo is 16×16 pixels in size.
After that you can add this code to your theme’s functions file.
The footer in WordPress admin area shows the message ‘Thank you for creating with WordPress’. You can change it to anything you want by adding this code.
function remove_footer_admin () {

echo 'Fueled by <a href="http://www.wordpress.org" target="_blank">WordPress</a> | WordPress Tutorials: <a href="https://www.wpbeginner.com" target="_blank">WPBeginner</a></p>';

}

add_filter('admin_footer_text', 'remove_footer_admin');
Feel free to change the text and links that you want to add. Here is how it looks on our test site.
Add Custom Dashboard Widgets in WordPress
You probably have seen widgets that numerous plugins and themes add in the WordPress dashboard. As a theme developer, you can add one yourself by pasting the following code:
add_action('wp_dashboard_setup', 'my_custom_dashboard_widgets');

function my_custom_dashboard_widgets() {
global $wp_meta_boxes;

wp_add_dashboard_widget('custom_help_widget', 'Theme Support', 'custom_dashboard_help');
}

function custom_dashboard_help() {
echo '<p>Welcome to Custom Blog Theme! Need help? Contact the developer <a href="mailto:yourusername@gmail.com">here</a>. For WordPress Tutorials visit: <a href="https://www.wpbeginner.com" target="_blank">WPBeginner</a></p>';
}
Have you seen the default mystery man avatar on blogs? You can easily replace it with your own branded custom avatars. Simply upload the image you want to use as default avatar and then add this code to your functions file.
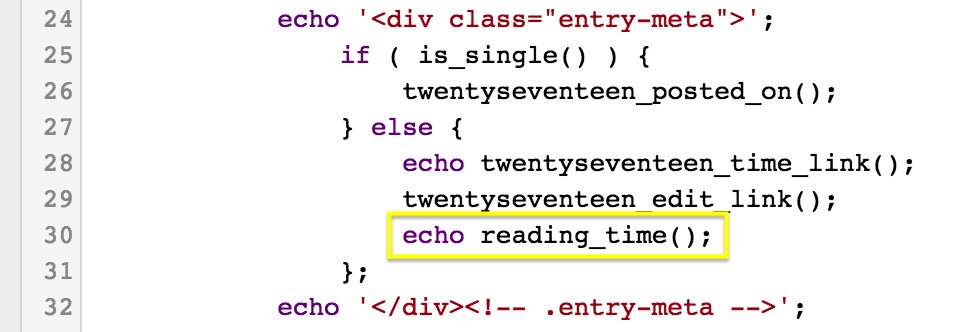
This neat trick enables you to calculate and display the estimated amount of time required to read a post. Your visitors can then get a general idea of how long the content is right away.
To implement this code, you need to make two separate edits. The first one is done to the functions file as usual, where you’ll want to paste the following snippet:
However, this only performs the calculation. You’ll now need to add the following code wherever you want the results to be displayed:echo reading_time();
For example, you could add it to the metadata that appears alongside each post. Every theme is constructed differently, but in the Twenty Seventeen theme, this is located in template-parts > post > content.php.
The estimated reading time will now appear in each post’s header alongside the date.
5. Automatically Update Your Copyright Notice
Updating the year in your copyright notice is one of those little tasks that’s easy to forget. One way you can keep up is by using this trick that automatically generates the copyright date based on the year when your first post was made up.
Then add the following code wherever you want the copyright information to be displayed:
<?php echo wpb_copyright(); ?>
You’ll now see the dynamically updating copyright date on your site.
In this case, we added the date to the footer.php file so it would be displayed at the bottom of the page.
Dynamic Copyright Date in WordPress Footer
You can simply add copyright date by editing the footer template in your theme. However, it will not show when your site started and it will not automatically change next year.
You can use this code to add a dynamic copyright date in WordPress footer.
After adding this function, you’ll need to open your footer.php file and add the following code wherever you like to display the dynamic copyright date:
<?php echo wpb_copyright(); ?>
This function looks for the date of your first post, and the date of your last post. It then echos the years wherever you call the function.
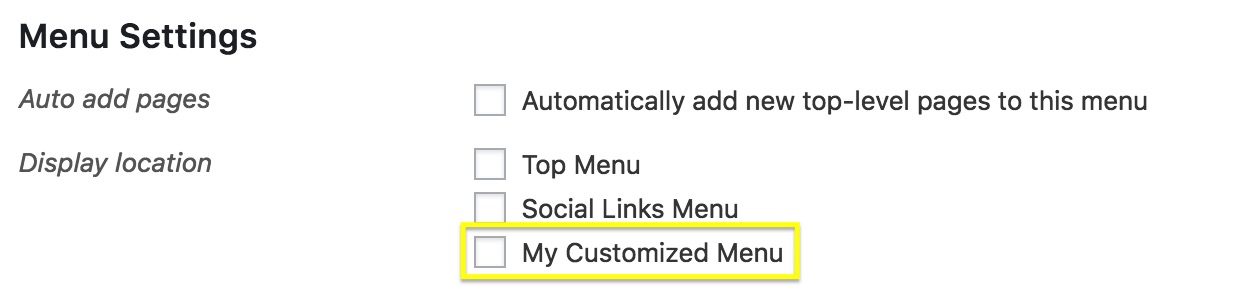
Most themes have pre-defined navigation menus, but what if you want to create your own menu and place it wherever you want on your site? All you need to do is paste this code into your functions file:
You can replace ‘My Customized Menu’ with the name you want to give the menu. If you go to Appearance > Menus in your admin area, you should see the new option listed.
You can now add the new menu anywhere on your site.
Most commonly, you’ll want to place this code in the header.php file.
Add New Navigation Menus to Your Theme
WordPress allows theme developers to define navigation menus and then display them. Add this code in your theme’s functions file to define a new menu location in your theme.
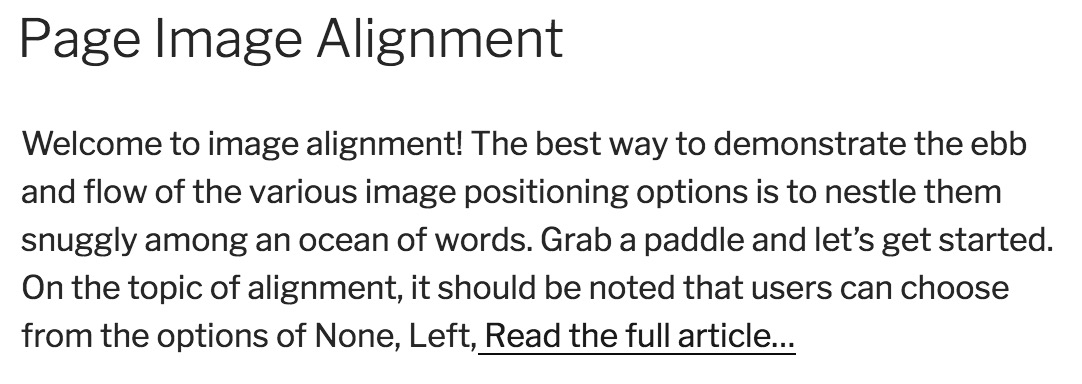
Excerpts are short sample descriptions of your posts that can be displayed on your homepage or in search results, instead of the full post’s contents. By default all excerpts have the same length and link text, but you can change that.
First, let’s alter the text of the link that takes you from the excerpt to the full post. This is usually “Read more” or “Continue reading,” but you can make it whatever you want by pasting the following snippet into your functions file:
function new_excerpt_more($more) {
global $post;
return '<a class="moretag" href="'. get_permalink($post->ID) . '"> Read the full article...</a>';
}
add_filter('excerpt_more', 'new_excerpt_more');
Here the link text has been set to Read the full article…:
Then, let’s change the length of the excerpt. Paste this code into your functions file:
function new_excerpt_length($length) {
return 20;
}
add_filter('excerpt_length', 'new_excerpt_length');
By default, the standard length is 55 words. In this example, it’s been set to 20. You can change the number to whatever you wish.
8. Add a Random Background to Your Site
Finally, let’s end with a fun design trick. This tweak enables you to randomly generate a new background color for your site every time somebody visits it. Start by adding the following code to the functions file:
This code generates the HTML tag for the colors, so all you need to do now is to make sure it gets applied to the page. To do that, you’ll need to find the <body> tag, which should look like this:
<body <?php body_class(); ?>>
This is usually found in the header.php file, but can be elsewhere depending on your theme. When you’ve located the right line, simply replace it with the following code:
One way to do this is by using wp-config.php file. However, if you do that you will not be able to set the correct address on the settings page. The WordPress URL and Site URL fields will be locked and uneditable.
If you want to fix this, then you should add this code to your functions file.
Don’t forget to replace example.com with your own domain name.
Once you are logged in, you can go to Settings and set the URLs there. After that you should remove the code you added to the functions file, otherwise it will keep updating those URLs any time your site is accessed.
Add Additional Image Sizes in WordPress
WordPress automatically creates several image sizes when you upload an image. You can also create additional image sizes to use in your theme. Add this code your theme’s functions file.
Adding Widget Ready Areas or Sidebar in WordPress Themes
This is one of the most used ones and many developers already know about this. But it deserves to be in this list for those who don’t know. Paste the following code in your functions.php file:
Have you seen blogs that adds their advertisement in their RSS Feeds below each post. You can accomplish that easily with a simple function. Paste the following code:
function wpbeginner_postrss($content) {
if(is_feed()){
$content = 'This post was written by Syed Balkhi '.$content.'Check out WPBeginner';
}
return $content;
}
add_filter('the_excerpt_rss', 'wpbeginner_postrss');
add_filter('the_content', 'wpbeginner_postrss');
The post thumbnail or featured images are usually only displayed within your site design. You can easily extend that functionality to your RSS feed with a simple function in your RSS feed.
Login errors in WordPress can be used by hackers to guess whether they entered wrong username or password. By hiding login errors in WordPress you can make your login area a bit more secure.
function no_wordpress_errors(){
  return 'Something is wrong!';
}
add_filter( 'login_errors', 'no_wordpress_errors' );
Now users see a generic message when they enter incorrect username or password.
WordPress allows users to login with username or email address. You can easily disable login by email in WordPress by adding this code to your functions file.
Sometimes you may end up with a grammar or spelling mistake in your article. The mistake goes live and is distributed to your RSS feed subscribers. If you have email subscriptions on your WordPress blog, then those subscribers will get it as well.
Simply add this code in your theme’s functions file.
function publish_later_on_feed($where) {

    global $wpdb;

    if ( is_feed() ) {
        // timestamp in WP-format
        $now = gmdate('Y-m-d H:i:s');

        // value for wait; + device
        $wait = '10'; // integer

        // http://dev.mysql.com/doc/refman/5.0/en/date-and-time-functions.html#function_timestampdiff
        $device = 'MINUTE'; //MINUTE, HOUR, DAY, WEEK, MONTH, YEAR

        // add SQL-sytax to default $where
        $where .= " AND TIMESTAMPDIFF($device, $wpdb->posts.post_date_gmt, '$now') > $wait ";
    }
    return $where;
}

add_filter('posts_where', 'publish_later_on_feed');
In this code we have used 10 minutes as $wait or delay time. Feel free to change that into any number of minutes you want.
If you have forgotten your WordPress password and email, then you can add an admin user by adding this code to your theme’s functions file using an FTP client.
Don’t forget to fill in the username, password, and email fields. Once you login to your WordPress site, don’t forget to delete the code from your functions file.
Welcome panel is a meta box added to the dashboard screen of WordPress admin area. It provides useful shortcuts for beginners to do things on their new WordPress site.
You can easily hide by adding this code in your functions file.
Show Total Number of Registered Users in WordPress
Do you want to show total number of registered users on your WordPress site? Simply add this code to your theme’s functions file.
// Function to return user count
function wpb_user_count() {
$usercount = count_users();
$result = $usercount['total_users'];
return $result;
}
// Creating a shortcode to display user count
add_shortcode('user_count', 'wpb_user_count');
This code creates a shortcode that allows you to display total number of registered users on your site. Now you just need to add this shortcode to [user_count] your post or page where you want to show the total number of users.
You may have seen WordPress themes using an old or even class for WordPress comments. It helps users visualize where one comment ends and the next one begins.
You can use the same technique for your WordPress posts. It looks aesthetically pleasing and helps users quickly scan pages with lots of content. Simply add this code to your theme’s functions file.
This code simply adds an odd or even class to WordPress posts. You can now add custom CSS to style them differently. Here is a sample code to help you get started.
Add Additional File Types to be Uploaded in WordPress
By default, WordPress allows you to upload a limited number of most commonly used file types. However, you can extend it to allow other file types. Add this code to your theme’s functions file:
This code allows you to upload SVG and PSD files to WordPress. You will need to Google to find out the mime types for the file types you want to allow and then use it in the code.
By default, when you upload an image in WordPress it is automatically linked to the image file or the attachment page. If users click on the image they are then taken to a new page away from your post.
Here is how you can easily stop WordPress from automatically linking image uploads. All you have to do is to add this code snippet to your functions file:
function wpb_imagelink_setup() {
    $image_set = get_option( 'image_default_link_type' );

    if ($image_set !== 'none') {
        update_option('image_default_link_type', 'none');
    }
}
add_action('admin_init', 'wpb_imagelink_setup', 10);
Now when you upload a new image in WordPress, it will not be automatically linked. You can still link it to the file or attachment page if you want.
If you run a multi-author site and want to showcase author bios at the end of your post, then you can try this method. Start by adding this code to your functions file:
function wpb_author_info_box( $content ) {

global $post;

// Detect if it is a single post with a post author
if ( is_single() && isset( $post->post_author ) ) {

// Get author's display name
$display_name = get_the_author_meta( 'display_name', $post->post_author );

// If display name is not available then use nickname as display name
if ( empty( $display_name ) )
$display_name = get_the_author_meta( 'nickname', $post->post_author );

// Get author's biographical information or description
$user_description = get_the_author_meta( 'user_description', $post->post_author );

// Get author's website URL
$user_website = get_the_author_meta('url', $post->post_author);

// Get link to the author archive page
$user_posts = get_author_posts_url( get_the_author_meta( 'ID' , $post->post_author));

if ( ! empty( $display_name ) )

$author_details = '<p class="author_name">About ' . $display_name . '</p>';

if ( ! empty( $user_description ) )
// Author avatar and bio

$author_details .= '<p class="author_details">' . get_avatar( get_the_author_meta('user_email') , 90 ) . nl2br( $user_description ). '</p>';

$author_details .= '<p class="author_links"><a href="'. $user_posts .'">View all posts by ' . $display_name . '</a>';

// Check if author has a website in their profile
if ( ! empty( $user_website ) ) {

// Display author website link
$author_details .= ' | <a href="' . $user_website .'" target="_blank" rel="nofollow">Website</a></p>';

} else {
// if there is no author website then just close the paragraph
$author_details .= '</p>';
}

// Pass all this info to post content
$content = $content . '<footer class="author_bio_section" >' . $author_details . '</footer>';
}
return $content;
}

// Add our function to the post content filter
add_action( 'the_content', 'wpb_author_info_box' );

// Allow HTML in author bio section
remove_filter('pre_user_description', 'wp_filter_kses');
Next you will need to add some custom CSS to make it look better. You can use this sample CSS as an starting point.
XML-RPC is a method that allows third party apps to communicate with your WordPress site remotely. This could cause security issues and can be exploited by hackers.
Simply add this code to your functions file to turn off XML-RPC in WordPress:
If your WordPress theme does not automatically link featured images to full articles, then you can try this method. Simply add this code to your theme’s functions file.
We hope this article helped you learn some new useful tricks for functions.php file in WordPress. You may also want to see our ultimate guide to boost WordPress speed and performance.
If you liked this article, then please subscribe to our YouTube Channel for WordPress video tutorials. You can also find us on Twitter and Facebook.
Poedit ist ein Open-Source-Editor für Übersetzungsdateien zum Lokalisieren von Softwareschnittstellen, die gettext verwenden , wie WordPress Core , Plugins und Themes. Es ist für Windows, macOS und Linux verfügbar.
Mit Poedit können Sie eine herunterladen POT-Datei mit den Original-WordPress- Strings und eine .PO-Datei und . MO-Dateien mit Ihren Übersetzungen. Poedit bietet eine saubere und benutzerfreundliche Übersetzungsschnittstelle und unterstützt Pluralformen und UTF-8. Poedit gibt es in zwei Versionen: „Kostenlos“ und „Lizenziert“. Der Vorteil der lizenzierten Version besteht darin, dass Sie ursprüngliche WordPress-Strings vorübersetzen können.
Gehen Sie zu Datei → Speichern unter… , um Ihre Übersetzungen in einer .po-Datei zu speichern. Ihre Datei sollte den Namen der Sprache enthalten, in die Sie übersetzen möchten. Überprüfen Sie die Codex-Seite, um Ihrer Datei den richtigen Namen zu geben: https://codex.wordpress.org/WordPress_in_Your_Language . Der Name, den Sie verwenden sollten, ist die Kombination aus der des Projekts (lokalisieren Sie sie innerhalb von Codes) und einer kurzen Zeichenfolge Textdomäne in Klammern neben dem Namen einer Sprache (zB Französisch – Français (fr_FR)). Wenn die Textdomäne beispielsweise bwp-minify ist und die Übersetzung Französisch ist, benennen Sie einfach die .po-Datei bwp-minify-fr_FR.
Poedit kompiliert automatisch eine . mo- Datei für Sie, wenn Sie Ihre Arbeit in der vorhandenen .po-Datei speichern. Gehen Sie dazu zu Datei → Einstellungen aktivieren Sie und auf der Registerkarte Editor das Kontrollkästchen .mo-Datei beim Speichern automatisch kompilieren .
Der grundlegende Übersetzungsbildschirm besteht aus einer Liste von zu übersetzenden Zeichenfolgen und zwei separaten Fenstern für die ursprüngliche Zeichenfolge und die übersetzte Zeichenfolge.
Der Vorgang ist einfach:
Klicken Sie auf eine Zeichenfolge aus dem Pool.
Fügen Sie die Übersetzung im Übersetzungsmodal hinzu (im Modal auf der rechten Seite könnten Entwicklerhinweise sein, also vergessen Sie nicht, danach zu suchen).
Speichern Sie Ihre Übersetzungen.
Übersetzte Strings werden im String-Pool neben dem Original angezeigt und Sie können Ihren Fortschritt am unteren Rand des Übersetzungsbildschirms verfolgen.
Hinweis: Wenn Sie die Vorübersetzung verwenden, haben die hinzugefügten Übersetzungen eine andere Farbe. Sie müssen den Zustand der Zeichenfolge ändern, indem Sie sie bearbeiten und dann speichern.
Oder verwenden Sie die Schaltfläche Benötigt Arbeit rechts neben der Zeile, um die Zeichenfolge zu bearbeiten und zu genehmigen.
Nachdem Sie die Original-POT-Datei aus dem Projekt heruntergeladen und mit Poedit übersetzt haben, müssen Sie die Datei in das Projekt hochladen, um Ihre Übersetzungen zu importieren.
Um Ihre Übersetzungen zu speichern und zusammenzustellen, gehen Sie zu Datei → Speichern unter… , um Ihre Übersetzungen in einer PO-Datei zu speichern.
Stellen Sie vor dem Hochladen Ihrer übersetzten Datei sicher, dass das Gebietsschema richtig eingestellt ist.
Nach der Festlegung können Sie Ihre Übersetzungen in das Projekt importieren, indem Sie den importieren verwenden Übersetzungen Link . Von hier aus können Sie Ihre Übersetzungsdatei auswählen.
Wenn Sie in Poedit neben einer (oder mehreren) Ihrer Übersetzungen ein gelbes Warnschild sehen, bedeutet dies, dass mit der Übersetzung etwas nicht stimmt.
Wenn Sie die Zeichenfolge auswählen, können Sie die Fehlerursache sehen:
Sie müssen diese Warnungen beheben, bevor Sie Ihre Datei hochladen. Sobald Sie die Zeichenfolge beheben, wird die Warnung entfernt und die Fehlermeldung verschwindet.
Beachten Sie auch, dass Poedit manchmal Zeichen entfernt, was zu Problemen mit Platzhaltern führen kann. Beispiele: „% s“ statt „%s“ oder „%1s“ statt „%1$s“
So benennen Sie Produktdaten-Tabs von einer einzelnen Produktseite aus um
So benennen Sie Produktdaten-Tabs von einer einzelnen Produktseite aus um
Um einzelne, mehrere oder alle Produktdaten-Tabs von einer einzelnen Produktseite aus umzubenennen, befolgen Sie bitte die folgenden Schritte:
1- Gehen Sie zu wp-content >> Themes >> porto >> functions.php Datei und öffnen Sie die Datei zum Bearbeiten wie gezeigt:
2- Gehen Sie zum Ende der functions.php Datei und fügen Sie den folgenden Code dort ein, um alle Registerkarten umzubenennen, wie im folgenden Screenshot gezeigt:
/**
* Produktdaten-Tabs umbenennen
*/
add_filter( 'woocommerce_product_tabs', 'woo_rename_tabs', 98 );
Funktion woo_rename_tabs( $tabs ) {
$tabs['description']['title'] = __( 'Weitere Informationen' );  // Benennen Sie den Beschreibungs-Tab um
$tabs['Bewertungen']['Titel'] = __( 'Bewertungen' );  // Benennen Sie die Registerkarte "Bewertungen" um
$tabs['additional_information']['title'] = __('Produktdaten');  // Benennen Sie die Registerkarte für zusätzliche Informationen um
geben $tabs zurück;
}
Umbenannt:
3- Gehen Sie zum Ende der functions.php Datei und fügen Sie den folgenden Code dort ein, um die umzubenennen, Beschreibung“ Registerkarte “ wie im folgenden Screenshot gezeigt:
4- Gehen Sie zum Ende der functions.php Datei und fügen Sie den folgenden Code dort ein, um die umzubenennen, Bewertungen“ Registerkarte “ wie im folgenden Screenshot gezeigt:
5- Gehen Sie zum Ende der functions.php Datei und fügen Sie den folgenden Code dort ein, um die umzubenennen Zusätzliche Informationen“ Registerkarte “ nur wie im folgenden Screenshot gezeigt :
/**
* Produktdaten-Tabs umbenennen
*/
add_filter( 'woocommerce_product_tabs', 'woo_rename_tabs', 98 );
Funktion woo_rename_tabs( $tabs ) {
$tabs['additional_information']['title'] = __('Produktdaten');  // Benennen Sie die Registerkarte für zusätzliche Informationen um
return $tabs;
}
UPLOADFILTER BEI WORDPRESS? „DIESER DATEITYP IST AUS SICHERHEITSGRÜNDEN LEIDER NICHT ERLAUBT.“
UPLOADFILTER BEI WORDPRESS? „DIESER DATEITYP IST AUS SICHERHEITSGRÜNDEN LEIDER NICHT ERLAUBT.“
Uploadfilter bei WordPress? “Dieser Dateityp ist aus Sicherheitsgründen leider nicht erlaubt.” – deinWP.de
Möchtest du etwas (außer Bilder) in die Mediathek von WordPress laden oder einen Import deiner Artikel bei WooCommerce starten, aber die Fehlermeldung „Dieser Dateityp ist aus Sicherheitsgründen leider nicht erlaubt.“ macht dir einen Strich durch die Rechnung? Kein Grund zur Panik! Das ist eine Sich…
Möchtest du etwas (außer Bilder) in die Mediathek von WordPress laden oder einen Import deiner Artikel bei WooCommerce starten, aber die Fehlermeldung „Dieser Dateityp ist aus Sicherheitsgründen leider nicht erlaubt.“ macht dir einen Strich durch die Rechnung? Kein Grund zur Panik! Das ist eine Sicherheitsmaßnahme von WordPress, damit sich keine unerwarteten Dateien auf den Server laden lassen, womit unter Anderen Schadcode eingeschleust werden kann.
Setz dich in Ruhe hin, trink ein Heißgetränk und wir erklären dir den Rest: Die Mediathek von WordPress dient im Allgemeinen dazu, nicht nur Bilder, sondern auch andere Dateien für deine Website zu verwalten. Daher der Name Mediathek und nicht Bilderthek 😉 Möchtest du nun beispielsweise eine beliebige Datei hochladen, SVGs oder PDFs zum Download auf deiner Seite anbieten, kann es sein, dass die Mediathek dir den Upload verweigert. Da WordPress nicht weiß, was sich in deiner Datei befindet, blockt es unbekannte Typen aus Sicherheitsgründen. Verhindert so, dass sie überhaupt auf dem Server abgelegt werden können. Während eine gepackte ZIP-Datei aus dem Stand funktionieren sollte, klappt es z.B. mit einer RAR-Datei nicht.
Das moderne und webkonforme SVG-Grafikformat wird leider ebenfalls geblockt. Dieser Dateityp kann neben den reinen Vektorinformationen des Bildes auch Scripte mit sich bringen, welche deine Seite angreifen können. Daher ist der von SVGs in die Mediathek vorerst gesperrt.
Ein weiteres Beispiel dafür, dass der Dateityp nicht erlaubt ist, finden wir bei WooCommerce. Wenn du z.B. Artikel per CSV-Datei importieren möchte, folgt die unerwartete Fehlermeldung prompt und sorgt für Verwirrung, da man sie schließlich auch exportieren kann.
Uploads für alle Dateitypen erlauben
Mit folgender Zeile in der Konfigurationsdatei wp-config.php, kannst du den WordPress eigenen „Uploadfilter“ deaktivieren, bzw. um genau zu sein, den Upload aller Dateien für deine Seite freischalten. Kopiere dazu den Befehl und füge ihn am Ende deiner wp-config.php ein. (Die Datei befindet sich auf dem Server im Hauptverzeichnis deiner Website.)
define( 'ALLOW_UNFILTERED_UPLOADS', true );
Nun sollte es auch mit dem gewünschten Upload klappen und deine Datei landet in der Mediathek, statt geblockt zu werden.
Entferne oder deaktivere (statt „true“ einfach „false“ eintragen) nach Möglichkeit diesen Eintrag wieder, sobald du fertig bist mit deinem Upload, um die Sicherheit deiner Seite nicht unnötig zu gefährden.
Sollte der Eintrag in der wp-config.php nicht ausreichend sein, müssen wir den SVG-Dateityp für deine WordPress-Installation aktivieren. Öffne dazu deine functions.php deines (Child-)Themes und trage folgende Zeilen ein.
Damit solltest du keine Probleme mehr haben, deine SVG-Datei in die Mediathek hochzuladen.
Besonderheit bei SVG-Grafiken
Beim hochladen von SVG-Dateien gibt es ab WordPress 5 noch eine Kleinigkeit zu beachten. Diese Vektorgrafiken müssen in der ersten Zeile mit einer XML-Deklaration wie der nachfolgenden beginnen um akzeptiert zu werden und sollten sonst keinen unsicheren Code enthalten.
1
<?xmlversion="1.0"encoding="utf-8"?>
Je nachdem wie du deine SVG-Grafiken erstellst, kann es vorkommen, dass die genannte Deklaration fehlt. Bei Adobe Illustrator ist die Auszeichnung bereits enthalten, wobei du bei Inkscape darauf achten solltest, dass sie im Speicherdialog (der SVG-Ausgabe) nicht entfernt wird. Im Zweifel öffne deine Grafik mit einem Texteditor (z.B. Sublime) und ergänze die Angabe in der ersten Zeile, sollte sie noch fehlen. Um komplett sicherzugehen, kannst du auch Online-Tools wie dieses hier nutzen, um deine SVG-Datei zu „säubern“ und korrekt zu formatieren.
Weitere Dateitypen für den Upload freigeben
Grundsätzlich sind verschiedenste Dateiformate für deinen Upload in WordPress freigegeben, welche mit dem o.g. Eintrag in der wp-config.php problemlos hochgeladen werden können. Diese umfassen die meisten gängigen Formate für Bilder, Texte, Audio und Video und werden unter /wp-includes/functions.php in der Whitelist-Funktion wp_check_filetype() angegeben. Sollte dein Upload trotz Anpassung der wp-config.php also nicht klappen, kann es sein, dass du deinen gewünschten Dateityp erst dieser Liste hinzufügen musst.
Schriftarten sind in dieser Liste nicht enthalten und führen zum bekannten Fehler beim Upload. Für z.B. eine .ttf-Datei kannst du das in der functions.php deines (Child-)Themes mit folgendem Schnipsel erledigen.
Möchtest du weitere unbekannte Dateitypen hinzufügen, kannst du alternativ den folgenden Schnipsel verwenden, wodurch die Dateiendungen .svg sowie .ttf und .otf für den Upload freigegeben wird. Gib das gewünschte Dateiformat in einer neuen Zeile an, sollten weitere unbekannte Dateien hinzukommen. Der Vorteil dieser Einzelanpassung ist, dass du diese nicht immer vornehmen musst und die Sicherheit nicht stark beeinträchtigt wird.
Beachte bitte, dass du die Änderung der wp-config.php weiterhin aktiv (true) haben musst, damit der Upload klappt. Eine Übersicht der sog. „Mime-Typen“ findest du hier.
Plugins für den SVG-Upload
Wir bei WordPress üblich, existieren für jegliche Herausforderungen dedizierte Plugins. Safe SVG von Daryll ist solch ein Plugin. Im Anschluss lassen sich SVGs wie normale Bilder in der Mediathek betrachten. SVG Support funktioniert ähnlich.
Dennoch, empfehlen wir für solch marginale Änderungen kein Extra-Plugin zu verwenden, denn auch diese bürgen ein gewisses Risiko.
Maik20. August 2019 um 13:14Hallo Florian, das ist schade. Welche Datei(art) möchtest du hochladen und welche Fehlermeldung kommt bei dir?Antworten
Christian6. April 2020 um 18:34Hey, funktioniert bei mir leider auch nicht!Ich möchte eine Schriftart hochladen mit dem format ttf.was könnte ich noch probieren?Antworten
Maik6. April 2020 um 23:37Hey Christian. Grundsätzlich sind verschiedenste Dateien in WordPress freigegeben. Diese werden unter /wp-includes/functions.php in der Whitelist-Funktion wp_check_filetype() angegeben. Sollte es mit dem Eintrag in der wp-config.php in deinem Fall also nicht getan sein, musst du deinen gewünschten Dateityp erst dieser Liste hinzufügen. Dies kannst du in der functions.php deines (Child-)Themes mit folgendem Schnipsel erledigen.12345functiondwp_mime($mimes) {$mimes['ttf'] = 'application/ttf';return$mimes;}add_filter('upload_mimes', 'dwp_mime');Möchtest du weitere Dateitypen hochladen, kannst du alternativ den folgendem Schnipsel verwenden. Einfach das gewünschte Dateiformat in einer neuen Zeile ergänzen, sollte weitere Dateien hinzukommen.12345678functiondwp_mimes() {$mime_types= array('ttf'=> 'application/ttf','otf'=> 'application/otf',);return$mime_types;}add_filter( 'upload_mimes', 'dwp_mimes');Damit sollte dein Upload der Schriftart-Datei(en) klappen.Der im Beitrag erwähnte Eintrag in der wp-config.php muss sicher weiter aktiviert sein für den Upload. Bitte nicht vergessen diesen wieder zu entfernen oder auf „false“ zu stellen, sobald du fertig bist.Antworten
Maik9. März 2021 um 0:45Ich glaube das liegt eher nicht an WordPress. 😉 Aber kann es sein, dass die Datei evtl. nicht die richtige Endung hat und deshalb blockiert wird? Dies kann passieren, wenn du z.B. eine webp- oder jpg-Datei mit .png-Endung nutzt. Im Zweifel sende die Datei vorher nochmal durch einen Konverter oder Bildbearbeitungsprogramm und versuche den Upload erneut. Sollte auch das nicht klappen, müsstest du einen Blick auf deinen Server werfen (png-Dateien erlaubt oder Upload-Verzeichnis fürs schreiben freigegeben?), da auch hier mögliche Ursachen liegen können.Antworten
Johanna3. April 2021 um 11:51Hallo Maik,bei mir funktioniert es leider auch nicht. Kannst du mir helfen? Ich finde bei mir das wp-config.php bei mir nicht, nur wpml-config.xml ist das das gleiche?Antworten
Maik3. April 2021 um 18:04Hallo Johanna, die wp-config.php findest du direkt im Hauptverzeichnis deiner Website und deine genannte wpml-config.xml ist für etwas anderes da (Übersetzung).Bezüglich deiner Uploadproblematik mit dem PNG-Bild würde ich zuerst prüfen, ob ein Upload allgemein auf der Seite klappt, da im normalen Fall Bilder mit der Endung .jpg, .jpeg, .png, .gif und .ico funktionieren sollten, ohne das du zusätzliche Einstellungen treffen musst. Sollte ein Upload anderer Dateien funktionieren, gehe sicher, dass die Bilddatei selbst auch korrekt ist. Also, dass es kein JPG-Bild mit falscher Dateiendung ist. Sollte das auch alles passen und es immernoch nicht klappen, müsstest du dir ggf. das Hosting näher anschauen und prüfen ob die z.B. das Modul „GD Library“ oder „PHP Imagemagick“ installiert ist. Wenn all das nicht klappt, nenne mir gerne die genaue Fehlermeldung, welche du beim Uplaod erhältst und wir finden sicher eine Lösung.Melde dich gerne nochmal mit dem Ergebnis. Bis dahin wünsche ich frohe Ostern.Antworten
Johanna3. April 2021 um 19:20Hallo Maik, es hat lange nicht geklappt und ich habe die wp-config.php trotz langem suchen nicht gefunden! Kann es sein, dass die versteckt ist? Habe dann das WP Config File Editor Plugin runtergeladen und es da konfiguriert! Dann hat es funktioniert!Danke dir , lg JohannaAntworten
Maik3. April 2021 um 19:51Das freut mich zu lesen, dass es geklappt hat.Am besten greifst du via FTP auf die Dateien deiner Website zu. Solltest du es über das Backend von WordPress versucht haben, wirst du sicher nur die Dateien deines Themes gesehen haben, kann das sein?Der Zugriff per (S)FTP ist insofern praktischer, weil du z.B. bei Ausfall eines Plugins handlungsfähig für die gesamte Seite bleibst und bei einem Fehler nicht auf das Backend angewiesen bist. Gerade die wichtigsten Dateien wie die wp-config.php oder die functions.php (Child-Theme) sollte man direkt auf dem Server bearbeiten können, da bei Fehlern evtl. die gesamte Website nicht erreichbar ist und somit auch das Plugin oder der Backend-Bereich zum ändern nicht mehr funktioniert.Antworten
Sergej Baum2. Juli 2021 um 18:04Hallo, ich habe ihm Plugin: (WP Config File Editor) die Eingabe getätigt, damit ich Bilder hochladen kann. Allerdings kommt dann diese Fehlermeldung wenn ich auf Cusomizer (Ozean Extra) gehe:Es gab einen kritischen Fehler auf deiner Website. Bitte überprüfe den Posteingang deiner Website-Administrator-E-Mail-Adresse für weitere Anweisungen.Erfahre mehr über die Problembehandlung in WordPress.Wenn ich allerding das Plugin (WP Config File Editor) deaktiviere funktioniert das einwandfrei. Was habe ich falsch gemacht oder wie kann ich es rückgängig machen?Vielen DankAntworten
Maik2. Juli 2021 um 18:14Hi Sergej, das ist eine gute Frage und ich kann mir vorstellen, dass lediglich ein Zeichen falsch ist oder vergessen wurde. Dazu müsste ich allerdings deine Änderungen sehen oder die genaue Fehlerbeschreibung kennen. Hierzu müsstest du die Fehler via „define('WP_DEBUG', true);“ (ohne „“) in deiner wp-config.php aktivieren. Alternativ sollte der Fehler auch in der genannten Mail an dich stehen. Was das Plugin „WP Config File Editor“ angeht, denke ich werden deine Anpassungen wieder zurückgesetzt, sobald du das Plugin deaktivierst. Somit besteht auch kein Fehler mehr. Aber das ist nur eine Vermutung, weil ich das Plugin nicht kenne und eher die Bearbeitung via (S)FTP empfehlen würde.Antworten
Sergej2. Juli 2021 um 21:08(S)FTP – du meinst vom Webspace aus oder von WordPress? Da ich nicht immer auf meinen Webspace Hoster gehen möchte habeich mir das Plugin extra installiert um von dort aus direkt Befehle zu erteilen. Es kam eine E-Mail richtig – dort stand: das Ocean Extra einen Fehler hat. Hier die Meldung: „In diesem Fall hat WordPress einen Fehler in einem deiner Plugins, Ocean Extra, abgefangen.“ Sobald ich das Plugin „WP Config File Editor“ deaktiviere funktionier Ocean Extra wieder und ich kome auch in den Customizer. Okay nehmen wir an ich deaktiviere das Plugin „WP Config File Editor“ damit ich wieder arbeiten kann – ich aber mehrere Bilder auf meine WordPress Seite hochladen möchte – dieser aber blockiert mit der Meldung: „Dieser Dateityp ist aus Sicherheitsgründen leider nicht erlaubt“, versuche es dann von FTP aus. Kommt mit großer Wahrscheinlich das gleiche Szenario. Weitere Frage: Damit ich Bilder hochladen möchte muss ich immer wieder ins FTP und den Befehl „true“ durch „false“ ersetzen“? Oder habe ich einen Denkfehler? Klär mich auf:DAntworten
Maik3. Juli 2021 um 2:35Lass uns bitte deine Fragen und die Inhalte getrennt betrachten, da ich für den Aufbau deiner Website keine umfangreiche Analyse im Ganzen geben kann. Ohne Link oder Einblick in den bereits erwähnten Fehlerlog würde das ohnehin auch dem Lesen aus deiner Kristallkugel gleich kommen. 😀
Die Art der Bearbeitung deiner Seite in Code-Bereichen wie der wp-config.php oder functions.php solltest du je nach eigenem Level selbst entscheiden. Siehe auch im Kommentar über uns. Ich kenne die einzelnen Funktionen des genannten Plugins (WP Config File Editor) nicht und schlage hier eine pluginfreie Lösung vor, um es schlank zu halten. Die Code-Bearbeitung mittels Plugins hat durchaus den Vorteil, dass diese Einträge über das Backend getätigt werden können. Teils gibt es aber auch den Nachteil, dass bei einem Fehler nurnoch der Weg per FTP gegangen werden kann, da die Bearbeitung über das Backend nicht mehr möglich ist. Aus diesem Grund habe ich den Zugang zum FTP (Webspace) erwähnt. Solltest du bereits erfahrener sein, kannst du gerne dafür Plugins nutzen, solltest aber immer Zugriff per FTP parat haben um genannte Probleme beheben zu können.
Wenn der Fehler aussagt, dass „Ocean Extra“ ein Problem hat, würde ich dort nach der Ursache suchen. Die Bewertungen und Support-Fragen, lassen zumindest vermuten, dass nicht alles ganz rund läuft. Aber auch hier habe ich keine Ahnung, was das Plugin im einzelnen macht und tippe nur darauf, dass sich da etwas nicht verträgt.
Zurück zur eigentlichen Frage und ob du immer wieder „true“ durch „false“ beim Eintrag in der wp-config.php ersetzen musst. Diese Methode ist eher für Ausnahmefälle zu sehen, da du hier Tür und Tor für alle Dateien im Upload öffnest, was ein deutliches Sicherheitsrisiko für deine Seite bedeuten kann. Normalerweise solltest du jegliche Art Bilder OHNE diese Einstellung hochladen können, weshalb dies mMn keine Dauerlösung sein sollte. Um welches Dateiformat handelt es sich denn bei dir?
Sergej3. Juli 2021 um 13:48Dateityp des Bilder: Symbol (.ico) (habe gerade eben nochmals geöffnet und mir ist aufgefallen, dass es sich durch Paint öffnen lässt. Sobald ich die Datei „Öffnen mit“ – Fotos – wähle, ändert sich die Datei auf: ICO-Datei (.ico).Meine große besteht darin, dass ich keine großen Programmier Kenntnisse verfüge und das ich den Befehl im FTP (Webspace) wieder falsch eintippen sollte, weil ich nicht weiß wie man es rückgängig machen kann – außer man führt davor einen Back up durch ggf. man ruft den Webhoster an und macht es rückgängig?Ich werde das Plugin somit löschen und nur noch durch FTP Webspace Befehle ausführen – damit ich diese Dateibilder hochladen kann – welchen Befehl sollte ich den genau jetzt eintippen per „Kopieren und Einfügen“ Taste? Und nach dem Hochladen der Bilder, um die Website nicht zu „gefährden“ was genau eintippen? Sprich: einfach das „true“ durch „false“ ersetzen und es ist alles beim alten?Danke für die schnelle Antwort👍
Maik15. Juli 2021 um 0:55Ich habe bisher verstanden, dass du eine Datei (.ico) hochladen möchtest und das nicht klappt. Allerdings sollte der Upload für Grafiken (jpg, png, gif) und Icons (.ico) jederzeit und ohne extra Einstellungen möglich sein.Ich kann mir vorstellen, dass deine Datei ggf. eine falsche Endung hat. Soll heißen, wenn du eine Grafik (z.B. jpg) abspeicherst und die Endung zu „.ico“ nur im Dateinamen änderst, ist der Dateityp weiterhin falsch. Dies erkennt WordPress und verhindert den Upload, weil es merkt, dass die Endung und der Inhalt der Dateitype (.ico) nicht zusammenpassen. Das gleiche passiert, wenn du deine Datei -wie beschrieben- mit (öffnen mit) „Fotos“ öffnest. Hier erkennt das Programm, dass es sich um eine andere Datei handelt und benennt diese wieder um.Versuch doch einfach mal diese korrigierte .ico-Datei hochzuladen. Kommt der gleiche Fehler dann auch?Ich hoffe das bringt etwas Licht ins Dunkel? 🙂
Sergej5. August 2021 um 0:38Hallo, das Problem wurde gelöst. Es war ein Missverständnis. Ich habe das Plugin einfach gelöscht und wieder neu installiert – meine Website funktionierte wie gewohnt. Das Bild (.ico) konnte nicht hochgeladen werden, weil es für das Favicon der Website geeignet ist und nur durch die Website-Einstellungen (Favicon Hochladen) funktioniert. Alle anderen jpg etc funktionierte sowieso an allen anderen Stellen von WordPress. Nur das Favicon (.ico) funktionierte bei mir nur unter Costumizer (Website Information). Thats it.
Marco30. Oktober 2021 um 11:20Genau das brauchte ich jetzt: „Setzt dich hin – nimm ein Heißgetränk“. Dann lesen und alles läuft wieder. Danke für die gute Hilfe!Antworten
Category: Build Your Site Like: 4 Post Date: October 15, 2018
Porto bietet ein leistungsstarkes und fortschrittlichstes Menü. Es gibt 6 Bereiche des Themes, denen Sie ein Menü zuweisen können.
Hauptmenü
Seitenleistenmenü
Top Navigation
Sekundäres Menü – Rechtes Menü in der Kopfzeile Typ 19 mit zentriertem Logo.
Ansicht Switcher – Sie können WPML Sprachumschalter zeigen statt-Umschalter Menü.
Währungsumschalter – Sie können den wpml-Währungsumschalter anstelle des Währungsumschalter-Menüs anzeigen.
Wichtig!
Wenn Sie hinzufügen Portfolio-, FAQ- und Mitgliederarchivseiten müssen, im Menü sollten Sie installieren und aktivieren WordPress Post Type Archive Links .
Gehen Sie in der auf Darstellung > Menüs Admin-Seitenleiste .
Klicken Sie auf Neues Menü erstellen oder wählen Sie ein Menü aus.
Neues Menüelement hinzufügen. Wenn Dropdown den zusätzlichen Menüpunkt der Tiefe 1, können Sie die siehe Menüoptionen wie Menüsart, Popup Position usw. Wählen Menü Typ to schmal oder breit und Popup Spalten (nur breit) .
Wählen Sie Popup-Position nach links oder rechts, Ausrichten (nur bei breitem Menütyp), Mitte (nur bei breitem Menütyp).
Sie können ein Popup-Hintergrundbild hochladen und die Hintergrundposition usw. festlegen. Wenn der zusätzlichen Menüpunktes der Tiefe 2 Dropdown Liste können Sie die siehe Menüoptionen wie Spalten, Hintergrundbild, etc. Sie diese Optionen konfigurieren sollten.
Im Menüpunkt können Sie einen Block einblenden. Sie sollten einen neuen Block unter erstellen oder bearbeiten Blöcke > Neu hinzufügen in der Admin-Seitenleiste . Sie sollten einen Block Slug Namen in hinzufügen Blockname Option.
Wenn Drop Down Menüpunkt hinzugefügt, können Sie die siehe Menüoptionen wie Do not Link, zeigen nicht einen Link, nicht tun einen Link auf Mobile Panel zeigen, Tip Etiketten, etc. Sie können diese Optionen konfigurieren sollten.
Nachdem Sie die Menüpunkte bearbeitet haben, klicken bitte auf Sie Menü speichern .
Porto Site-Geschwindigkeit
ODER
Dies ist bei allen WordPress-Websites ganz normal. Es ist nicht das Theme-spezifische, sondern wie WordPress funktioniert. Alle WordPress-Sites müssen nach dem Start optimiert werden.
Sie müssen bestimmte Aspekte der Website optimieren, um die Seitenladegeschwindigkeiten zu optimieren.
Für minify CSS, JS, HTML hat das Theme diese Funktion: Porto >> Assistent zur Geschwindigkeitsoptimierung
Wenn dies immer noch nicht hilft, können Sie ein Caching-Plugin wie das W3-Cache-Plugin verwenden. Und Sie können einen kostenlosen oder kostenpflichtigen CDN-Dienst wie Cloudflare, MaXCDN oder Stackpath verwenden.
Als letzten Ausweg können Sie einen CDN-Dienst verwenden.
So verbessern Sie Ihren Google Page Speed Score:
Was ist Google PageSpeed Insights?
Google PageSpeed Insights ist das Tool von Google, mit dem Webmaster (oder jeder andere) die Ladegeschwindigkeit ihrer Websites testen können. Es werden sowohl mobile als auch Desktop-Versionen Ihrer Website getestet. Es sagt Ihnen, was Ihre Website verlangsamt und gibt Ihnen Vorschläge, wie Sie das Problem beheben können. Es gibt eine Punktzahl von bis zu 100 (je höher, desto besser), also ist natürlich 100 das Ziel.
Die Hauptgeschwindigkeitsfaktoren umfassen:
Komprimierung aktivieren
Reduzieren Sie die Antwortzeit des Servers
Eliminieren Sie JavaScript und CSS, die das Rendern blockieren, in Inhalten, die über dem Falten stehen
CSS minimieren
JavaScript minimieren
HTML minimieren
Komprimierung aktivieren:
Das erste, was auf der Liste stand, war das Komprimieren von Ressourcen mit gzip oder das Deflationieren, um die Anzahl der über das Netzwerk gesendeten Bytes zu reduzieren. Ich habe im Plugin-Verzeichnis nach gzip gesucht. Das erste Plugin auf der Liste war GZip Ninja Speed Compression. Es sah gut aus, hatte viele Downloads und hatte eine gute Bewertung. Es funktioniert jedoch nur auf Apache-Servern. Ich wollte für jeden etwas.
This free plugin was designed with speed tests in mind. It will remove any query strings from your CSS and JavaScript, enable GZIP compression, and more. The results were a dramatic improvement on install.
Eliminate Render-blocking JavaScript and CSS
The next thing on the list was to Eliminate render-blocking JavaScript and CSS in above-the-fold content.
Dieses kostenlose Plugin komprimiert JavaScript und CSS. Sie können wählen, was komprimiert werden soll, aber die Komprimierung soll bei der Installation funktionieren.
Dieses Plugin soll Dateien wie Stile und Skripte komprimieren und von der Kopfzeile in die Fußzeile verschieben. Es wird auch den HTML-Code verkleinern und ihn so leicht wie möglich machen.
Server-Antwortzeit
Die Site befindet sich auf einem gemeinsam genutzten Server. Die Antwortzeit des Servers war ein Problem, das immer wieder auftauchte. Ich hatte oft sehr niedrige Werte wegen der Server-Antwortzeit. Ich müsste den Test wiederholen, nur um eine Punktzahl ohne Serverproblem zu erhalten. Ich wusste, dass ich den Hosting-Plan auf einen besseren Server aktualisieren musste, aber ich wollte zuerst sehen, was ich mit Plugins machen könnte.
Dieses ist ein kostenloses Plugin von Automattic. Es wollte, dass ich meine Permalink-Struktur repariere, bevor es funktionieren würde. Ich nahm die Anpassung vor und fuhr dann mit den Einstellungen fort, um sicherzustellen, dass ich alle empfohlenen Einstellungen ausgewählt hatte.
Dieser hat viele Einstellungen und Konfigurationen zu durchlaufen. Wenn Sie CDN verwenden möchten, müssen Sie ein Konto erstellen. Wählen Sie nicht Alle umschalten, es sei denn, Sie möchten ein Konto einrichten. Ich habe Seiten-Cache, Minify, Datenbank-Cache, Objekt-Cache und Browser-Cache aktiviert. Ich habe auch die Minifying-Einstellungen für HTML/XML, JS und CSS festgelegt. Ich wollte Better WordPress Minify deaktivieren.
Dieser möchte auch, dass Permalinks repariert werden. Die von mir gewählten Optionen sind das Cache-System, HTML verkleinern, CSS kombinieren, JavaScript kombinieren und Gzip. Die Premium-Edition verfügt über eine Funktion zum Optimieren von Bildern.
Sichtbaren Inhalt priorisieren
Dadurch wurde mir mitgeteilt, dass für meine Seite zusätzliche Netzwerk-Roundtrips erforderlich sind, um den oben angezeigten Inhalt zu rendern. Nur 19% meiner über dem Falten stehenden Inhalte konnten gerendert werden. Es schlug vor, die Menge an HTML zu reduzieren, die zum Rendern des Inhalts erforderlich ist. Ich könnte dies tun, indem ich es priorisiere. Vorschläge enthalten:
Minimieren
CSS statt Bilder verwenden
Komprimierung verwenden
HTML minimieren
Eine weitere vorgeschlagene Lösung bestand darin, meinen HTML-Code zu verkleinern, was zu einer Reduzierung um 2 % führen würde. Ich habe nach HTML-Minify gesucht.
Dieses kostenlose Plugin minimiert JavaScript, CSS und HTML. Die einzige Anpassung, die ich vorgenommen habe, bestand darin, alle Skripte in die Fußzeile zu verschieben.
Bilder optimieren
To speed up load times it’s best to resize your images before uploading them. Once you have your images uploaded you can still resize them using a plugin. Another option is to use a plugin that resizes them as they’re uploaded.
Dieser erforderte viele Dateien, die nicht installiert wurden. Wenn die Dateien mit dem Plugin installiert werden, ist es einfach zu verwenden, aber die Installation der Dateien erfordert viele zusätzliche Schritte.
Dieses kostenlose Plugin ändert die Größe von Fotos, die Sie bereits hochgeladen haben. Sie können die gewünschte Bildgröße und die Komprimierungsstufe festlegen.
Dieses kostenlose Plugin komprimiert Ihre Bilder beim Hochladen. Sie können auch in das Dashboard gehen und Ihre aktuelle Bibliothek reparieren lassen.
Was ich gelernt habe und die drei wichtigsten Dinge
Diese drei Punkte haben mir die meisten Leistungsverbesserungen gebracht:
Kompression und Minimierung – Verwenden Sie einen Leistungs-Geschwindigkeits-Booster. Sie optimieren und minimieren Ihr JS, CSS und HTML. Ich hatte die meisten Verbesserungen, als ich WP Performance Score Booster verwendet habe. Eine andere, die Dateien minimierte, die kein anderes Plugin minimieren würde, war Autoptimize.
Cache – Verwenden Sie ein Plugin für den Cache. Dies wird dazu beitragen, Ihren Server zu beschleunigen. WP Super Cache hat mir die besten Ergebnisse geliefert, weil es Dateien minimiert hat, die kein anderes Plugin minimieren würde.
Bilder optimieren – Holen Sie sich die Dateigröße so klein wie möglich, ohne zu viel Bildqualität zu verlieren. Sie können dies tun, indem Sie die Größe ändern und die Bilder komprimieren.
Seien Sie vorsichtig mit Plugins
Es ist nicht immer eine gute Idee, mehr als ein Plugin zu verwenden, um dieselbe Arbeit zu erledigen. Ich habe mehrere verwendet, die sich überlappten und manchmal hatte ich Probleme. Schlechte Probleme. Die Deinstallation eines von ihnen führte dazu, dass ich von vorne begann. Wenn Sie ein Plugin verwenden, um eine bestimmte Aufgabe zu erledigen und es nicht den Platz eines anderen Plugins einnimmt, aber beide eine Funktion teilen, schalten Sie diese Funktion bei einem der Plugins aus. Auf diese Weise haben Sie keine Probleme damit, dass Ihre Plugins gegeneinander kämpfen. In vielen Fällen wird es kein Problem verursachen, aber es ist möglich. Es könnte zumindest Ihren Server verlangsamen.
Um beispielsweise das Rendering blockierende Google Font CSS zu beheben, habe ich Simple Minify installiert. Das Problem ist, dass ich bereits Plugins hatte, die mein CSS verkleinerten. Dieser hatte einen Konflikt und verursachte einen Fehler, der die Site deaktivierte. Glücklicherweise musste ich das Plugin nur löschen, um die Site wieder zum Laufen zu bringen.
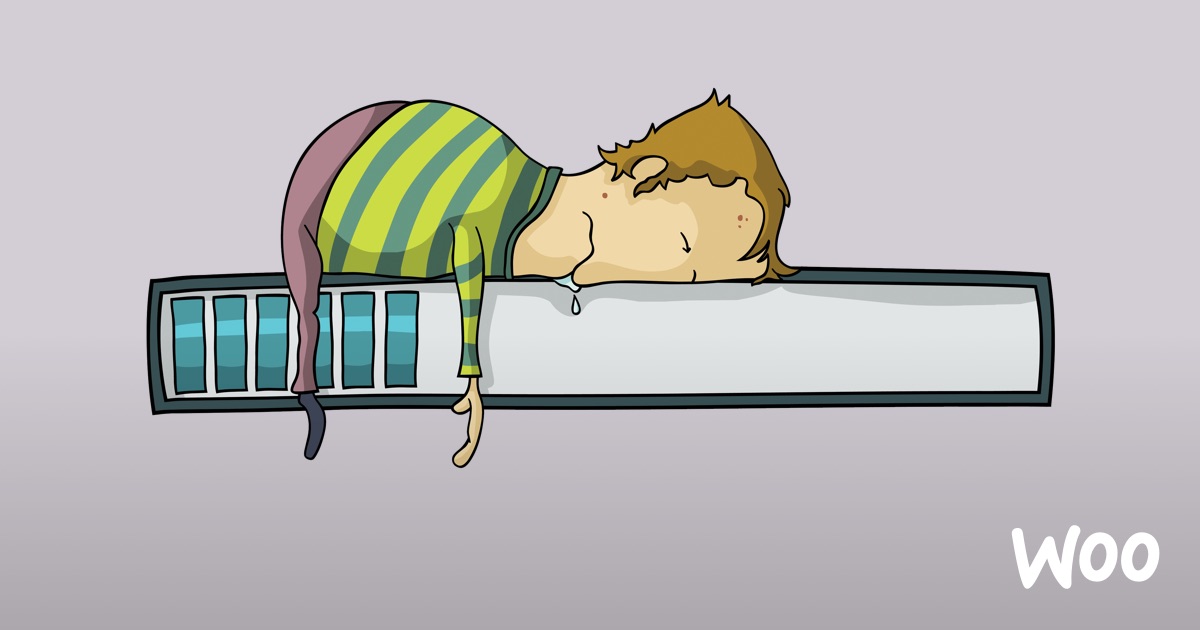
Why is My WooCommerce Site Slow? And How To Fix It
If your eCommerce site slows down, you’ll want to troubleshoot and fix the problem fast, but what if you don’t know where the problem is coming from? The good news is in most cases you can fix a slow site by checking a few key things.
How to Speed up a Slow WooCommerce Site (2021 Ultimate Guide)
Do you want to speed up your WooCommerce store? Check out our guide and find out how to optimize your site performance and make it faster!
Ich hoffe, das hilft…
Wie man das Seitenlayout der Suchergebnisse einstellt/wählt/ändert.
Die Suchergebnisseite stammt aus Standard-WP-Dateien. Sie können es nicht direkt bearbeiten. Um das Layout zu ändern, befolgen Sie bitte die unten aufgeführten Schritte:
Das Layout der Suchergebnisseite funktioniert mit dem bestimmten Suchinhaltstyp, den Sie unter Darstellung >> Themenoptionen >> Kopfzeile >> Suchformular ausgewählt haben. Wenn Sie zum Beispiel Content-Type suchen als Produkt auswählen und das Layout der Shop-Seite als Sidebar-Layout verwenden, dann funktioniert auch die Suchergebnisseite mit dem gleichen Layout wie die Shop-Seite.
Wenn Sie nun das Banner von der Suchergebnisseite entfernen möchten, übernimmt die Suchergebnisseite das Layout der Shop-Seite. Um also das Kategorie-Banner von der Suchergebnisseite zu entfernen, müssen Sie es von der Shop-Seite entfernen: Klicken Sie auf Hier
Und wenn Sie Search Content-Type als Post wählen und das Layout der Blog-Seite ohne Seitenleisten-Layout verwenden, dann funktioniert auch die Suchergebnisseite mit dem gleichen Layout wie die Blog-Seite.
Wenn Sie die Suchergebnisseite anpassen und das Layout des Suchergebnisses ändern möchten, müssen Sie die Datei search.php bearbeiten und das neue Layout in die Datei search.php einfügen. Wie Sie sehen können, haben wir das Suchseitenlayout genauso hinzugefügt wie das benutzerdefinierte Layout für Beitragstypen, das aus den Themenoptionen ausgewählt wurde. Wenn Sie beispielsweise den Posttyp „Suchen“ als Post festlegen, erhält die Suchergebnisseite das Layout des Seitenlayouts des Blogarchivs aus den Designoptionen. Sie müssen also das Layout in der Datei search.php erstellen. Außerdem müssen Sie die Änderungen in der Datei wp-content/themes/porto/inc/functions/layout.php innerhalb der porto_search_form-Funktion vornehmen.