praxisorientiertes-online-marketing
Praxisorientiertes Online-Marketing
[expand title=“mehr lesen…“]
[/expand]
[expand title=“mehr lesen…“]
[/expand]
[expand title=“mehr lesen…“]
[/expand]
[expand title=“mehr lesen…“]
[/expand]
[expand title=“mehr lesen…“]
[/expand]
[expand title=“mehr lesen…“]
This is an article on ” How we can Configure RAID 1 on FreeBSD”
I have done the OS installation ( with RAID 1 ) on FreeBSD 11.04 consisting of 2 disks ( 250 GB SSD )
First of all we need to familiarize how the disks are named in the OS.
Normally in FreeBSD, each disk will be named as “ada0” and “ada1” respectively.
Because, on other Linux OS’s like CentOS, Ubuntu, Debian the disk will be named as “sda” and “sdb”
Step 1 :
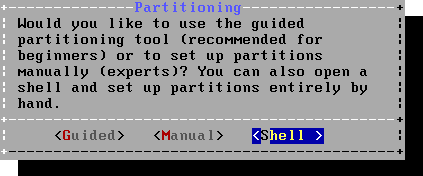
Mount the ISO, then reboot the server and Start the FreeBSD install as we normally do.
Choose “Shell” option once you are prompted to the window as below
Step 2 : Setting up the partitions on the disks
Make sure that both the disks are clean and there are no other partitions on the disk.
If you have any doubt, we can destroy the existing partitions.
Use this commands to destroy the partition
Once you are on the shell prompt, we now need to manually partition both the disks.
Here we are using the below mentioned partition layout:
/boot : 128k
swap : 4G
/ : rest of the space
##Setup 1st disk
gpart create -s gpt ada0
gpart add -s 128k -t freebsd-boot -l boot0 ada0
gpart add -a 1m -s 4G -t freebsd-swap -l swap0 ada0
gpart add -a 1m -t freebsd-ufs -l root0 ada0
##Install boot code to first disk
gpart bootcode -b /boot/pmbr -p /boot/gptboot -i 1 ada0
##Setup 2nd disk
gpart create -s gpt ada1
gpart add -s 128k -t freebsd-boot -l boot1 ada1
gpart add -a 1m -s 4G -t freebsd-swap -l swap1 ada1
gpart add -a 1m -t freebsd-ufs -l root1 ada1
##Install boot code to 2nd disk
gpart bootcode -b /boot/pmbr -p /boot/gptboot -i 1 ada1
Step 3: Setup The Gmirror
true > /dev/ada0
true > /dev/ada1
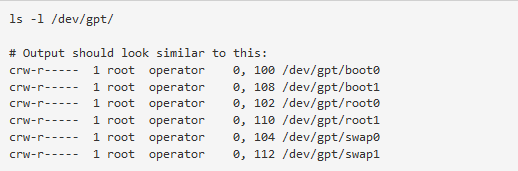
Once done, we can check whether the partitions configured are assigned correctly by using this command
You will be displayed a result as like
Now we need to build mirrors for each partition we configured.
For this we use “gmirrors”
gmirror label -h boot /dev/gpt/boot0 /dev/gpt/boot1
gmirror label -h swap /dev/gpt/swap0 /dev/gpt/swap1
gmirror label -h root /dev/gpt/root0 /dev/gpt/root1
Now load the geo_mirror KLD
#kldload geom_mirror
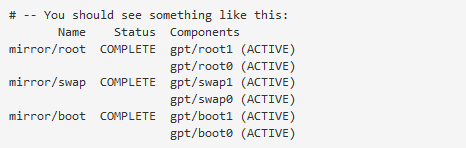
Then we can check the status of the gmirror. If it is okay, the Status will be “Complete” and all the Components will be “Active”.
Step 4 : Mount the Root(/) file system
Here we are using SSD. For this we need to use the option “-t” to the newfs.
This will help to enable the TRIM Support.
#newfs -t -U -L root /dev/mirror/root
Now mount the new file system to “/mnt”
#mount /dev/mirror/root /mnt
Step 5: Exit out from the shell prompt by using “exit” to continue with the Installation process.
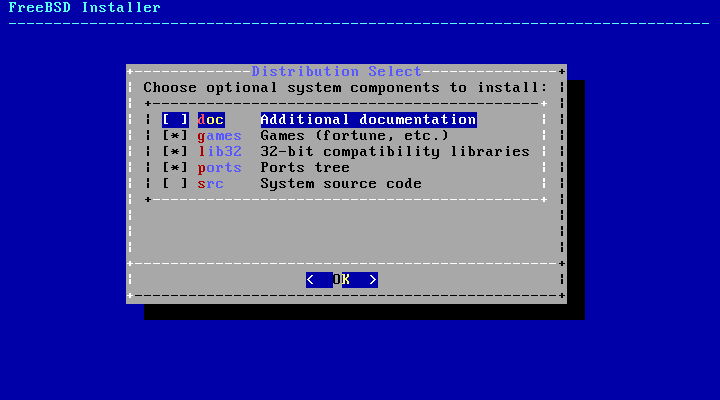
Step 6: You will be now prompted to a choose system components to install
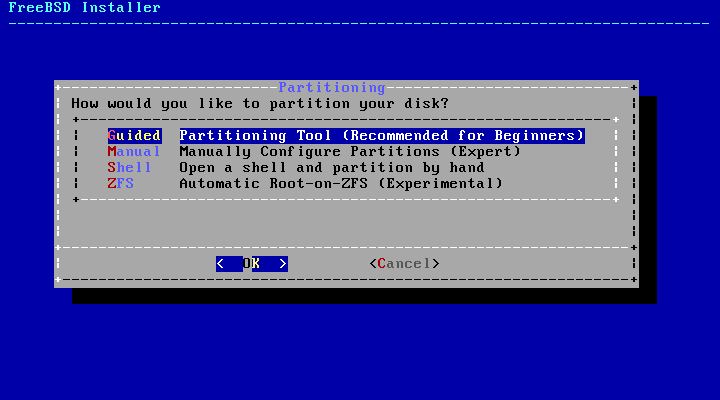
Step 7: Next will be partitioning. Choose again Shell from the next window
Once you are again prompted to shell, we now need to create the partitions to fstab file to complete the process.
#vi /tmp/bsdinstall_etc/fstab
Edit the file as updated below :
Device Mountpoint FStype Options Dump Pass#
/dev/mirror/swap none swap sw 0 0
/dev/mirror/root / ufs rw 1 1
Step 8: Exit
Once the installation is completed, you will be prompted to a window like

choose “Yes”. You will be again booted to Shell prompt.
If we are not doing these steps, there is a chance for getting “mount root” error.
Proceed with the below steps:
Edit “/boot/loader.conf” with the entry geom_mirror_load=”YES
Reboot the server, once the Installation completed.
You will be now booted into the OS.
ServerAdminz provides Outsourced 24/7 Technical Support, Remote Server Administration, Server Security, Linux Server Management, Windows Server Management and Helpdesk Management to Datacenters, Hosting companies and ISPs around the world. We specialize in Extended Server Security, Server Hardening, Support for Linux/UNIX/Windows servers, products and services.We provide Unix/Linux/Windows Server Management to Data centers, large companies and ISPs around the world.
ServerAdminz is a server support company specialized in Outsourced 24/7 Web Hosting Support, Remote Infrastructure Management, NOC, Cloud and Enterprise Security Services. With over 10+ of years of experience in working with major Data Centers and ISPs with 130+ experienced technicians, we continue to manage more than 49,000 servers from 85+ countries and has bagged 5 international awards.
[/expand]
[expand title=“mehr lesen…“]
Hauptseite > Netzwerk+Zubehör > OPNsense
Hauptseite > Server-Software > FreeBSD
FreeBSD stellt mehrere Kommandos bereit, die es erlauben Informationen zur verwendeten Hardware anzuzeigen. In diesem Artikel zeigen wir einige dieser Kommandos. Sofern nicht anders angeführt, haben wir einen 1HE Intel Single-CPU RI1102D-F Server mit OPNsense Version 18.7 verwendet.
Das Dienstprogramm camcontrol ermöglicht die Steuerung des FreeBSD CAM-Subsystems. CAM steht für Common Access Method. Es ist eine generische Möglichkeit, I/O-Busse SCSI-ähnlich anzusprechen. Mit dem Parameter ‚devlist‘ zeigt es die vorhandenen Devices an.
# camcontrol devlist
Die Ausgabe (in diesem Beispiel auf einem LES network+) zeigt:
<SanDisk SD8SFAT064G1122 Z2333000> at scbus0 target 0 lun 0 (pass0,ada0)
Die Logdatei system.log enthält zahlreiche Informationen, die während des Systemstarts und auch danach vom FreeBSD Kernel und anderen Software Komponenten dokumentiert werden.
# clog /var/log/system.log
Die Ausgabe zeigt:
Jul 10 12:56:37 OPNsense syslogd: kernel boot file is /boot/kernel/kernel
Jul 10 12:56:37 OPNsense kernel: Copyright (c) 1992-2017 The FreeBSD Project.
Jul 10 12:56:37 OPNsense kernel: Copyright (c) 1979, 1980, 1983, 1986, 1988, 1989, 1991, 1992, 1993, 1994
Jul 10 12:56:37 OPNsense kernel: The Regents of the University of California. All rights reserved.
Jul 10 12:56:37 OPNsense kernel: FreeBSD is a registered trademark of The FreeBSD Foundation.
Jul 10 12:56:37 OPNsense kernel: FreeBSD 11.1-RELEASE-p9  e86703e30(stable/18.1) amd64
Jul 10 12:56:37 OPNsense kernel: FreeBSD clang version 4.0.0 (tags/RELEASE_400/final 297347) (based on LLVM 4.0.0)
Jul 10 12:56:37 OPNsense kernel: VT(efifb): resolution 800x600
Jul 10 12:56:37 OPNsense kernel: [HBSD LOG] logging to system: enabled
Jul 10 12:56:37 OPNsense kernel: [HBSD LOG] logging to user: disabled
Jul 10 12:56:37 OPNsense kernel: [HBSD HARDENING] procfs hardening: enabled
Jul 10 12:56:37 OPNsense kernel: [HBSD ASLR] status: opt-out
Jul 10 12:56:37 OPNsense kernel: [HBSD ASLR] mmap: 30 bit
[...]
Jul 10 12:56:37 OPNsense kernel: [HBSD SEGVGUARD] status: opt-out
Jul 10 12:56:37 OPNsense kernel: [HBSD SEGVGUARD] expiry: 120 sec
Jul 10 12:56:37 OPNsense kernel: [HBSD SEGVGUARD] suspension: 600 sec
Jul 10 12:56:37 OPNsense kernel: [HBSD SEGVGUARD] maxcrashes: 5
Jul 10 12:56:37 OPNsense kernel: CPU: Intel(R) Xeon(R) CPU D-1518 @ 2.20GHz (2200.05-MHz K8-class CPU)
Jul 10 12:56:37 OPNsense kernel: Origin="GenuineIntel"  Id=0x50663  Family=0x6  Model=0x56  Stepping=3
Jul 10 12:56:37 OPNsense kernel: Features=0xbfebfbff<FPU,VME,DE,PSE,TSC,MSR,PAE,MCE,CX8,APIC,SEP,MTRR,PGE,MCA,CMOV,PAT,PSE36,CLFLUSH,DTS,ACPI,MMX,FXSR,SSE,SSE2,SS,HTT,TM,PBE>
Jul 10 12:56:37 OPNsense kernel: Features2=0x7ffefbff<SSE3,PCLMULQDQ,DTES64,MON,DS_CPL,VMX,SMX,EST,TM2,SSSE3,SDBG,FMA,CX16,xTPR,PDCM,PCID,DCA,SSE4.1,SSE4.2,x2APIC,MOVBE,POPCNT,TSCDLT,AESNI,XSAVE,OSXSAVE,AVX,F16C,RDRAND>
Jul 10 12:56:37 OPNsense kernel: AMD Features=0x2c100800<SYSCALL,NX,Page1GB,RDTSCP,LM>
Jul 10 12:56:37 OPNsense kernel: AMD Features2=0x121<LAHF,ABM,Prefetch>
Jul 10 12:56:37 OPNsense kernel: Structured Extended Features=0x21cbfbb<FSGSBASE,TSCADJ,BMI1,HLE,AVX2,SMEP,BMI2,ERMS,INVPCID,RTM,PQM,NFPUSG,PQE,RDSEED,ADX,SMAP,PROCTRACE>
Jul 10 12:56:37 OPNsense kernel: Structured Extended Features3=0xc000000<IBPB,STIBP>
Jul 10 12:56:37 OPNsense kernel: XSAVE Features=0x1<XSAVEOPT>
[...]
# devinfo -rv
Die Ausgabe zeigt:
nexus0
  cryptosoft0
  apic0
  ram0
      I/O memory addresses:
          0x0-0x9bfff
          0x100000-0x795d0fff
          0x797a2000-0x7989afff
          0x7bdb1000-0x7bdb1fff
          0x7be38000-0x7bffffff
          0x100000000-0x17fffffff
  acpi0
[...]
    cpu0 pnpinfo _HID=ACPI0007 _UID=0 at handle=\_SB_.SCK0.CP00 _PXM=0
      acpi_throttle0
      est0
      p4tcc0
      acpi_perf0
      cpufreq0
[...]
          pci5
              pcib5 bus numbers:
                  4
            ix0 pnpinfo vendor=0x8086 device=0x15ac subvendor=0x15d9 subdevice=0x15ac class=0x020000 at slot=0 function=0 dbsf=pci0:4:0:0 handle=\_SB_.PCI0.BR2C.H000
                Interrupt request lines:
                    0x111
                    0x112
                    0x113
                    0x114
                    0x115
                    0x116
                    0x117
                    0x118
                    0x119
                pcib5 prefetch window:
                    0xfbc00000-0xfbdfffff
                    0xfbe04000-0xfbe07fff
[...]
  aesni0
Das Dienstprogramm dmesg zeigt den Inhalt des Systemnachrichtenpuffers (system message buffer) an.
# dmesg
Die Ausgabe zeigt:
Copyright (c) 1992-2017 The FreeBSD Project.
Copyright (c) 1979, 1980, 1983, 1986, 1988, 1989, 1991, 1992, 1993, 1994
	The Regents of the University of California. All rights reserved.
FreeBSD is a registered trademark of The FreeBSD Foundation.
FreeBSD 11.1-RELEASE-p11  21b4c8ea1d5(stable/18.7) amd64
[...]
real memory  = 4294967296 (4096 MB)
avail memory = 3955470336 (3772 MB)
Event timer "LAPIC" quality 600
ACPI APIC Table: <SUPERM SMCI--MB>
FreeBSD/SMP: Multiprocessor System Detected: 8 CPUs
FreeBSD/SMP: 1 package(s) x 4 core(s) x 2 hardware threads
[...]
ix0: <Intel(R) PRO/10GbE PCI-Express Network Driver, Version - 3.2.12-k> mem 0xfbc00000-0xfbdfffff,0xfbe04000-0xfbe07fff
[...]
igb0: <Intel(R) PRO/1000 Network Connection, Version - 2.5.3-k> port 0xe000-0xe01f mem
[...]
nvd0: <INTEL SSDPEKKW128G8> NVMe namespace
nvd0: 122104MB (250069680 512 byte sectors)
[...]
aesni0: <AES-CBC,AES-XTS,AES-GCM,AES-ICM> on motherboard
[...]
Das Tool dmidecode zeigt den Inhalt der DMI (Desktop Management Interface) Tabellen:
# dmidecode
Unter FreeBSD und OPNsense muss dmidecode zumeist manuell installiert werden:
# pkg install dmidecode
Die Ausgabe zeigt dann:
root@fw-neufelden:~ # dmidecode
# dmidecode 3.2
# SMBIOS entry point at 0x8d346000
Found SMBIOS entry point in EFI, reading table from /dev/mem.
SMBIOS 3.0 present.
68 structures occupying 3320 bytes.
Table at 0x8D343000.

Handle 0x0000, DMI type 0, 24 bytes
BIOS Information
	Vendor: American Megatrends Inc.
	Version: 5.12
	Release Date: 05/24/2019
	Address: 0xF0000
	Runtime Size: 64 kB
	ROM Size: 16 MB
	Characteristics:
		PCI is supported
		BIOS is upgradeable
		BIOS shadowing is allowed
		Boot from CD is supported
[...]
Das Kommando freebsd-version zeigt die Version sowie den Patchlevel des installierten Systems an. Die Option ‚-k‘ zeigt dabei die Kernel Version.
# freebsd-version -k
Die Ausgabe zeigt:
11.1-RELEASE-p11
Die Option ‚-u‘ zeigt dabei die Userland Version.
# freebsd-version -u
Die Ausgabe zeigt:
11.1-RELEASE-p11
Mit den geom Kommandos (Kurzbegriff in FreeBSD für disk geometry) können die unterschiedlichen FreeBSD GEOM Klassen gesteuert werden.
Die aktuellen Partionsinformationen können mit dem folgenden Kommando abgefragt werden:
# gpart show
Die Ausgabe (in diesem Beispiel auf einem LES network+) zeigt:
=>       40  125045344  ada0  GPT  (60G)
         40     409600     1  efi  (200M)
     409640       1024     2  freebsd-boot  (512K)
     410664  106171048     3  freebsd-ufs  (51G)
  106581712   16777216     4  freebsd-swap  (8.0G)
  123358928    1686456        - free -  (823M)
Details zu den Partitionen zeigt folgendes Kommando:
# gpart list
Die Ausgabe (in diesem Beispiel auf einem LES network+) zeigt:
Geom name: ada0
modified: false
state: OK
fwheads: 16
fwsectors: 63
last: 125045383
first: 40
entries: 152
scheme: GPT
Providers:
1. Name: ada0p1
   Mediasize: 209715200 (200M)
   Sectorsize: 512
   Stripesize: 0
   Stripeoffset: 20480
   Mode: r0w0e0
   rawuuid: ae6015a9-6f0d-11e8-a8f7-0030180173f6
   rawtype: c12a7328-f81f-11d2-ba4b-00a0c93ec93b
   label: (null)
   length: 209715200
   offset: 20480
   type: efi
   index: 1
   end: 409639
   start: 40
[...]
Consumers:
1. Name: ada0
   Mediasize: 64023257088 (60G)
   Sectorsize: 512
   Mode: r2w2e5
# ifconfig
Die Ausgabe zeigt:
ix0: flags=8843<UP,BROADCAST,RUNNING,SIMPLEX,MULTICAST> metric 0 mtu 1500
	options=e407bb<RXCSUM,TXCSUM,VLAN_MTU,VLAN_HWTAGGING,JUMBO_MTU,VLAN_HWCSUM,TSO4,TSO6,LRO,VLAN_HWTSO,RXCSUM_IPV6,TXCSUM_IPV6>
	ether ac:1f:6b:64:aa:2e
	hwaddr ac:1f:6b:64:aa:2e
	inet 172.16.10.2 netmask 0xffffff00 broadcast 172.16.10.255
	inet6 fe80::ae1f:6bff:fe64:aa2e%ix0 prefixlen 64 scopeid 0x1
	nd6 options=21<PERFORMNUD,AUTO_LINKLOCAL>
	media: Ethernet autoselect
	status: no carrier
[...]
igb0: flags=8843<UP,BROADCAST,RUNNING,SIMPLEX,MULTICAST> metric 0 mtu 1500
	options=6407bb<RXCSUM,TXCSUM,VLAN_MTU,VLAN_HWTAGGING,JUMBO_MTU,VLAN_HWCSUM,TSO4,TSO6,LRO,VLAN_HWTSO,RXCSUM_IPV6,TXCSUM_IPV6>
	ether ac:1f:6b:64:a5:e6
	hwaddr ac:1f:6b:64:a5:e6
	inet 172.16.1.2 netmask 0xffffff00 broadcast 172.16.1.255
	inet6 fe80::ae1f:6bff:fe64:a5e6%igb0 prefixlen 64 scopeid 0x3
	nd6 options=21<PERFORMNUD,AUTO_LINKLOCAL>
	media: Ethernet autoselect
	status: no carrier
[...]
# kldstat
Die Ausgabe zeigt:
Id Refs Address            Size     Name
 1   92 0xffffffff80200000 21484c0  kernel
 2    1 0xffffffff8234a000 6e18     if_gre.ko
 3    1 0xffffffff82351000 7570     if_tap.ko
[...]
45    1 0xffffffff827e9000 7130     aesni.ko
# pciconf -lv
Die Ausgabe zeigt:
[...]
ix0@pci0:4:0:0:	class=0x020000 card=0x15ac15d9 chip=0x15ac8086 rev=0x00 hdr=0x00
    vendor     = 'Intel Corporation'
    device     = 'Ethernet Connection X552 10 GbE SFP+'
    class      = network
    subclass   = ethernet
[...]
igb0@pci0:7:0:0:	class=0x020000 card=0x153315d9 chip=0x15338086 rev=0x03 hdr=0x00
    vendor     = 'Intel Corporation'
    device     = 'I210 Gigabit Network Connection'
    class      = network
    subclass   = ethernet

[...]
igb2@pci0:11:0:0:	class=0x020000 card=0x152115d9 chip=0x15218086 rev=0x01 hdr=0x00
    vendor     = 'Intel Corporation'
    device     = 'I350 Gigabit Network Connection'
    class      = network
    subclass   = ethernet
[...]
# pkg info
Die Ausgabe zeigt:
GeoIP-1.6.12                   Find the country that any IP address or hostname originates from
apinger-0.7                    IP device monitoring tool
[...]
cpustats-0.1                   Gather system statistics
[...]
ntp-4.2.8p11_2                 The Network Time Protocol Distribution
openldap-sasl-client-2.4.46    Open source LDAP client implementation with SASL2 support
openssh-portable-7.7.p1_6,1    The portable version of OpenBSD's OpenSSH
openssl-1.0.2o_4,1             SSL and crypto library
openvpn-2.4.6_1                Secure IP/Ethernet tunnel daemon
opnsense-18.7                  OPNsense release package
opnsense-lang-18.1.7           OPNsense translations
opnsense-update-18.7           OPNsense update utilities
[...]
suricata-4.0.5                 High Performance Network IDS, IPS and Security Monitoring engine
syslogd-11.1                   FreeBSD syslogd with additions
unbound-1.7.3                  Validating, recursive, and caching DNS resolver
wpa_supplicant-2.6_2           Supplicant (client) for WPA/802.1x protocols
zip-3.0_1                      Create/update ZIP files compatible with PKZIP
# pkg info opnsense
Die Ausgabe zeigt:
opnsense-18.7
Name           : opnsense
Version        : 18.7
Installed on   : Tue Aug  7 13:51:34 2018 CEST
Origin         : opnsense/opnsense
Architecture   : FreeBSD:11:amd64
Prefix         : /usr/local
Categories     : sysutils www
Licenses       : BSD2CLAUSE
Maintainer     : franco@opnsense.org
WWW            : https://opnsense.org/
Comment        : OPNsense release package
Annotations    :
	FreeBSD_version: 1101001
	repo_type      : binary
	repository     : OPNsense
Flat size      : 25.1MiB
Description    :
950d04f47
# sysctl -a
Die Ausgabe zeigt:
kern.ostype: FreeBSD
kern.osrelease: 11.1-RELEASE-p11
kern.osrevision: 199506
kern.version: FreeBSD 11.1-RELEASE-p11  21b4c8ea1d5(stable/18.7)
[...]
hw.igb.tx_process_limit: -1
hw.igb.rx_process_limit: 100
hw.igb.num_queues: 0
hw.igb.header_split: 0
hw.igb.buf_ring_size: 4096
hw.igb.max_interrupt_rate: 8000
hw.igb.enable_msix: 1
hw.igb.enable_aim: 1
hw.igb.txd: 1024
hw.igb.rxd: 1024
[...]
dev.igb.0.host.header_redir_missed: 0
dev.igb.0.host.serdes_violation_pkt: 0
dev.igb.0.dropped: 0
dev.igb.0.eee_disabled: 0
dev.igb.0.dmac: 0
dev.igb.0.tx_processing_limit: -1
dev.igb.0.rx_processing_limit: 100
dev.igb.0.fc: 3
dev.igb.0.enable_aim: 1
dev.igb.0.nvm: -1
dev.igb.0.%parent: pci8
dev.igb.0.%pnpinfo: vendor=0x8086 device=0x1533 subvendor=0x15d9 subdevice=0x1533 class=0x020000
dev.igb.0.%location: slot=0 function=0 dbsf=pci0:7:0:0 handle=\_SB_.PCI0.RP01.D02D
dev.igb.0.%driver: igb
dev.igb.0.%desc: Intel(R) PRO/1000 Network Connection, Version - 2.5.3-k
dev.igb.%parent:
[...]
In Kombination mit ‚grep‘ können Informationen wie Treiberversionen gesammelt ausgegeben werden:[1]
root@OPNsense-18-7:~/hw-analyse-frontio-mit-x710 # sysctl -a | grep -E 'dev.(igb|ix|em).*.%desc:'
dev.igb.5.%desc: Intel(R) PRO/1000 Network Connection, Version - 2.5.3-k
dev.igb.4.%desc: Intel(R) PRO/1000 Network Connection, Version - 2.5.3-k
dev.igb.3.%desc: Intel(R) PRO/1000 Network Connection, Version - 2.5.3-k
dev.igb.2.%desc: Intel(R) PRO/1000 Network Connection, Version - 2.5.3-k
dev.igb.1.%desc: Intel(R) PRO/1000 Network Connection, Version - 2.5.3-k
dev.igb.0.%desc: Intel(R) PRO/1000 Network Connection, Version - 2.5.3-k
dev.ixl.1.%desc: Intel(R) Ethernet Connection 700 Series PF Driver, Version - 1.9.9-k
dev.ixl.0.%desc: Intel(R) Ethernet Connection 700 Series PF Driver, Version - 1.9.9-k
dev.ix.1.%desc: Intel(R) PRO/10GbE PCI-Express Network Driver, Version - 3.2.12-k
dev.ix.0.%desc: Intel(R) PRO/10GbE PCI-Express Network Driver, Version - 3.2.12-k
root@OPNsense-18-7:~/hw-analyse-frontio-mit-x710 # sysctl dev.ixl.0.fw_version
dev.ixl.0.fw_version: fw 6.0.48442 api 1.7 nvm 6.01 etid 800035cf oem 1.262.0
Das Tool usbconfig zeit Details zu angeschlossenen USB-Geräten:
# usbconfig
Die Ausgabe zeigt:
root@OPNsense:~ # usbconfig
ugen0.1: <0x8086 XHCI root HUB> at usbus0, cfg=0 md=HOST spd=SUPER (5.0Gbps) pwr=SAVE (0mA)
ugen0.2: <Logitech USB Receiver> at usbus0, cfg=0 md=HOST spd=FULL (12Mbps) pwr=ON (98mA)
Mit der Option -h erscheinen Informationen zu weiteren Kommandos:
root@OPNsense:~ # usbconfig -h
usbconfig - configure the USB subsystem
usage: usbconfig -u <busnum> -a <devaddr> -i <ifaceindex> [cmds...]
usage: usbconfig -d [ugen]<busnum>.<devaddr> -i <ifaceindex> [cmds...]
commands:
  set_config <cfg_index>
  set_alt <alt_index>
  set_template <template>
  get_template
  add_dev_quirk_vplh <vid> <pid> <lo_rev> <hi_rev> <quirk>
  remove_dev_quirk_vplh <vid> <pid> <lo_rev> <hi_rev> <quirk>
  add_quirk <quirk>
  remove_quirk <quirk>
  dump_quirk_names
  dump_device_quirks
  dump_all_desc
  dump_device_desc
  dump_curr_config_desc
  dump_all_config_desc
  dump_string <index>
  dump_info
  show_ifdrv
  suspend
  resume
  power_off
  power_save
  power_on
  reset
  list
  do_request <bmReqTyp> <bReq> <wVal> <wIdx> <wLen> <data...>
root@OPNsense:~ #
Details zu einem bestimmten Gerät können mit der Option -d zur Auswahl des Gerätes und mit dem Kommando dump_all_desc abgefragt werden:
# usbconfig -d ugen0.2 dump_all_desc
Die Ausgabe zeigt:
root@OPNsense:~ # usbconfig -d ugen0.2 dump_all_desc
ugen0.2: <Logitech USB Receiver> at usbus0, cfg=0 md=HOST spd=FULL (12Mbps) pwr=ON (98mA)

  bLength = 0x0012
  bDescriptorType = 0x0001
  bcdUSB = 0x0200
  bDeviceClass = 0x0000  <Probed by interface class>
  bDeviceSubClass = 0x0000
  bDeviceProtocol = 0x0000
  bMaxPacketSize0 = 0x0008
  idVendor = 0x046d
  idProduct = 0xc52e
  bcdDevice = 0x2301
  iManufacturer = 0x0001  <Logitech>
  iProduct = 0x0002  <USB Receiver>
  iSerialNumber = 0x0000  <no string>
  bNumConfigurations = 0x0001

 Configuration index 0
[...]
Das Tool x86info erlaubt es, zahlreiche Informationen über den verwendeten Prozessor auszulesen, z.B. auch die Intel Microcode Version.
Hinweis: x86info ist bei OPNsense (das auf FreeBSD basiert), nicht enthalten. Damit es dennoch via pkg install x86info installiert werden kann, müssen zuvor FreeBSD Pakete temporär für die Installation zugelassen werden (Eintrag in /usr/local/etc/pkg/repos/FreeBSD.conf auf yes setzen). Nach der Installation sollte dieser Eintrag wieder auf no gestellt werden.
Installation von x86info unter OPNsense:
root@OPNsense:~ # vi /usr/local/etc/pkg/repos/FreeBSD.conf
root@OPNsense:~ # cat /usr/local/etc/pkg/repos/FreeBSD.conf
FreeBSD: { enabled: yes }
root@OPNsense:~ # pkg install x86info
[...]
The following 3 package(s) will be affected (of 0 checked):

New packages to be INSTALLED:
	x86info: 1.31.s02 [FreeBSD]
	libpci: 3.6.2 [OPNsense]
	pciids: 20180428 [FreeBSD]
[...]
root@OPNsense:~ # vi /usr/local/etc/pkg/repos/FreeBSD.conf
root@OPNsense:~ # cat /usr/local/etc/pkg/repos/FreeBSD.conf
FreeBSD: { enabled: no }
root@OPNsense:~ #
Damit das Tool ausgeführt werden kann, muss zuvor das Modul cpuctl mittels kldload geladen werden. Das folgende Beispiel zeigt die Ausgabe von x86info auf einem LES network+.
root@OPNsense:~ # kldload cpuctl
root@OPNsense:~ # x86info -a
x86info v1.31pre
MP Table:
#	APIC ID	Version	State		Family	Model	Step	Flags
#	 0	 0x15	 BSP, usable	 6	 14	 3	 0x0381
#	 2	 0x15	 AP, usable	 6	 14	 3	 0x0381

Found 4 identical CPUs
Extended Family: 0 Extended Model: 4 Family: 6 Model: 78 Stepping: 3
Type: 0 (Original OEM)
CPU Model (x86info's best guess): Core i7 [Skylake Mobile]
Processor name string (BIOS programmed): Intel(R) Core(TM) i5-6300U CPU @ 2.40GHz

Performance msrs:
  MSR_IA32_PERF_STATUS: 0x1c2a00001700
  MSR_IA32_MISC_ENABLE: 0x850089 [Enabled: TCC PerfMon EnhancedSpeedStep ]

Thermal msrs:
  MSR_PM_THERM2_CTL: 0x0 [Thermal monitor: 1]
  MSR_IA32_THERM_CONTROL: 0x0 [Software-controlled clock disabled (full speed)]
  MSR_IA32_THERM_STATUS: 0x88390000

Machine check MSRs:
Number of reporting banks : 8
Bank: 0 (0x400)
MC0CTL:    00000000 00000000 00000000 00000000
           00000000 00000000 00001111 11111111
MC0STATUS: 00000000 00000000 00000000 00000000
           00000000 00000000 00000000 00000000
MC0ADDR:   00000000 00000000 00000000 00000000
           00000000 00000000 00000000 00000000
[...]
Bank: 7 (0x41c)
MC7CTL:    00000000 00000000 00000000 00000000
           00000000 00000000 00000000 11111111
MC7STATUS: 00000000 00000000 00000000 00000000
           00000000 00000000 00000000 00000000
MC7ADDR:   00000000 00000000 00000000 00000000
           11111110 11110001 11011001 01000000

Microcode version: 0x00000000000000c2

eax in: 0x00000000, eax = 00000016 ebx = 756e6547 ecx = 6c65746e edx = 49656e69
eax in: 0x00000001, eax = 000406e3 ebx = 00100800 ecx = 7ffafbff edx = bfebfbff
[...]
eax in: 0x80000008, eax = 00003027 ebx = 00000000 ecx = 00000000 edx = 00000000

Cache info
 L1 Data Cache: 32KB, 8-way associative, 64 byte line size
 L1 Instruction Cache: 32KB, 8-way associative, 64 byte line size
 L2 Unified Cache: 256KB, 4-way associative, 64 byte line size
 L3 Unified Cache: 3072KB, 12-way associative, 64 byte line size
TLB info
 Instruction TLB: 2M/4M pages, fully associative, 8 entries
 Instruction TLB: 4K pages, 8-way associative, 64 entries
 Data TLB: 1GB pages, 4-way set associative, 4 entries
 Data TLB: 4KB pages, 4-way associative, 64 entries
 Shared L2 TLB: 4KB/2MB pages, 6-way associative, 1536 entries
 64 byte prefetching.
Feature flags:
 fpu vme de pse tsc msr pae mce cx8 apic sep mtrr pge mca cmov pat pse36 clflsh ds acpi mmx fxsr sse sse2 ss ht tm pbe sse3 pclmuldq dtes64 monitor ds-cpl vmx smx est tm2 ssse3 sdbg fma cx16 xTPR pdcm pcid sse4_1 sse4_2 x2apic movbe popcnt tsc-deadline aes xsave osxsave avx f16c rdrnd
Extended feature flags:
 SYSCALL xd pdpe1gb rdtscp em64t lahf_lm lzcnt prefetchw dts ida arat pln ecmd ptm hwp hwp_notify hwp_act_window hwp_epp hdc fsgsbase tsc_adj sgx bmi1 hle avx2 smep bmi2 erms invpcid rtm nofpucs mpx rdseed adx smap clflushopt ipt nonstop_tsc
Long NOPs supported: yes

MTRR registers:
MTRRcap (0xfe): 0x0000000000001d0a wc:1 fix:1 vcnt:10
[...]
MTRRdefType (0x2ff): 0x0000000000000c06 (fixed-range flag:1 enable flag:1 default type:0x06 (write-back))

APIC registers:
APIC MSR Base(0x1b): 			: 0x00000000fee00900
[...]
APIC Divide Configuration (for Timer)	: 0x00000000

Address sizes : 39 bits physical, 48 bits virtual
2.50GHz processor (estimate).

Total processor threads: 4
This system has 1 dual-core processor with hyper-threading (2 threads per core) running at an estimated 2.50GHz
[/expand]
[expand title=“mehr lesen…“]
While housekeeping the external hard disk laying around, I managed to squeeze out one spare hard disk out of this cleaning practice. The size is big enough to act as a backup media for my FreeBSD server & desktop workstations. The external hard disk partition layout preferred would be 3 partitions. The 1st (backup of OS & data) & 2nd partition (data backup) will be FreeBSD UFS & the 3rd will be FAT32 (for media transfer).
Since my workstation doesn’t support FreeBSD UFS file system, I’ll partition & format it using the FreeBSD server. All tools involve are command line utilities and can be done through remote secure shell. This post can also be serve as a guide for adding new/used additional hard disk to FreeBSD server.
Here goes :
If you’re using the hard disk fully in FreeBSD environment, follow the below steps instead to create a single big slice of the hard disk :
If the hard disk have existing partition table (equivalent to GEOM label), the following commands can be used to delete slices & index. The flow is first „Delete“ then „Destroy“.
E.g. Delete the slices first then Destroy the slices, Delete the GEOM label then Destroy the GEOM label (GEOM label is equivalent to partition table). :
Some notes :
where /dev/da0 is NOT „destroyable“ as it is a device.
Further reference can refer to :
man gpart
or
search for gpart manual pages at FreeBSD.org.
[/expand]
[expand title=“mehr lesen…“]
http://192.168.1.10/wissen/wp-content/uploads/2021/01/befehle_wichtig.txt
[/expand]
[expand title=“mehr lesen…“]
Im Original von David O’Brian.
Dieser Abschnitt beschreibt, wie Sie ein neues SATA-Laufwerk zu einer Maschine hinzufügen, die momentan nur ein Laufwerk hat. Dazu schalten Sie zuerst den Rechner aus und installieren das Laufwerk entsprechend der Anleitungen Ihres Rechners, Ihres Controllers und des Laufwerkherstellers. Starten Sie das System neu und melden Sie sich als Benutzer root an.
Kontrollieren Sie /var/run/dmesg.boot, um sicherzustellen, dass das neue Laufwerk gefunden wurde. In diesem Beispiel erscheint das neu hinzugefügte SATA-Laufwerk als ada1.
In diesem Beispiel wird eine einzige große Partition auf der Festplatte erstellt. Verwendet wird das GPT-Partitionsschema, welches gegenüber dem älteren und weniger vielseitigen MBR-Schema bevorzug wird.
Wenn die hinzugefügte Festplatte nicht leer ist, können alte Partitionsinformationen mit gpart delete entfernt werden. Details finden Sie in gpart(8).
Zuerst wird das Partitionsschema erstellt und dann eine einzelne Partition angefügt. Zur Verbesserung der Leistung auf neueren Festplatten mit größeren Blockgrößen, wird die Partition an einer Megabyte-Grenze ausgerichtet:
#gpart create -s GPT ada1#gpart add -t freebsd-ufs -a 1M ada1
Je nach Anwendung kann es wünschenswert sein, mehrere kleinere Partitionen zu haben. In gpart(8) finden Sie Optionen zum Erstellen von kleineren Partitionen.
Informationen über die Partitionen der Festplatte werden mit gpart show angezeigt:
%gpart show ada1=> 34 1465146988 ada1 GPT (699G) 34 2014 - free - (1.0M) 2048 1465143296 1 freebsd-ufs (699G) 1465145344 1678 - free - (839K)
Ein Dateisystem wird in der neuen Partition erstellt:
#newfs -U /dev/ada1p1
Ein leeres Verzeichnis wird als Mountpunkt erstellt, also ein Speicherort für die Montage der neuen Festplatte im originalen Dateisystem:
#mkdir /newdisk
Abschließend wird ein Eintrag in /etc/fstab hinzugefügt, damit die neue Festplatte automatisch beim Start eingehängt wird:
/dev/ada1p1 /newdisk ufs rw 2 2
Die neue Festplatte kann manuell montiert werden, ohne das System neu zu starten:
#mount /newdisk
[/expand]
[expand title=“mehr lesen…“]
Beigetragen von Allan Jude. Übersetzt von Björn Heidotting.
Die Kapazität einer Festplatte kann sich ohne Änderungen an bereits vorhandenen Daten erhöhen. Dies geschieht üblicherweise mit virtuellen Maschinen, wenn sich herausstellt, dass die virtuelle Festplatte zu klein ist und vergrößert werden soll. Zuweilen wird auch ein Abbild einer Platte auf einen USB-Stick geschrieben, ohne dabei die volle Kapazität zu nutzen. Dieser Abschnitt beschreibt, wie man Platten vergrößert, bzw. erweitert, um die Vorteile der erhöhten Kapazität zu nutzen.
Überprüfen Sie /var/run/dmesg.boot, um den Gerätenamen der Festplatte zu bestimmen, die vergrößert werden soll. In diesem Beispiel gibt es nur eine SATA-Festplatte im System, so dass die Platte als ada0 angezeigt wird.
Um die aktuelle Konfiguration der Partitionen auf der Festplatte anzuzeigen:
#gpart show=> 34 83886013 ada0 GPT (48G) [CORRUPT] 34 128 1 freebsd-boot (64k) 162 79691648 2 freebsd-ufs (38G) 79691810 4194236 3 freebsd-swap (2G) 83886046 1 - free - (512B)ada0
Wenn die Festplatte mit dem GPT-Partitionsschema formatiert wurde kann es vorkommen, dass sie als „corrupted“ angezeigt wird, weil sich die Sicherung der GPT-Partitionstabellen nicht mehr am Ende des Laufwerks befinden. Reparieren Sie in so einem Fall die Partitionstabelle mit gpart:
#gpart recoverada0 recoveredada0
Nun steht der zusätzliche Speicherplatz zur Verfügung und kann verwendet werden, um eine neue Partition anzulegen oder eine bestehende Partition zu erweitern:
#gpart show=> 34 102399933 ada0 GPT (48G) 34 128 1 freebsd-boot (64k) 162 79691648 2 freebsd-ufs (38G) 79691810 4194236 3 freebsd-swap (2G) 83886046 18513921 - free - (8.8G)ada0
Partitionen können nur auf zusammenhängenden, freien Speicherplatz vergrößert werden. In diesem Beispiel wird die letzte Partition der Platte als Swap-Speicher genutzt, aber die zweite Partition ist die, dessen Größe verändert werden soll. Weil der Swap-Speicher nur temporäre Daten enthält, kann er gefahrlos ausgehangen, gelöscht und nachdem die zweite Partition vergrößert wurde, als dritte Partition neu erstellt werden.
Deaktivieren Sie Swap-Speicher Partition:
#swapoff/dev/ada0p3
Löschen Sie die dritte Partition, angegeben mit dem Schalter -i, der Festplatte ada0:
#gpart delete -iada0p3 deleted3ada0#gpart show=> 34 102399933 ada0 GPT (48G) 34 128 1 freebsd-boot (64k) 162 79691648 2 freebsd-ufs (38G) 79691810 22708157 - free - (10G)ada0
Es besteht die Gefahr von Datenverlust, wenn die Partitionstabelle eines eingehangenen Dateisystems verändert wird. Es empfiehlt sich daher, die folgenden Schritte auf einem ausgehangenen Dateisystem durchzuführen, während die Umsetzung über eine Live-CD-ROM oder von einem USB-Gerät erfolgt. Wenn es jedoch absolut notwendig ist, kann ein eingehangenes Dateisystem auch vergrößert werden, nachdem die Sicherheitsfunktionen von GEOM deaktiviert wurden:
#sysctl kern.geom.debugflags=16
Vergrößern Sie die Partition und lassen Sie Platz, um die Swap-Partition in der gewünschten Größe neu erstellen zu können. Die zu ändernde Partition wird mit -i und die neue gewünschte Größe mit -s angegeben. Optional wird die Ausrichtung der Partition mit -a festgelegt. Dieser Schritt ändert nur die Größe der Partition. Das Dateisystem innerhalb der Partition wird in einem separaten Schritt erweitert.
#gpart resize -iada0p2 resized2-s47G-a 4kada0#gpart show=> 34 102399933 ada0 GPT (48G) 34 128 1 freebsd-boot (64k) 162 98566144 2 freebsd-ufs (47G) 98566306 3833661 - free - (1.8G)ada0
Erstellen Sie die Swap-Partition neu und aktivieren Sie sie:
#gpart add -t freebsd-swap -a 4kada0p3 addedada0#gpart show=> 34 102399933 ada0 GPT (48G) 34 128 1 freebsd-boot (64k) 162 98566144 2 freebsd-ufs (47G) 98566306 3833661 3 freebsd-swap (1.8G)ada0#swapon/dev/ada0p3
Erweitern Sie das UFS-Dateisystem, um die Kapazität der vergrößerten Partition zu nutzen:
#growfsDevice is mounted read-write; resizing will result in temporary write suspension for /. It's strongly recommended to make a backup before growing the file system. OK to grow file system on /dev/ada0p2, mounted on /, from 38GB to 47GB? [Yes/No]/dev/ada0p2Yessuper-block backups (for fsck -b #) at: 80781312, 82063552, 83345792, 84628032, 85910272, 87192512, 88474752, 89756992, 91039232, 92321472, 93603712, 94885952, 96168192, 97450432
Wenn das Dateisystem ZFS ist, wird die Größenänderung mit dem Unterkommando online und -e ausgelöst:
#zfs online -ezroot/dev/ada0p2
Sowohl die Partition als auch das Dateisystem wurden jetzt vergrößert, um den neu zur Verfügung stehenden Speicherplatz zu nutzen.
[/expand]